Difference between revisions of "Performing Live with Jack,Qsynth, and Bristol Organ"
| Line 63: | Line 63: | ||
| − | ... And by the way... as long as you keep net-book volume to acceptable output level, you shouldn't damage the amplifier. I | + | ... And by the way... as long as you keep net-book volume to acceptable output level, you shouldn't damage the amplifier. I posed this connection question to a veteran "sound-guy" that has setup audio equipment for '''Moe Koffman''' and '''The Good Brothers''' back in his "younger days". He states, '''''"this shouldn't be a problem what-so-ever, just keep volume down in net-book end and adjust volume via the amplifier"'''''... |
=== Setting up / Installing / Configuring Network, Ubuntu Studio, and Jack System === | === Setting up / Installing / Configuring Network, Ubuntu Studio, and Jack System === | ||
| Line 126: | Line 126: | ||
... But '''if you didn't know that, and launched the Qsynth application using that extra midi channel, then don't be surprised if your Bristol B3 organ abruptly aborts... no wonder!''' Therefore, you have to do a little planning head, and reserve extra midi channels for any Bristol Organs that have multiple keyboards prior to assigning various midi channels... | ... But '''if you didn't know that, and launched the Qsynth application using that extra midi channel, then don't be surprised if your Bristol B3 organ abruptly aborts... no wonder!''' Therefore, you have to do a little planning head, and reserve extra midi channels for any Bristol Organs that have multiple keyboards prior to assigning various midi channels... | ||
| + | [[Image:midi1.png|thumb|right|220px|<b>Qsynth MIDI Channel Dialog Box</b>. Notice a maximum of 16 midi channels, but also the ability to store into separate presets for later use. '''Notice the both MIDI channels 3 and 4 reserved for by Bristol B3 organ''' (both keyboard registers), '''Midi channel 10 is usually reserved for percussion'''...]] | ||
| + | ==== Tweaking Qsynth to Play Different MIDI Channels / Sound-fonts ==== | ||
| − | |||
| − | |||
Before proceeding with this section, please familiarise yourself with how to use Qsynth and sound-fonts by reading another one of my WIKIs:<br />[ [[Quick & Simple - Setting up Jack Server and Q-synth]] ]. I will assume that you have a basic knowledge of using Qysynth, obtaining sound-fonts, and adding sound-fonts in Qsynth for the remainder of this section. | Before proceeding with this section, please familiarise yourself with how to use Qsynth and sound-fonts by reading another one of my WIKIs:<br />[ [[Quick & Simple - Setting up Jack Server and Q-synth]] ]. I will assume that you have a basic knowledge of using Qysynth, obtaining sound-fonts, and adding sound-fonts in Qsynth for the remainder of this section. | ||
| Line 137: | Line 137: | ||
Steps to Assignment Instruments: | Steps to Assignment Instruments: | ||
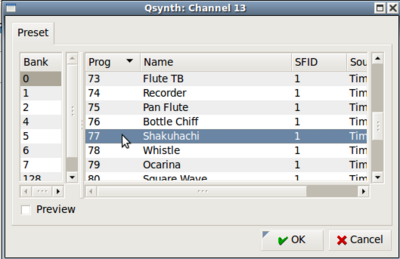
| − | [[Image:midi2.png|thumb|right|400px|Assigning Instrument (program) to a Bank (i.e. SFID or " | + | [[Image:midi2.png|thumb|right|400px|'''Assigning Instrument''' (program) to a '''Bank''' (i.e. "''SFID"'' or ''"Offset"'').]] |
# '''When adding sound-fonts into Qsynth, write-down the SFID number''' (i.e. Sound-font Identification number) - Do NOT close this dialog box quite yet! | # '''When adding sound-fonts into Qsynth, write-down the SFID number''' (i.e. Sound-font Identification number) - Do NOT close this dialog box quite yet! | ||
# Now, here's the trick: For each sound font, '''make certain that the "Offset" number corresponds to the same number as the SFID!''' | # Now, here's the trick: For each sound font, '''make certain that the "Offset" number corresponds to the same number as the SFID!''' | ||
Revision as of 19:11, 18 February 2011
Contents
- 1 Purpose of This Resource
- 2 Background
- 3 Setting up My Netbook
- 4 Sound Font Editing in Linux
- 5 Results / Discoveries
Purpose of This Resource
To Demonstrate how Ubuntu Studio can be used for live keyboard performances on a netbook computer...
Background
After playing keyboards in "garage bands" for over 2 decades, I have learned to "Keep it Simple"... the less you have to bring and setup - the better.. and I have tried everything including an ironing board for a keyboard stand!
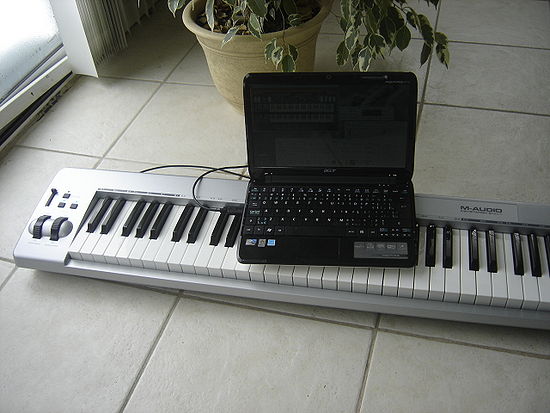
I have recently kept my performance set-up to a minimum:
- Midi Keyboard / usb cable
- Netbook Computer (running Ubuntu Studio), power-chord, Audio Adaptor cable
(from netbook to Amplifier). - Folding chairs (one chair to seat myself while the keyboard sits on my lap, and another chair to hold my netbook computer)
That's it! This method has worked for me for years (except I am now using a net-book computer, and will be bypassing the Tascam US122 USB/MIDI device since I now have a USB musical keyboard)...
... Here is a picture of myself (and keyboard setup) along with our band called "The Lucky Bleeders" performing at the Cameron House in Toronto, ON, Canada a few years back...
I have viewed many Internet posts indicating the "struggles" or "frustration" of finding a way to perform live in the Linux environment.
The answer is that it can be done, it just takes some knowledge of some Linux commands to launch and start Jack audio server, as well as launching some keyboard emulators, and finally making the appropriate connections (patches) to the keyboard and amplifier via the Jack audio server.
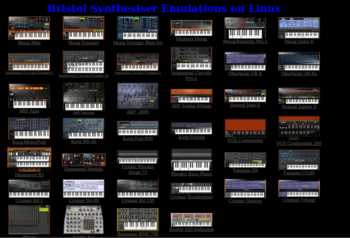
I will discuss in this WIKI how to use Linux Ubuntu Studio for live performances. Contrary to other Internet postings, you don't have to use an application such as Reaper (although that approach would make it more user-friendly for non-Linux users or "Newbies"). Instead, a well-written Bash shell script can be used to launch Jack and necessary keyboard applications such as Qsynth (Piano, and other sound-font voices), as well as Bristol Organ Emulator (Hammond B3, Vox, Rhodes Piano, Phophet5, Juno, Moog, etc).
Therefore, you can switch to different voices by switching to different transmitting MIDI channels,which may be more convenient than pointing and clicking on an instrument icon via the Reaper or Cubase applications (which are not free applications). Also, applications such as Bristol Organ allows a user to sync midi controller buttons or sliders (on the keyboard) to change control settings on the emulated organ by middle-clicking the mouse on the emulated keyboard's control knob and moving or activating the midi controller on the keyboard.
I have used MS Windows OS with Native Instruments Hammond B4, and other Native Instruments applications, so I have some experience when comparing open-source software against proprietary software (i.e. pros vs cons).
Setting up My Netbook
Here is a step-by-step guide to installing and configuring my netbook computer to run Ubuntu Studio:
Hardware / Software Information
I'm "pulling-out all the stops". I have decided to test the power of the Acer Aspireone netbook for live performances. It would have the advantage of small size and weight.
Here is my Hardware/Software Information:
Hardware (Acer AspireOne netbook) and Peripherals:
- Model 715h Wireless (ZA3)
- 11.6 inch screen
- 1 GB RAM (expandable to max of 2 GB - I will upgrade to 2 GB in the future)
- 160 GB Hard Drive (80 GB dedicated to Linux Ubuntu Studio - Dual boot Linux,MS Windows XP)
- MAudio 61 Keystation (USB interface)
- Tascam US122 USB interface (Optional, and can be replaced with 1/8 " stereo jack to 1/4 " mono jack into the AUX input of Amplifier)
Software (Ubuntu 10.10 Netbook Remix) Ubuntu Studio applications include:
- Realtime Kernel
- Jack Audio Server
- Qsynth (Graphical Frontend for Fluid Synth)
- Bristol Organ Emulator
- Swamy Sound Font Editor
FYI, the Maudio Fasttrack Pro is a greatd usb interface and "works out of the box" (after a couple of Jack server settings)... There is also a cheaper version for approx $87 CDN, but lacks MIDI connection (which may not be a problem since newer MIDI musical keyboards are USB anyways...)
Since I want to keep things simple, I have decided not to use any USB peripherals (other than the USB midi musical keyboard) for my band practices and live performances by connecting the netbook audio output directly to the amplifier. This allows me one less thing to carry around, and I can leave my Tascam US122 USB device at home in my basement studio. This "direct plugin method" can be achieved with an inexpensive 1/8 " stereo (male) to RCA "Y-adapter (female)" and an RCA (male) to 1/4 " (male) mono Jack cable (again, this is relatively inexpensive)!
Here are links for reference:
- 1/8 " stereo (male) to RCA "Y-adapter (female) - plugs into netbook headphone output: [ y-adaptor ]
- RCA (male) to 1/4 " (male) mono Jack cable - connects to Y-adapter and amplifier input: [ RCA to 1/4 inch Jack Cable ]
... And by the way... as long as you keep net-book volume to acceptable output level, you shouldn't damage the amplifier. I posed this connection question to a veteran "sound-guy" that has setup audio equipment for Moe Koffman and The Good Brothers back in his "younger days". He states, "this shouldn't be a problem what-so-ever, just keep volume down in net-book end and adjust volume via the amplifier"...
Setting up / Installing / Configuring Network, Ubuntu Studio, and Jack System
I obtained the Ubuntu Netbook version for Ubuntu: [ http://www.ubuntu.com/netbook/get-ubuntu/download ]
I didn't worry about Ubuntu Studio or loading updates - I would recommend to follow "MY SEQUENCE" (listed below):
- I need to setup my 11.6 inch screen Acer Aspireone after install. I have noticed that the video card chipset is different than the older 10 inch screen model (ZA3). Although a "pain", I followed some of the steps from the Ubuntu resource for the Intel GMA500 "Poulsbo" video driver: [ https://wiki.ubuntu.com/HardwareSupportComponentsVideoCardsPoulsbo#karmic ]
From with resource, I performed the following:
- Opened terminal and ran the command:
sudo add-apt-repository ppa:gma500/ppa && sudo apt-get update && sudo apt-get install poulsbo-driver-2d poulsbo-driver-3d poulsbo-config - Rebooted the computer.
- After reboot, then installed updates (ie. Ran "update manager" from Admin).
- Rebooted the computer.
- Ran Synaptic Package Manager (from Admin), and installed Ubuntu Studio Desktop (I selected ALL packages associated with Ubuntu Studio).
- Followed instructions to make my Tascam US122 device work with my netbook: [ https://help.ubuntu.com/community/TASCAM_US-122 ]
- Opened terminal and ran the command:
- I "Tweaked" the appearance of my Gnome Desktop like running the Avant Window Navigator (docking panel appearance like Mac OSX), and removed the "old-style" gnome-panels. Here is a resource that I created to help: [ Replacing Panels with Docking Station (awn) ]
- NOTE: I had trouble when displaying my net-book on the data display in class. Every time I pressed a key, the screen would go blue and return display to my net-book. I thought it was attributed to Ubuntu, but all I needed to do was update (flash) my BIOS from v3010 to v3012. Refer to the section below labelled:
Steps to Enhance CPU performance (Acer AspireOne a751h) for a full set of procedures to solve this problem. It seems to have also solved the hibernation problem, and also the problem of not displaying Python applets on my Avant Window Navigator docking tray...! - Now that you have Ubuntu Studio on your machine, here are some guides that I have written to help you get started
(This is assuming that you are using the Tascam US122 usb interface, although that is NOT necessary if you have a USB keyboard):
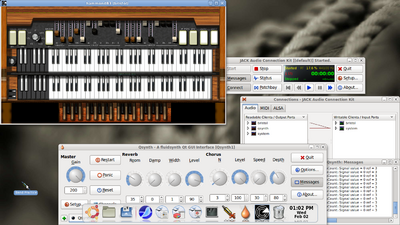
The organ emulator called Bristol Organ can simply be run via the startBristol command (after the Jack audio server has been started). To simplify the process of starting jack audio server, launching and making input/output connections for both Qsynth and several Bristol Organ emulations, it is easier to place commands into a Bash shell script and run shell script as a program! Please see next section for an example of how I did this...
YouTube Tutorials
Here are some links to good YouTube videos demonstrating Jack audio server, and various synths:
About Jack audio server: [ http://www.youtube.com/watch?v=fMz6fDGBnA4 ]
CPU Scaling - Part I [ http://www.youtube.com/watch?v=Bn6g_YCxq2o ] (Refer to section Steps to Enhance CPU performance below)
CPU Scaling - Part II [ http://www.youtube.com/watch?v=wAq4ihIhivg&NR=1 ](Refer to section Steps to Enhance CPU performance below)
Jack audio server & Synth I: [ http://www.youtube.com/watch?v=iVPr6iUuO3g ]
Jack audio Server & Synth II: [ http://www.youtube.com/watch?v=YHR9hQVrRIQ ]
Qsynth Synth & Sound Fonts: [ http://www.youtube.com/watch?v=vdtWYsUSK8s ]
LMMS Synth: [ http://www.youtube.com/watch?v=boRmY9jH7fs ]
"Putting it All Together" with a Bash Shell Script
One *perceived* problem that a typical "end-user" would face is having to manually connect (patch) various Devices (like a keyboard), with various keyboard emulators (like Qsynth and Bristol organ). But it is important to realise that these "graphical applications" are just convenient "front-ends" or user-friendly graphical representations of Linux commands.
Since they are Linux commands, these command, to launch and make patches (connections), and simply be added to a file (called a shell script), and run like program (either as an desktop icon), or a start-up program from boot-up.
For reference, here is a link to my Bash Shell script: [ txt ]
For additional reference, here is a link that explains how above shell script works: [ coming soon ]
Using Ubuntu Studio for Live Performances
I will be making some assumptions here: first, I am using my M-AUDIO Keystation 61es Midi Controller keyboard, and second, I am going to plug in directly from Net-book's headphone jack into the amplifier.
First, the Initial Setup
- Boot Net-book into Ubuntu Studio, and turn down the system volume to a lower level.
- Plug M-Audio keyboard (via USB connector) into Net-book.
- Plug Y-Adaptor into net-book's head-phone port, and connect up RCA portion of cable to Y-Adaptor, and 1/4 inch end of cable to the input connector of amplifier (see to bottom of "Hardware/Software Information" for reference).
- Refer to "Putting it All Together with a Bash Shell Script" to learn how to automatically launch for performance session with the keyboard applications such as Qsynth and Bristol Organ. When you have created that Bash Shell script, launch your performance session, and wait until all of the applications are running, and that all of the connections have been made.
A Few Words of Warning About MIDI Channels & Bristol Organ
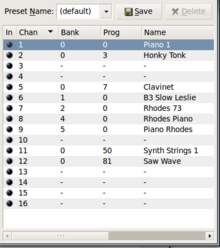
I have always wondered how Bristol Organ managed multiple keyboards. For example, the Bristol (Hammond) B3 organ has two sets of keyboards (upper and lower), and I was curious how to access the lower keyboard. The answer is easier that you think! When you issue the command to run the Bristol B3 organ with a midi channel, then the next higher midi channel will be reserved for the lower keyboard - totally awesome!...
... But if you didn't know that, and launched the Qsynth application using that extra midi channel, then don't be surprised if your Bristol B3 organ abruptly aborts... no wonder! Therefore, you have to do a little planning head, and reserve extra midi channels for any Bristol Organs that have multiple keyboards prior to assigning various midi channels...
Tweaking Qsynth to Play Different MIDI Channels / Sound-fonts
Before proceeding with this section, please familiarise yourself with how to use Qsynth and sound-fonts by reading another one of my WIKIs:
[ Quick & Simple - Setting up Jack Server and Q-synth ]. I will assume that you have a basic knowledge of using Qysynth, obtaining sound-fonts, and adding sound-fonts in Qsynth for the remainder of this section.
I have see some misinformation regarding the use of sound-fonts with Qsynth. You can add in a lot of sound-fonts with Qsynth, and then assign them (either using a particular sound, or incorporating "sound banks") to midi channels. I am currently have assigned instruments to 10 midi channels (2 have been reserved for my B3 Organ. In addition, you can save these midi assigns as different "preset names" to be saved and loaded as needed during performance or practice.
In order to assign MIDI channels in Qsynth, when you click the Channels button, you will see the Channels dialog box appear. Notice that this dialog box allows for a total of 16 midi channels (this is more than I require for a typical practice or performance). If you require more, you can save different midi instrument assignments to various profiles (perhaps to be loaded between your sets).
Steps to Assignment Instruments:
- When adding sound-fonts into Qsynth, write-down the SFID number (i.e. Sound-font Identification number) - Do NOT close this dialog box quite yet!
- Now, here's the trick: For each sound font, make certain that the "Offset" number corresponds to the same number as the SFID!
- Now, click OK to save and exit the sound-font dialog box.
- If you are running Jack, then you need to restart the Jack engine. This will require that you manually connect the instruments in the "Jack Connections" dialog box. If this is "a pain", you could always quit all applications, and re-run your Bash shell script to launch your music session...
- Go to the Channels dialog box, and double-click on a midi channel.
I am selecting the next available channel - 13. - The Channel 13 Midi Channel Dialog box appears.
- Select the Bank number (which corresponds to the Offset or SFID that you have written-down).
- Then click on the program number to select an instrument (depending on the sound-font, there may be only one to select, or a wide variety if the sound-font is a bank of sounds).
- !! NOTE: in order for the changes to take effect, you need to click the Save button; otherwise, all your changes will be lost!
- You may need to restart the Jack engine and re-establish your connections.
That's it! Start performing!!
My M-AUDIO keyboard allows me to easily change between midi channels by pressing the Advanced Functions button, and then pressing a note on the keyboard that corresponds to the midi channel. Easy-Breezy, and efficient! :)
Here is a link to documentation of my M-AUDIO midi keyboard for reference:
[ http://www.m-audio.com/images/global/manuals/050505-KSSeries_UG_EN01.pdf ]
Sound Font Editing in Linux
Note: The Swamy sound-font editor allows me to build or modify sound fonts.s I must admit that I'm not an expert on sound-fonts.
In the future, I will discuss how to use a sound-font editor to create your own sound-fonts (instruments) to play with the keyboard.
Here is a link to the Project Swamy Webpage: http://sourceforge.net/apps/mediawiki/swami/index.php?title=Main_Page
Results / Discoveries
My net-book system works well (to my surprise). I will be taking my hardware set-up to band practice next week to make certain it works for the entire practice. I will keep taking it to practices and monitor my netbook's performance until I am confident to use for live "gigs". So far, so good...
I have taken my system to band practice, and didn't have to use my Tascam US122 USB device - this is a resounding success! I will now be using my Linux system for live performances for now, and into the future! I'm a happy camper :)
Tips, Pros & Cons
Jack & High CPU Usage (and Recommended Solution)
I am content to use the Bristol Hammond B3 keyboard emulator, and Q-synth (with sound-fonts) for piano, electric piano and other types of instruments. I will only notice some distortion if I simultaneously strike many keys on the keyboard (which I seldom do)...
I have also noticed when running other Bristol keyboard emulators, the CPU usage is very high in the Jack audio server - this can cause sound distortion. This is no doubt attributed to the limited power of the arm processor - adding RAM will not have a considerable impact on the quality of multiple Bristol emulators.
There is a method to change your Acer AspireOne into "performance mode" in order to keep CPU Usage within acceptable levels. By default, Ubuntu has set the default CPU frequency (i.e. performance) of newly installed computers to "On Demand". This is for a number of reasons including not constantly requiring fan to draw down the battery (although I would be plugged in for practice and performance anyways). The Acer Aspireone a751h CPU has the "speedstep" feature, and will now show the step to change it to "performance".
Steps to Enhance CPU performance (Acer AspireOne a751h):
- ATTENTION: Take time to read these instructions. Flashing BIOS can come with risks and I take no responsibility for any disasters encountered, but this procedure did work for me...
- Check BIOS version. I had version 3010, which didn't support Speedstep feature, but version 3012 does support that feature (which means you need to download version, and flash your BIOS).
- I have dual boot, so decided to perform the BIOS flash in my MS WIndows XP portion of notebook:
- Boot netbook into MS Windows (not Ubuntu Linux)
- Go to following page to download most recent BIOS version from ACER webpage: [http://support.acer.com/us/en/product/default.aspx?tab=5&modelId=1112]
- Unzip the file folder in c:\windows\system32
- Make certain you are logged into MS Windows as administrator (if you have not created password for account, you should do so, or procedure may not work!)
- Use Windows Explorer to navigate to the BIOS_Acer_3212 subdirectory you unzipped, and proceed in the subdirectory called Windows.
- Right-click on the WinPhlash file and then select Run.
- You will be prompted for authorization. Select for account, then enter your administrator account name and password.
- Carefully read all instructions before proceeding with flashing your BIOS. Your machine should be plugged in. It would be a bad, bad thing if your machine is powered off in the middle of flashing your BIOS! The decision to flash you BIOS is yours, not mine.
- Proceed with the flashing of your BIOS. When completed, the system will reboot.
- When your system reboots, select Ubuntu Linux at the Grub boot-loader menu.
- There is an applet for the Gnome panel called CPU Frequency Scaling Monitor. Add this applet to your gnome panel by right-clicking on your panel and then selecting "Add to Panel" and select that applet. Note: If you are running another panel system like Avant Window Navigator (like me), you can open a terminal and run the command gnome-panel, and add the CPU Frequency Scaling Monitor applet. Don't worry, when you reboot your machine the settings you make to the CPU Frequency and Scaling Monitor will remain, although the gnome-panel will not be present.
- Click the icon for CPU Frequency Scaling Monitor and select Performance.
- Launch your Jack audio system and keyboards, and you should notice a noticeable improvement in the performance and CPU usage.
I also noticed when I updated my net-book's BIOS to version 3012, that it solved other performance issues like switching back to net-book screen instead of data-projector screen whenever I pressed a key...
High CPU Usage When Using Rakarrack
The Rakarrack Application is an Effects processor. For example, you can get a grittier B3 sound by running the output through an "overdrive" filter or program. Unfortunately, this application seems to tie up a lot of the CPU. I Will later investigate if there is some type of option to help reduce the load on the CPU when using this application...
Here is a link to the Rakarrack web-page: http://rakarrack.sourceforge.net/
What I Love About Open-Source Applications
What I really love about open-source applications is being able to communicate with many of the software developers.
I have even suggested an improvement to an application that was implemented immediately!
Here is a link to e-mail correspondence to Nick Copeland, developer of the Bristol Organ emulator (open source equivalent to Native Instruments B4, Electrik Piano, etc...)
[ Correspondence with Nick Copeland ]
Is it Worth It?
In my opinion: YES!
I cannot begin to imagine the amount of money that I have saved as a result of using Linux Ubuntu Studio. I have rolled back the money that I saved to help build my basement recording studio (and will never worry about software costs in the future!). No doubt, I should start donating to these developers to acknowledge their great products!
I realize that I have an unique advantage from having taught Unix and Linux courses over 2 decades, although Linux is becoming easier to use, and the on-line support networks are becoming better. I have tried to "spread the word" about using Linux and open-source applications over many years. I have had some great success and some failures in this campaign. I consider that it comes down to an issue of empowerment:
Either take the time to learn how to use open source applications, or become dependent and accept the cost of letting others do the thinking for you...
Here is one of my previous blog posts that explains my position on open-source software: [ http://murraysaul.wordpress.com/2010/01/22/hacking-can-be-a-good-thing/ ]
