Teams Winter 2011/team1/Android/Edit Contact
Contents
[hide]8. Edit Contact
8.1 Create Edit Layout and Menu Item
8.1.1 Add the String value for the layout title to String.xml:
<string name="editContact_textView">Edit Contact</string>8.1.2 Right click on layout -> New -> Android XML File .
8.1.3 Enter edit.xml for the file name and check Layout:
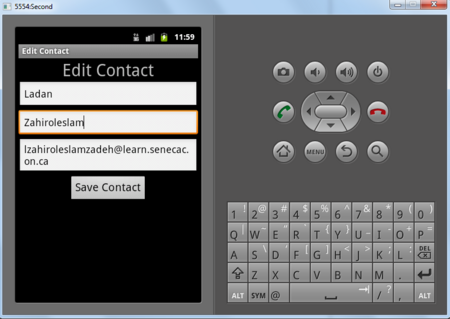
8.1.4 Using Linear Layout, create this layout for editing contact information:
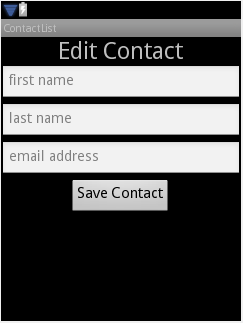
8.1.5 Here is the edit.xml implementation:
<?xml version="1.0" encoding="utf-8"?>
<LinearLayout xmlns:android="http://schemas.android.com/apk/res/android"
    android:layout_width="match_parent" android:layout_height="match_parent"
    android:orientation="vertical">
    <TextView android:layout_width="wrap_content"
        android:layout_height="wrap_content" android:id="@+id/titleTextViewEdit"
        android:gravity="center_vertical" android:textSize="30dp"
        android:layout_gravity="center" android:text="@string/editContact_textView"></TextView>

    <EditText android:layout_width="match_parent"
        android:layout_height="wrap_content" android:layout_marginBottom="3dp" android:hint="@string/hint_first_name" android:id="@+id/firstNameEdit"></EditText>

    <EditText android:layout_width="match_parent"
        android:layout_height="wrap_content" android:isScrollContainer="true"
        android:layout_marginBottom="3dp" android:hint="@string/hint_last_name" android:id="@+id/lastNameEdit"></EditText>

    <EditText android:layout_width="match_parent"
        android:layout_height="wrap_content" android:layout_marginBottom="3dp" android:hint="@string/hint_email" android:id="@+id/emailEdit"></EditText>

    <Button android:layout_width="wrap_content"
        android:layout_height="wrap_content" android:id="@+id/saveContact_buttonEdit"
        android:text="@string/saveButton" android:gravity="center_horizontal"
        android:layout_gravity="center_horizontal" android:textSize="20dp"></Button>
</LinearLayout>
8.1.6 Now Add the Edit menu Item. for this purpose click on menu.xml and brouse to the xml view, and add the menu item. Here is how it looks like:
<?xml version="1.0" encoding="utf-8"?>
<menu
  xmlns:android="http://schemas.android.com/apk/res/android">
    <item android:id="@+id/item1" android:title="Add Student"></item>
    <item android:id="@+id/item2" android:title="Delete Student"></item>
    <item android:id="@+id/item3" android:title="View Student"></item>
    <item android:id="@+id/item4" android:title="Edit Student"></item>
    <item android:id="@+id/item5" android:title="Send E-mail"></item>
</menu>
8.1.. Now build your project so that the ids are generated in R.java
8.2 Create EditContactActivity
8.2.1 Create the EditContactActivity in your package and make sure it extends Activity class.
package cs.ecl.team1.android;

import android.app.Activity;
public class AddContactActivity extends Activity {
@Override
    protected void onCreate(Bundle savedInstanceState) {
        super.onCreate(savedInstanceState);
    }
}
8.2.2 Add private fields:
    private String firstName;
    private String lastName;
    private String email;
8.2.3 Make sure that on creation it adds the edit layout to the view, so change the OnCreate method:
@Override
    protected void onCreate(Bundle savedInstanceState) {
        super.onCreate(savedInstanceState);
        setContentView(R.layout.edit); // adds edit layout to view
    }
}
8.2.4 get the Intent of this Activity (later when starting this activity, we will send an Intent including the data of the selected student for editing). Then read he data from it and set the EditTexts values:
@Override
    protected void onCreate(Bundle savedInstanceState) {
        super.onCreate(savedInstanceState);
        setContentView(R.layout.edit); // adds edit layout to view

        Intent i = this.getIntent(); // get this page intent

        // read the data from the Intent
        EditText fNameEditText = (EditText) findViewById(R.id.firstNameEdit);
        fNameEditText.setText(i.getStringExtra("oldFirstName"));

        EditText lNameEditText = (EditText) findViewById(R.id.lastNameEdit);
        lNameEditText.setText(i.getStringExtra("oldLastName"));

        EditText emailEditText = (EditText) findViewById(R.id.emailEdit);
        emailEditText.setText(i.getStringExtra("oldEmail"));


    }
}
8.2.5 Add and implement the save button: in the OnCreate method:
    //save Button implementation
        Button saveButton = (Button) findViewById(R.id.saveContact_buttonEdit);
        saveButton.setOnClickListener(new OnClickListener() {
            public void onClick(View arg0) {
                firstName = ((EditText) findViewById(R.id.firstNameEdit)).getText().toString();
                lastName = ((EditText) findViewById(R.id.lastNameEdit)).getText().toString();
                email = ((EditText) findViewById(R.id.emailEdit)).getText().toString();

                finish();
            }
        });
8.3.5 Now you need to override the finish() method:
@Override
    public void finish() {
        Intent i = new Intent();
        if (firstName.equals("") && lastName.equals("") && email.equals("")) {
            setResult(0);
        }
        else { // add the modified data to the intent
            i.putExtra("newFirstName", firstName);
            i.putExtra("newLastName", lastName);
            i.putExtra("newEmail", email);
            setResult(RESULT_OK, i);
        }
        super.finish();
    }
8.3.6 Here is the completed source of the EditContactActivity:
package cs.ecl.team1.android;

import android.app.Activity;
import android.content.Intent;
import android.os.Bundle;
import android.view.View;
import android.view.View.OnClickListener;
import android.widget.Button;
import android.widget.EditText;


public class EditContactActivity extends Activity {
    private String firstName;
    private String lastName;
    private String email;

    @Override
    protected void onCreate(Bundle savedInstanceState) {
        super.onCreate(savedInstanceState);

        setContentView(R.layout.edit);

        // get the intent sent to this class
        Intent i = this.getIntent();

        EditText fNameEditText = (EditText) findViewById(R.id.firstNameEdit);
        fNameEditText.setText(i.getStringExtra("oldFirstName"));

        EditText lNameEditText = (EditText) findViewById(R.id.lastNameEdit);
        lNameEditText.setText(i.getStringExtra("oldLastName"));

        EditText emailEditText = (EditText) findViewById(R.id.emailEdit);
        emailEditText.setText(i.getStringExtra("oldEmail"));


        //save Button implementation
        Button saveButton = (Button) findViewById(R.id.saveContact_buttonEdit);
        saveButton.setOnClickListener(new OnClickListener() {
            public void onClick(View arg0) {
                firstName = ((EditText) findViewById(R.id.firstNameEdit)).getText().toString();
                lastName = ((EditText) findViewById(R.id.lastNameEdit)).getText().toString();
                email = ((EditText) findViewById(R.id.emailEdit)).getText().toString();

                finish();
            }
        });
    }

    @Override
    public void finish() {
        Intent i = new Intent();
        if (firstName.equals("") && lastName.equals("") && email.equals("")) {
            setResult(0);
        }
        else {
            i.putExtra("newFirstName", firstName);
            i.putExtra("newLastName", lastName);
            i.putExtra("newEmail", email);
            setResult(RESULT_OK, i);
        }
        super.finish();
    }


}
8.3 Add the EditContactActivity to the Android Manifest
Now we have to declare our EditContactActivity in the Manifest: open the AndroidManifest.xml and add this:
<activity android:label="Edit Contact" android:name="EditContactActivity"></activity>8.4 Implement the EditContact in the main activity class
8.4.1 Add the following private fields to the ContactList Activity :
    // added for Edit
    private static final int EDIT_CONTACT =1;
    private Student selectedStudent;
8.4.2 In the onOptionsItemSelected(MenuItem item) method add the following case to the switch code block:
case R.id.item4:// Edit
            // set the private field :selectedStudent so that it can be accessed later
            selectedStudent = (Student)contactsList.getSelectedItem();
            // create an Intent for EditContactActivity class
            Intent j = new Intent(this, EditContactActivity.class);
            // add the selected student's data to the intent so that the EditContactActivity class can read them
            j.putExtra("oldFirstName",selectedStudent.getFirstname());
            j.putExtra("oldLastName", selectedStudent.getLastName());
            j.putExtra("oldEmail",selectedStudent.getEmail());
            // Start the EditContactActivity activity
            startActivityForResult(j, EDIT_CONTACT);
            break;
8.4.3 Modify the onActivityResult() method to accommodate the results of the EditContactActivity. Here is the completed code if this method:
@Override
    protected void onActivityResult(int requestCode, int resultCode, Intent intent) {// modified to implement Edit
        switch (requestCode){
        case CREATE_CONTACT: // Add new Contact
             if (resultCode == Activity.RESULT_OK) {
                    studentList.addElement(new Student(intent.getExtras().getString("firstName"),
                            intent.getExtras().getString("lastName"), intent.getExtras().getString("email")));
                }
                else {
                    showDialog("No contact was added!");
                }
                displayData(studentList);
        break;
        case EDIT_CONTACT: // edit the selected Student
                 // implement Edit
                 if (resultCode == Activity.RESULT_OK) {
                 Student oldS = selectedStudent;
                 Student newS= new Student(intent.getExtras().getString("newFirstName"),
                                            intent.getExtras().getString("newLastName"),
                                            intent.getExtras().getString("newEmail"));
                        for(int i = 0; i< studentList.size() ; i++){
                                Student s= (Student)studentList.elementAt(i);
                            if (s.getName().compareTo(oldS.getName())==0 && s.getEmail().compareTo(s.getEmail())==0){
                                studentList.remove(s);
                                studentList.add(newS);
                            }

                          }

                 } else {
                    showDialog("No contact was edited!");
                 }
                 displayData(studentList);

            break;
        default:
            break;
        }

    }
8.5 Edit Contact In action
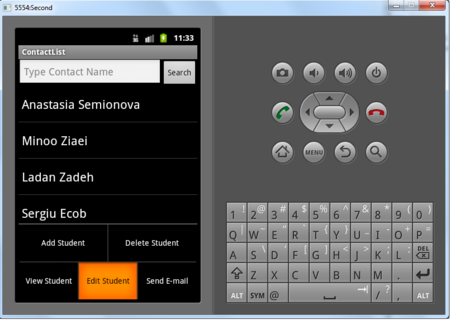
8.5.1 Build and run the project. Scrole mous buton to select a contact, and then click on the menu button of the virtual device. and then click on the EditContact menu option. Please note that the selected contact seems unselected but it's ok:
8.5.2 the Edit Contact view will apear with the selected student shown.
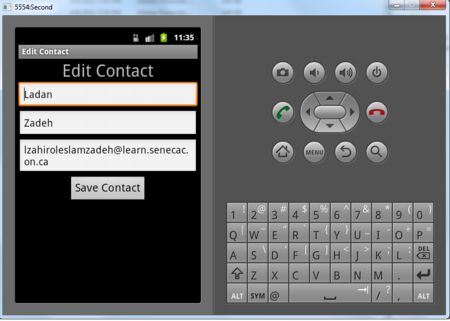
8.5.3 edit the Contact's info:
8.5.4 click on save contact button and see the result:
