Difference between revisions of "Simple Recording with Audacity"
| Line 61: | Line 61: | ||
<table> | <table> | ||
<tr> | <tr> | ||
| − | <td>[[Image:audacityInputBar1.png|400px| ]]</td> | + | <td>[[Image:audacityInputBar1.png|400px| ]]<br /><br /></td> |
</tr> | </tr> | ||
<tr> | <tr> | ||
| − | <td>[[Image:audacityInputBar2.png| | + | <td>[[Image:audacityInputBar2.png|200px| ]]<br /><br /></td> |
</tr> | </tr> | ||
<tr> | <tr> | ||
Revision as of 16:22, 24 June 2011
Contents
Purpose
- This WIKI explains how to use the Audacity application to create simple recordings.
- Audacity is an easy-to-use digital multi-track audio recorder and processor. This application is also available in Windows and MAC OSX due to its popularity.
- In this tutorial, we will only concentrate on recording a voice via the computer lab's webcam, and importing and some background music. The artist and performer of this song has given permission for this song to be used in these Westminster YouTube videos.
YouTube Video
- If you want to see the visual steps for "Simple Recording with Audacity",
- Here is a link to a customized YouTube video: http://www.youtube.com/watch?v=uppLRSh2RCI
Written Instructions
- Below are the instructions on how to create a simple recording (eg. commercial) using the Audacity application:
- WARNING: YOU ARE NOT PERMITTED TO USE COPYRIGHTED MATERIAL WHEN USING ANY APPLICATION IN THE WESTMINSTER COMPUTER LAB WITHOUT PERMISSION OF THE ARTIST. IT IS RECOMMENDED THAT THE MUSIC YOU CREATE BE "HOME-MADE", OR USE PUBLIC DOMAIN MUSIC.
Set-up Prior to Using Audacity
- In this tutorial, we will keep the recording session simple:
- No recording of instruments
- Recording from a simple microphone (WebCam)
- Since there may be several input devices connected to the computer system, never assume that the recording input device is the WebCam. We need to check and if possible, change the sound settings on the computer system to select the WebCam as the audio recording device.
- Go to the main menu and select: PREFERENCES -> SOUND
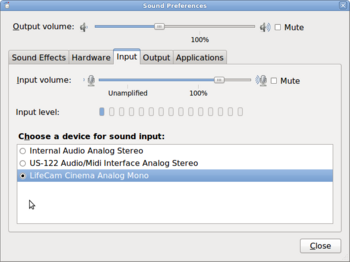
- In the "Sound Preferences" dialog box, click the Input tab, and select LifeCam Cinema Analog Mono by pointing and clicking on the radio button.
- Refer to diagram on the right to confirm. When finished, click the CLOSE button.
Main Elements of the Audacity Application
The Audacity application window has several elements:
Importing Music into Audacity
To be completed ...
Recording Your Voice
To be completed ...
Editing Recorded Tracks / Adding Effects
To be completed ...
Saving Project / Exporting to Other Sound Formats
To be completed ...

