Template:Ecl installation
Revision as of 09:03, 13 January 2011 by Jordan.anastasiade (talk | contribs)
Install Eclipse {{{type}}}
- Go to Eclipse Downloads and choose {{{name}}} (attention at operating system 32/64 bit).
- Unzip the downloaded file in /Eclipse_Platform/{{{type}}} directory.
- Start Eclipse (click the eclipse executable file in /Eclipse_Platform/{{{type}}}/eclipse directory
- In the dialog box:Workspace Launcher -> Workspace type: ./wskp/{app-type} where {app-type} could be: hello or simple or lab
{{{install}}}
For this course you will be using the workspace defined in /Eclipse_Platform/{{{type}}}/eclipse/wksp/...
|
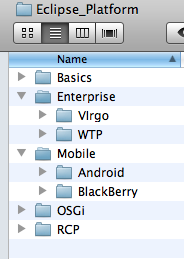
The root directory for this course is: Eclipse_Platform
|
where:
|
- You have to install also a new repository system Subversive (SVN) from Eclipse (be aware that SVN is an project in incubation and this is an early access).
- Steps to install SVN in Eclipse:
- Start Eclipse and define the workspace (in Workspace Launcher dialog box; type as required: ./wksp/hello).
- Click Help->Install New Software....
- In the Install dialog box click on "Available Software Sites" (the link below the Add button)
- In the new dialog box called Preferences, type in the edit box the word 'sub' (as you type we will see the selected items from the below list).
- In the list box you must have now the location: ''http://download.eclipse.org/technology/subversive/0.7/update-site/''
- Click the check box and click the button Reload
- A dialog box called Test Connection is displayed; click OK after the test is performed successfully (otherwise if the site is not active, you cannot download the software).
- Click OK to end the Preferences dialog box.
- Open the combo-box 'Work-with' .
- At this point you must see the URL previously selected, namely ''http://download.eclipse.org/technology/subversive/0.7/update-site/''
- Select the URL item.
- The text box must contain few (three or more) items (all of them start with Subversive and end with Incubation).
- Click on the first and third one (unless you want to have also the source coude in which case you can select the second item).
- Click Next twice, then accept the licence agreement and click the Finish button.
- In the Software Updates dialog click the Restart Now button.
- When Eclipse starts you MUST also see a new dialog box called 'Install Connectors'; there is a software component called SVN connector that must be installed. (the connectors are developed by a company called Polaroid).
- At the time of this writing, namely Jan 2011, the product is called SVN Kit 1.3.3; please click the check box and follow the instruction to install the connector. (click Finish->Next->Next->Accept->Finish)
- At one point a dialog box "Security Warning" will be displayed; At the question: 'Do you want to continue with the installation?" click OK. (this is a standard message for the software installed from outside Eclipse open source projects).
- Click Restart Now in the Software Updates dialog.
- When Eclipse starts you must have an new Welcome page with Subversive Overview link (read it, if you want to now more about it). Congratulations, you installed SVN in Eclipse!
- In Eclipse click menu Window->Open Perspective->Other...
- In the Open Perspective dialog you must see the SVN Repository Exploring item; click on it and click OK.
- In the SVN Repository Panel (the left panel), click the New Repository Location button (the yellow cylinder with the plus greenish sign).
- In the dialog box "New Repository Location" you have to define few items such as:
- URL: svn://zenit.senecac.on.ca/ecl500/Lectures
- User: guest
- Password: 1673852
- Click Finish
- In the dialog box "New Repository Location" you have to define few items such as:
- At this point in the SVN Repository panel you should see the content of svn://zenit.senecac.on.ca/ecl500/Lectures
- Right click on the item you are studying in this particular lab (for instance in the {{{type-small}}} hello lab select w11-{{{type-small}}}-hello item) and click on Check Out menu.
Check your working environment by running the Hello Sample from Course Repository
You may also want to install JUnit Library to be able to debug your applications.
To install JUnit follow the instructions:
- Download JUnit4.x.jar from the JUnit website . The download contains a "junit-4.*.jar" which is the JUnit library.
- To make JUnit available in your Java project you have to add the the JUnit library file to your Java classpath. (If you do not know how to do it, please use this Eclipse tutorial to learn how to add jar files to your Eclipse project).

