OPS245 Lab 2 dev
Contents
LAB PREPARATION

Purpose / Objectives of Lab 2
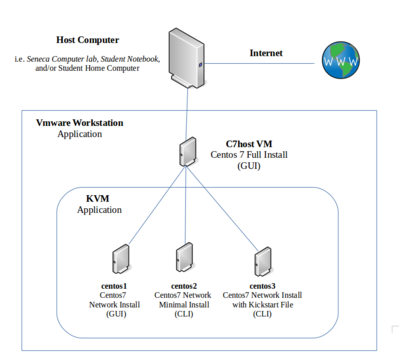
In this lab, you will create 3 remaining virtual machines using another virtualization program called KVM that will run in your r9host VM. These VMs will be used throughout the remainder of this course to learn how to administer them (installing software, managing services, networking, etc).
While you are performing this lab, it is recommended to generally note the major differences in the different installation methods, and which method you prefer to use if you were a Linux system administrator in charge of installing many Linux distributions for an organization.
Main Objectives
- Installing additional Virtualization Software on your r9host machine (KVM)
- Create 3 separate VMs (virtual machines) using different installation methods:
- rhel1: Network Red Hat Enterprise Linux Installation (Graphical)
- rhel2: Network Red Hat Enterprise Linux Installation (minimal install - CLI only)
- rhel3: Network Red Hat Enterprise Linux Installation with Kickstart configuration file (CLI only)
- Manipulate virtual machines by CLI (virsh)
- Properly backup VM images and backup VM configuration files
- Create and run Bash Shell scripts to automatically create a post-install report for an installed VM.
| Minimum Required Materials |
Linux Command Reference | ||||
|
Virtualization |
Miscellaneous |
Matrix Online Tutorials:
| |||
INVESTIGATION 1: SETUP FOR NESTED VIRTUAL MACHINES
Part 1: Install KVM Virtualization Application
We will now install the KVM package in order to create our remaining "nested" VMs. We will also be starting several services (including nftables) and disabling the firewalld service. We will learn more about managing firewalls using nftables in lab6.
- Perform the following steps:
- Log into your r9host machine.
- perform a software update on your r9host VM by issuing the following command:
sudo dnf update
- Using elevated privileges, install the virtualization software by issuing the command:
sudo dnf install libvirt virt-manager python3-libvirt virt-viewer - Restart your r9host virtual machine. If you fail to do this, you may experience virtualization network problems.
- Start the virtualization service:
sudo systemctl start libvirtd
NOTE: The most recent variants of RHEL a service called nftables that replaces firewalld, however the firewalld is still active by default. Firewalld rules are translated by the kernel into nftables rules. Therefore, it makes sense to learn nftables. In this course we will concentrate on nftables. - To disable and remove firewalld, issue the following commands:
sudo systemctl disable firewalld
sudo systemctl stop firewalld
sudo yum remove firewalld
- To start and enable the nftables services, issue the following commands:
sudo systemctl enable nftables
sudo systemctl start nftables
- Issue the following command to confirm the nftables service is running:
sudo systemctl status nftables
- Start the graphical tool by selecting the menu options Applications>System Tools>Virtual Machine Manager or by typing the command
virt-manager(without sudo!) - You will be learning in the next investigation to perform several different types of Red Hat Linux installs.
Part 2: Configure VMware Workstation for Nested VMs
Although we are using VMware Workstation to run our r9host VM, we will now install and configure another virtualization package called KVM in order to install the remaining VMs for this course. Since we are "nesting" VMs (i.e. running a VM inside another VM) we need to configure our r9host's Linux boot-up parameters in order to allow these VMs to run efficiently.
- Perform the following steps:
- In a terminal use elevated privileges to edit the file called: /etc/modprobe.d/kvm.conf
- If this file doesn't exist, double-check your UEFI settings in VMWare Workstation for r9host. If BIOS is selected, you MUST redo Lab 1.
- Search for the first occurrence of the Linux Kernel boot command. Do not make the following changes on more than one entry!
- Uncomment (remove the #) the boot option: options kvm_intel nested=1 (for AMD processors options kvm_amd nested=1).
-
-->


