Tutorial 11 - SED & AWK
Revision as of 12:58, 14 November 2021 by Jason Michael Carman (talk | contribs) (→INVESTIGATION 2: USING THE AWK UTILITY)
Content under development
Contents
USING SED & AWK UTILTIES
Main Objectives of this Practice Tutorial
- Use the sed command to manipulate text contained in a file.
- List and explain several addresses and instructions associated with the sed command.
- Use the sed command as a filter with Linux pipeline commands.
- Use the awk command to manipulate text contained in a file.
- List and explain comparison operators, variables and actions associated with the awk command.
- Use the awk command as a filter with Linux pipeline commands.
Tutorial Reference Material
| Course Notes |
Linux Command/Shortcut Reference | ||
| Course Notes:
|
Text Manipulation | Commands
| |
KEY CONCEPTS
Using the sed Utility
Usage:
Syntax: sed [-n] 'address instruction' filename
How it Works:
- The sed command reads all lines in the input file and will be exposed to the expression
(i.e. area contained within quotes) one line at a time. - The expression can be within single quotes or double quotes.
- The expression contains an address (match condition) and an instruction (operation).
- If the line matches the address, then it will perform the instruction.
- Lines will display be default unless the –n option is used to suppress default display
Address:
- Can use a line number, to select a specific line (for example: 5)
- Can specify a range of line numbers (for example: 5,7)
- Regular expressions are contained within forward slashes (e.g. /regular-expression/)
- Can specify a regular expression to select all lines that match a pattern (e.g /^[0-9].*[0-9]$/)
- If NO address is present, the instruction will apply to ALL lines
Instruction:
- Action to take for matched line(s)
- Refer to table on right-side for list of some
common instructions and their purpose
Using the awk Utility
Usage:
awk [-F] 'selection-criteria {action}’ file-name
How It Works:
- The awk command reads all lines in the input file and will be exposed to the expression (contained within quotes) for processing.
- The expression (contained in quotes) represents selection criteria, and action to execute contained within braces {}
- if selection criteria is matched, then action (between braces) is executed.
- The –F option can be used to specify the default field delimiter (separator) character
eg. awk –F”;” (would indicate a semi-colon delimited input file).
Selection Criteria
- You can use a regular expression, enclosed within slashes, as a pattern. For example: /pattern/
- The ~ operator tests whether a field or variable matches a regular expression. For example: $1 ~ /^[0-9]/
- The !~ operator tests for no match. For example: $2 !~ /line/
- You can perform both numeric and string comparisons using relational operators ( > , >= , < , <= , == , != ).
- You can combine any of the patterns using the Boolean operators || (OR) and && (AND).
- You can use built-in variables (like NR or "record number" representing line number) with comparison operators.
For example: NR >=1 && NR <= 5
Action (execution):
- Action to be executed is contained within braces {}
- The print command can be used to display text (fields).
- You can use parameters which represent fields within records (lines) within the expression of the awk utility.
- The parameter $0 represents all of the fields contained in the record (line).
- The parameters $1, $2, $3 … $9 represent the first, second and third to the 9th fields contained within the record.
- Parameters greater than nine requires the value of the parameter to be placed within braces (for example: ${10},${11},${12}, etc.)
- You can use built-in variables (such as NR or "record number" representing line number)
eg. {print NR,$0} (will print record number, then entire record).
INVESTIGATION 1: USING THE SED UTILITY
ATTENTION: The due date for successfully completing this tutorial (i.e. tutorial 11) is by Friday, December 15 @ 11:59 PM (Week 14).
In this investigation, you will learn how to manipulate text using the sed utility.
Perform the Following Steps:
- Login to your matrix account and confirm you are located in your home directory.
- Issue a Linux command to create a directory called sed
- Issue a Linux command to change to the sed directory and confirm that you are located in the sed directory.
- Issue the following Linux command to download the data.txt file
(copy and paste to save time):
cp ~osl640/tutorial11/data.txt . - Issue the more command to quickly view the contents of the data.txt file.
When finished, exit the more command by pressing the letter q
The p instruction with the sed command is used to
print (i.e. display) the contents of a text file. - Issue the following Linux command:
sed 'p' data.txt
NOTE: You should notice that each line appears twice.
The reason why standard output appears twice is that the sed command
(without the -n option) displays all lines regardless of an address used.
We will use pipeline commands to both display stdout to the screen and save to files
for confirmation of running these pipeline commands when run a checking-script later in this investigation. - Issue the following Linux pipeline command:
sed -n 'p' data.txt | tee sed-1.txt
What do you notice? You should see only one line.
You can specify an address to display lines using the sed utility
(eg. line #, line #s or range of line #s). - Issue the following Linux pipeline command:
sed -n '1 p' data.txt | tee sed-2.txt
You should see the first line of the text file displayed.
What other command is used to only display the first line in a file? - Issue the following Linux pipeline command:
sed -n '2,5 p' data.txt | tee sed-3.txt
What is displayed? How would you modify the sed command to display the line range 10 to 50?
The s instruction is used to substitute text
(a similar to method was demonstrated in the vi editor in tutorial 9). - Issue the following Linux pipeline command:
sed '2,5 s/TUTORIAL/LESSON/g' data.txt | tee sed-4.txt | more
What do you notice? View the original contents of lines 2 to 5 in the data.txt file
in another shell to confirm that the substitution occurred.
The q instruction terminates or quits the execution of the sed utility as soon as it is read in a particular line or matching pattern. - Issue the following Linux pipeline command:
sed '11 q' data.txt | tee sed-5.txt
What did you notice? How many lines were displayed
before the sed command exited?
You can use regular expressions to select lines that match a pattern. In fact,
the sed command was one of the first Linux commands that used regular expression.
The rules remain the same for using regular expressions as demonstrated in tutorial 9
except the regular expression must be contained within forward slashes
(eg. /regexp/ ). - Issue the following Linux pipeline command:
sed -n '/^The/ p' data.txt | tee sed-6.txt
What do you notice? - Issue the following Linux pipeline command:
sed -n '/d$/ p' data.txt | tee sed-7.txt
What do you notice?
The sed utility can also be used as a filter to manipulate text that
was generated from Linux commands. - Issue the following Linux pipeline command:
who | sed -n '/^[a-m]/ p' | tee sed-8.txt | more
What did you notice? - Issue the following Linux pipeline command:
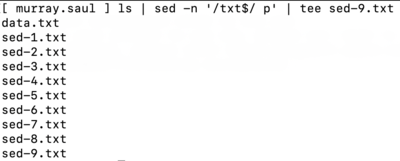
ls | sed -n '/txt$/ p' | tee sed-9.txt
What did you notice? - Issue the following to run a checking script:
~osl640/week11-check-1
If you encounter errors, make corrections and re-run the checking script
until you receive a congratulations message, then you can proceed.
- In the next investigation, you will learn how to manipulate text using the awk utility.
INVESTIGATION 2: USING THE AWK UTILITY
In this investigation, you will learn how to use the awk utility to manipulate text and generate reports.
Perform the Following Steps:
- Change to your home directory and issue a command to confirm
you are located in your home directory. - Issue a Linux command to create a directory called awk
- Issue a Linux command to change to the awk directory and confirm you are located in the awk directory.
Let's download a database file that contains information regarding classic cars. - Issue the following linux command (copy and paste to save time):
cp ~osl640/cars.txt . - Issue the cat command to quickly view the contents of the cars.txt file.
The "print" action (command) is the default action of awk to print
all selected lines that match a pattern.
This action (contained in braces) can provide more options
such as printing specific fields of selected lines (or records) from a database. - Issue the following linux command all to display all lines (i.e. records) in the cars.txt database that matches the pattern (or "make") called ford:
awk '/ford/ {print}' cars.txt
We will use pipeline commands to both display stdout to the screen and save to files for confirmation of running these pipeline commands when run a checking-script later in this investigation. - Issue the following linux pipeline command all to display records
in the cars.txt database that contain the pattern (i.e. make) ford:
awk '/ford/' cars.txt | tee awk-1.txt
What do you notice? You should notice ALL lines displayed without using search criteria.
You can use builtin variables with the print command for further processing.
We will discuss the following variables in this tutorial:
$0 - Current record (entire line)
$1 - First field in record
$n - nth field in record
NR - Record Number (order in database)
NF - Number of fields in current record
For a listing of more variables, please consult your course notes. - Issue the following linux pipeline command to display the model, year, quantity and price
in the cars.txt database for makes of chevy:
awk '/chevy/ {print $2,$3,$4,$5}' cars.txt | tee awk-2.txt
Notice that a space is the delimiter for the fields that appear as standard output.
The tilde character ~ is used to search for a pattern or display standard output for a particular field. - Issue the following linux pipeline command to display all plymouths (plym)
by model name, price and quantity:
awk '$1 ~ /plym/ {print $2,$3,$4,$5}' cars.txt | tee awk-3.txt
You can also use comparison operators to specify conditions for processing with matched patterns
when using the awk command. Since they are used WITHIN the awk expression,
they are not confused with redirection symbols
< Less than
<= Less than or equal
> Greater than
>= Greater than or equal
== Equal
!= Not equal - Issue the following linux pipeline command to display display the car make, model, quantity and price of all vehicles whose prices are less than $5,000:
awk '$5 < 5000 {print $1,$2,$4,$5}' cars.txt | tee awk-4.txt
What do you notice? - Issue the following linux pipeline command to display display car make,
model, quantity and price of vehicles whose prices are less than $5,000:
awk '$5 < 5000 {print $1,$2,$4,$5}' cars.txt | tee awk-5.txt - Issue the following linux pipeline command to display the car make,
year and quantity of cars that begin with the letter 'f':
awk '$1 ~ /^f/ {print $1,$2,$4}' cars.txt | tee awk-6.txt
Combined pattern searches can be made
by using compound operator symbols:
&& (and)
|| (or) - Issue the following linux pipeline command to list all fords
whose price is greater than $10,000:
awk '$1 ~ /ford/ && $5 > 10000 {print $0}' cars.txt | tee awk-7.txt - Issue the following linux command (copy and paste to save time):
cp ~osl640/tutorial11/cars2.txt . - Issue the cat command to quickly view the contents of the cars2.txt file.
- Issue the following linux pipeline command to display the year
and quantity of cars that begin with the letter 'f' for the cars2.txt database:
awk '$1 ~ /^f/ {print $2,$4}' cars2.txt | tee awk-8.txt
What did you notice?
The problem is that the cars2.txt database separates each field by a semi-colon (;) instead of TAB.
Therefore, it does not recognize the second and fourth fields.
You need to issue awk with the -F option to indicate that this file's fields are separated (delimited) by a semi-colorn. - Issue the following linux pipeline command to display the year
and quantity of cars that begin with the letter 'f' for the cars2.txt database:
awk -F";" '$1 ~ /^f/ {print $2,$4}' cars2.txt | tee awk-9.txt
What did you notice this time? - Issue the following to run a checking script:
~osl640/week11-check-2
If you encounter errors, make corrections and re-run the checking script until you
receive a congratulations message, then you can proceed.
- Complete the Review Questions sections to get additional practice.
= LINUX PRACTICE QUESTIONS =


