OPS235 Lab 1 - CentOS7 - HD2
Contents
LAB PREPARATION
Purpose of Lab 1
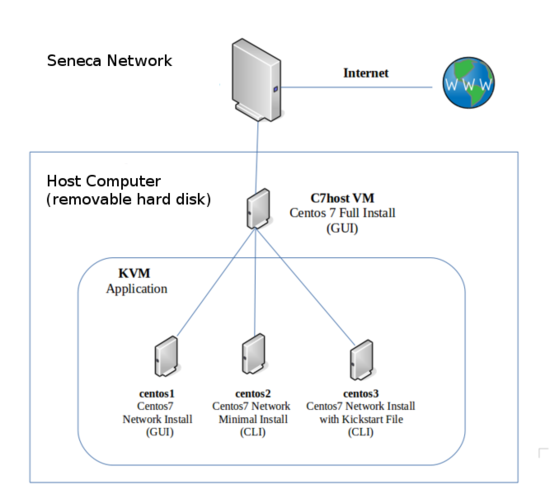
In order to save money and resources when learning to install, to manage, and to connect Linux machines to form networks, we will be using Virtual Machines for this course.
- lab1: Create a Centos7 Host machine (c7host) on your removable hard drive.
- Lab2: Install a Virtual package on your host machine called KVM which will be used to create 3 remaining Virtual Machines (VMs) that will be used to learn about Linux system administration for the remainder of this course.
It is ESSENTIAL to have a removable hard drive with a minimum storage capacity of 240 GB to perform your lab sessions and provide a host for your other Centos7 host and other VMs that you will create in lab2. Due to space requirements, you are NOT permitted to share this removable hard drive with any other course material than our OPS235 course.
Main Objectives
- Correctly install the CentOS 7 FULL INSTALL DVD (c7host) on your removable hard drive.
- Note common Linux commands and record them in your lab1 logbook.
- Use Shell scripts to generate a post-install report for your Centos7 host VM.
- Disable Linux Kernel security enhancements to allow easier internal networking connections (to be reactivated in a later lab).
| Minimum Required Materials |
Linux Command Reference | ||||
| Package Management
rpm |
Miscellaneous | Matrix on-line tutorials
| |||
INVESTIGATION 1: CREATE AND INSTALL HOST MACHINE (c7host)
In this lab, you will learn how to install your Centos Full Install DVD as a host machine. Make certain to record your observations in your lab1 logbook.
Part 1: Using KVM to Create a New Virtual Machine (VM)
c7host Machine Details:
- Name: c7host
- Boot media / Installation: CentOS7 Full Install DVD
- Download at Seneca College: CentOS 7 Full Install DVD (image file): http://belmont.senecacollege.ca/pub/centos/7/isos/x86_64/CentOS-7-x86_64-DVD-1611.iso
- Download outside Seneca College: http://mirror.csclub.uwaterloo.ca/centos/7/isos/x86_64/CentOS-7-x86_64-Everything-1611.iso
- Disk space: 240GB
- CPUs: 1
Perform the following steps:
- Although the images may be a little out of date (i.e. not exact), you can refer to this listing of installation screenshots for general reference:
[installation screen-shots ] - Insert your removable SATA hard disk into the drive tray.
- Set your computer's drive selector switch to external (a.k.a position #4).
- Power up the computer and insert the CentOS 7 Installation DVD into the DVD drive, then power-off computer.
- Power on the computer again, press the F9 key a few times upon boot, and select SATA5 near the bottom on the menu to boot from your DVD. After booting from the DVD, select from the installation menu: Install Centos7.
Note: If you experience unreadable display after you boot into your installed system, you can redo the install, but select from the install menu: Troubleshooting and then select Install in Basic Graphics Mode. - Next, you will be prompted for a language. In the first screen, select language English with subselection English-Canada and then click the Continue button on the bottom right-hand screen.
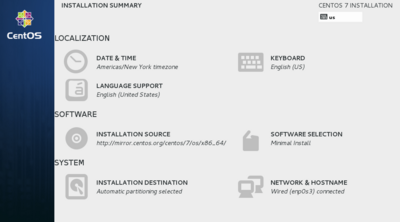
- The Install Summary should now appear. This screen allows the installer to customize their Centos7 system prior to installation.
- Configure the following installation settings from the Install Summary Screen:
DATE & TIME:- Click on the Map to select Toronto area (you may also select from the drop-down menu section)
- Click the DONE button at the top-left corner to finish and return to the Installation Summary screen.
NETWORK & HOSTNAME:- Select the default Ethernet connection and click the button on the top right-hand side to change the setting from OFF to ON.
- At the bottom left-hand corner type the hostname: c7host (all lowercase letters)
- Review your settings, then click the DONE button at the top-left corner to finish and return to the Installation Summary screen.
SOFTWARE SELECTION:- Select the software packages labelled: Gnome Desktop
- Click the DONE button at the top-left corner to finish and return to the Installation Summary screen.
- Although the Centos installtion program can provide suggestions on how to partition your hard disk, you will be customizing partitions for your hard disk. This custom partitioning is important since it will have consequences on future labs that you perform (especially for lab2).
Proceed to Part 2 to customize your partitions.
Part 2: Creating Partitions
The next step is to perform a custom installation for your Centos7 virtual machine using the Centos7 Full DVD. Upon creation of your c7host virtual machine, The VMware Workstation application will automatically simulate a "boot" to allow you to complete the installation process to create the Centos7 operating system on that virtual machine.
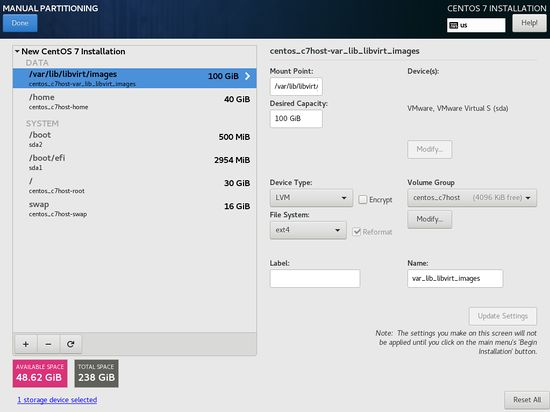 Carefully verify partition mount-names and sizes prior to proceeding with install. Check installation screenshots link for verification. |
- Perform the Following Steps:
- From the installation summary screen, click Installation Destination.
- In the installation destination screen, select the destination option: I will configure partitioning and then click Done.
- The manual partitioning screen should appear.
- If you have used your hard disk for previous Linux (Centos) distributions, you should remove them. Click on the distribution, and for each partition, select the partition and click the remove button (minus sign) and confirm deletion.
- Remember that the sizes are recorded in MB (eg. 30 GB = 30000 MB) and you should multiply GB by a factor of 1024 to get the correct size. (eg. 30 GB x 1024 = 30720 MB)
- Remember that the sizes are recorded in MB (eg. 30 GB = 30000 MB) and you should multiply GB by a factor of 1024 to get the correct size. (eg. 30 GB x 1024 = 30720 MB)
- We will now create some mount points under the root (/) partition. Click on the add button (plus) sign.
- In the Add a New Mount Point, click the drop-down button and select /boot/efi (or /boot if /boot/efi is not present) for the mount point and type 2954 as the desired capacity, and then click Add mount point.
- When you return to the main screen, make certain that this mount point is a Standard Partition and not LVM.
- Add another mount point, but in the Add a New Mount Point screen, select / as the mount-point (either by typing or selecting from drop-down menu), and enter 30720 in for partition size and click Add Mount Point button.
- You will return to the previous dialog box.
For the / partition, change the file-system type from xfs to ext4 and make certain that the Device Type is set to LVM. - Repeat the same steps above for the /home partition (calculate the equivalent size for 40GB (ext4 file-system type and LVM as device type).
- Add a mount point /var/lib/libvirt/images (type yourself, check spelling!) for size 100GB (file-system type ext 4 and device type LVM).
- Recheck each of the created partitions, and make certain that the file-system type is set to ext4 and the Device Type should be LVM.
- Finally, add a swap partition (Mount Point: swap) for 16 GB.
- Check that your partition settings are correct (you can ask your instructor or lab monitor to confirm), and then click Done (possibly twice) in order to proceed
- A Summary of Changes screen will appear to show the partitioning operations that will be created. Click the Accept Changes and click Begin Installation in the Installation Summary screen to proceed with the installation.
Part 3: Completing the Installation
- Perform the Following Steps:
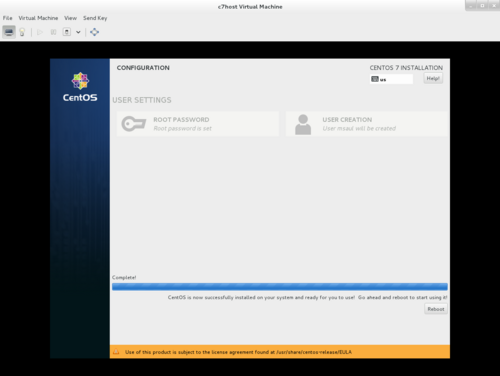
- During the installation process, you will required to create a root password (for administration access) and create a regular user account. Click on Root Password and enter your root password. Think of an appropriate password and record that password somewhere in case you forget! An indicator will appear to show you how secure your password is. Retype your root password and click Done (you may have to click Done twice if your password is not considered to be a strong password).
- You need to create a regular user account. This account will be used to graphical log into your host machine. It is never recommended to graphically log into a graphical Linux/Unix system as root. It is better to log into a regular user account, then run a command to login as root (you will learn how to do this later in this lab).
- Click User Creation and enter your full name, username, and an appropriate password (and confirm password). Click Done to finish (click twice if password is not considered to be a strong password).
- When installation is complete, you will notice a message at the bottom of the screen stating: CentOS is now successfully installed and ready for you to use!
- Click the Reboot button. Your DVD will briefly open in the DVD drive bay. Make certain to remove this installation DVD so that Centos will boot from your hard drive.
- After the system reboots, a boot menu should briefly appear, then prompt the user to accept the License Information (this is only a one-time occurrence).
In order to accept the license agreement, Click on License Not Accepted and graphically accept the license and then click FINISH CONFIGURATION to finish the installation process.
NOTE: If you have an older version of Centos7, you must perform the alternative steps:
Issue the following keystrokes:
1 followed by ENTER (to select the license agreement prompt
2 followed by ENTER (to accept the license agreement)
c followed by ENTER (to save the selection)
c followed by ENTER (a second time to continue booting into the system) - The system should then graphically prompt the user to login with their regular user account. Click on your regular user account name and enter your regular user password.
- The last phase of the installation process should now run:
- Confirm English as the default input source and click Next.
- Skip the creation of online accounts by clicking Next.
- Start using your installed Linux system by clicking Start Using CentOS Linux.
- Open a web-browser and check to see if you can connect to the Internet. It is essential that your Host machine can connect to the Internet in order to download checking scripts, installing software and performing software updates.
