Otts documentation
Contents
[hide]INTRODUCTION
Synopsis
oTTs, On-Time Timesheets, is an online system that allows Professors and Students to work collaboratively on System Design Projects. Seneca College's Computer Studies Department emphasizes strong team building skills, and achieves this through team projects. In the past, student and team progress have been monitored and maintained using conventional word processing documents. These conventional methods have proven to be difficult to synchronize between group members, and tended to lack substantial effort from those who were required to use them. oTTs creates an online environment where professors and students can work together to create and maintain personal timesheets and group project files. By allowing easy maintenance of projects and students for the professor, and simple manipulation functionality of timesheets and project files for students, oTTs takes the large task of project maintenance, and makes it simple for all those involved.
Disclaimers
This project site and wikipedia are a student project only. Any opinions, statements or claims expressed here are those of the creators and are not necessarily those of Seneca College. Seneca College's Information Technology Acceptable Use Policy (ITAUP) can be found here.
Credits
oTTs was created for Seneca College's Bachelor of Software Development degree program for the courses BTS530 & BTS630 - Major Project Implementation. The developers for this project were:
- Sara Minchella - sminchel at learn dot senecac dot on dot ca
- Cesar Oliveria - cdolivei at learn dot senecac dot on dot ca
With active stakeholder,
- Barb Czegel - barb dot czegel at senecac dot on dot ca
The programming languages used in this project are:
- ASP.NET & Visual Basic.NET
- AJAX
- JavaScript
INSTALLATION
System Requirements
In order to host oTTs, the system requirements are as follows:
- Internet Information Service (IIS)
- Web server such as warp.senecac.on.ca or hermes.senecac.on.ca
- Microsoft SQL Server
- ASP
- Compatible Browser (see Section 2.2 Browser Compatibility)
Browser Compatibility
oTTs strives to achieve a uniform appearance across all browsers and has been tested extensively on Firefox 2.0 and Internet Explorer 7. Either browser must have Javascript enabled for full and proper functionality to work.
For the best performance, it is suggested that FireFox 2.0 is used, and the system be viewed in full screen mode under a monitor resolution of 1024x768.
Getting Started
Before you Begin
Make sure you have installed and met all system requirements listed in Section 2.1 System Requirements. This document will describe how to install oTTs assuming these requirements have been met.
Database Step Up
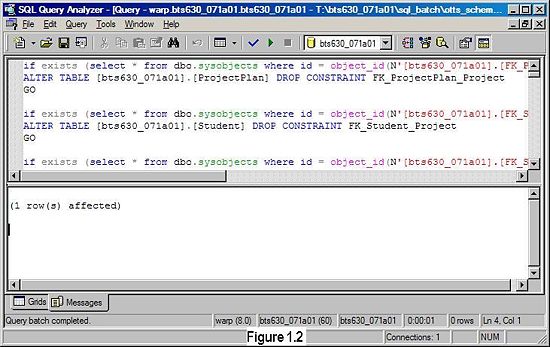
- Open SQL Query Analyzer, and connect to the warp server (http://warp.senecac.on.ca), using SQL Authentication.
- Enter your user ID and password, and click Connect
- Once you are authenticated, select File -> Open and navigate to the location where the script, otts_schema.sql is located.
- Validate the script by pressing CTRL + F5
- Once the validation is complete, run the script by pressing F5. The query should read 1 row(s) affected. The database is now setup.
Note: By default after the script has been executed, there will be a master administrator login in the database. It is recommended to use this login in order to create the initial administrator login before using the system. It is also highly recommended that the master administrator login be deleted upon initial login. Since the master administrator login does not have a valid email, simply changing the password is not recommended.
Master Administrator Login Information
User ID: master_admin
Password: master_admin
System Deployment
- Using Visual Studio 2005, open the Web Site Project, oTTs.
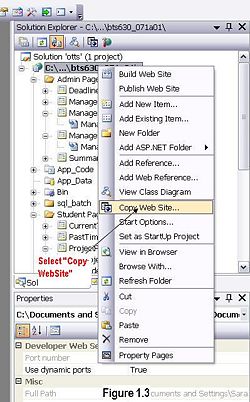
- In the Solutions Explorer, right click the Project's name, and select "Copy Web Site"
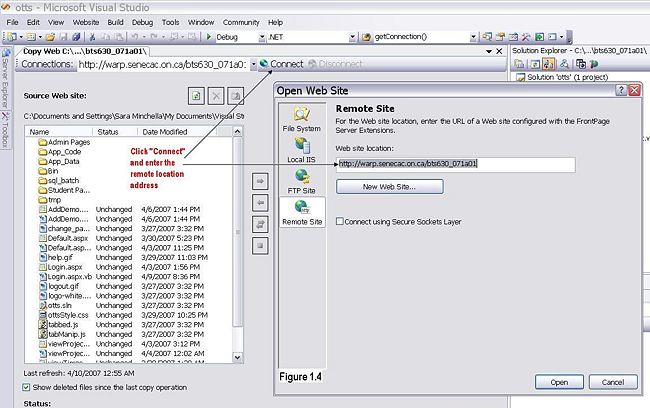
- Connect to the Remote Web Site, http://warp.senecac.on.ca/bts630_071a01
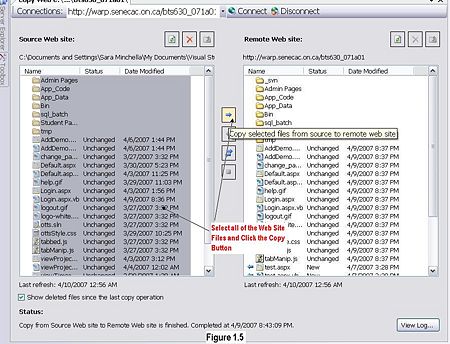
- Select all of the files from the Local Web Site, and copy them to the Remote Web Site.
- Check that the web site is running successfully, http://warp.senecac.on.ca/bts630_071a01
FUNCTIONALITY
Logging In
There are two types of accepted users that may log into oTTs; students and administrators. The two login types are distinguished by their e-mail addresses. Students have an email address with the domain of "learn.senecac.on.ca" and professors have an email address with the domain of "senecac.on.ca". The user ID for both login types are their respective email prefix. For example a user with the email address of johndoe@learn.senecac.on.ca, will have a user ID of johndoe. Each user's initial password will be e-mailed to them upon creation of their account by the system and this default password may be changed at any time by using the "Change Password" function (see Section 3.1.2 Change Password Function for details).
Forgotten Passwords
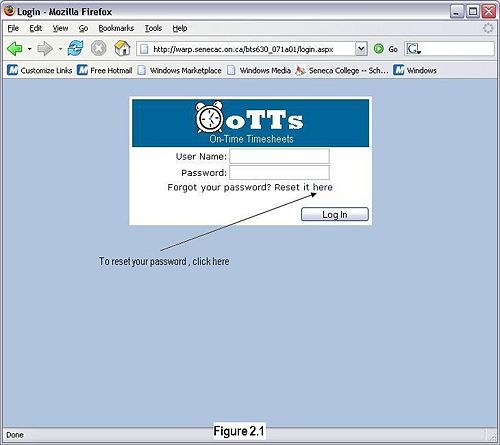
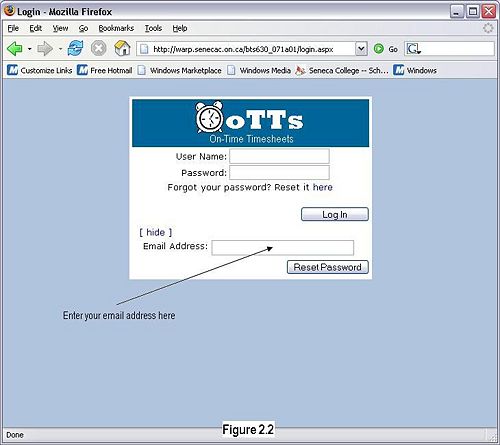
At the main login screen, users will be authenticated and directed to their appropriate screen. If a user has forgotten their password, it may be retrieved by clicking on the Reset Password Link located above the login button (see Figure 2.1). The user must enter an email address that either has the domain of senecac.on.ca for a administrator, or a domain of learn.senecac.on.ca for a student. The user must enter a valid email address associated with their account in order to have their password reset and emailed to them by the system. For reference, see Figure 2.2.
Change Password Function
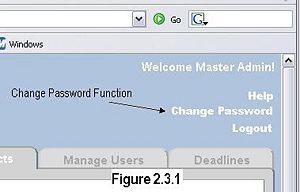
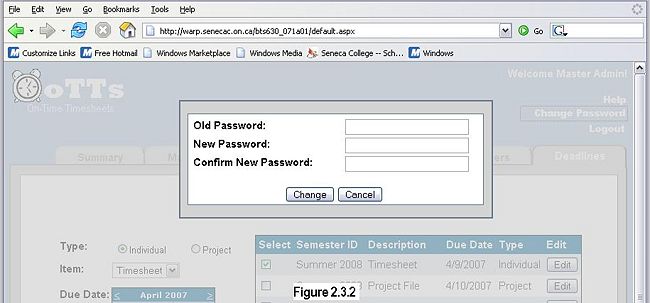
Passwords may be changed at any time by clicking on the Change Password button on the default screen for either login type, see Figure 2.3.1. A floating pop-up box will be displayed, and the screen below will be disabled. You may change your password, or cancel the action without any changes occurring. When changing a password you must enter your old password, enter your new password and then confirm it. Once all the fields have been validated, and you've clicked the "Change" button, your new password will be emailed to you by the system. The Change Password box will then disappear and the screen below will become reactivated. For reference, see Figure 2.3.2.Note: The Change Password popup box is draggable, you may move it around the screen to any location that you wish.
Valid Passwords
Passwords must be at least one character in length, and are case sensitive. A password may contain numbers, letters, and most special characters with the exception of single quotation marks.
Administrator
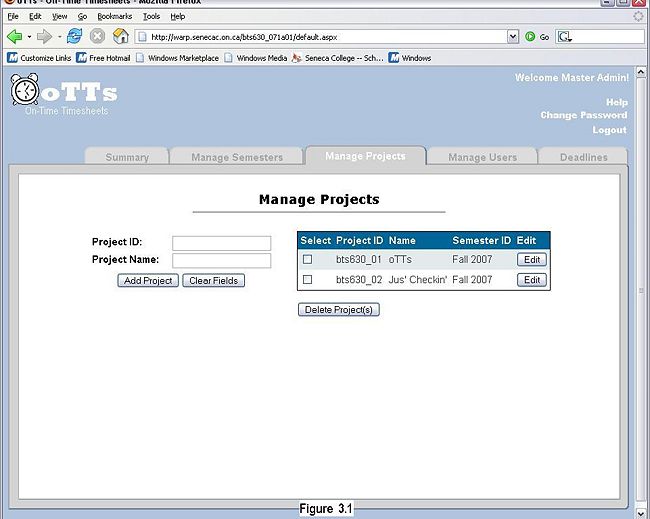
The role of the Administrator user is to create and maintain all users and their associated projects, as well as semester start/end dates, and project/individual deadlines. When an administrator logs in, the default tabs are Summary, Manage Semester, Manage Project, Manage Users, and Deadlines, all of which are described in the following sections. The layout is shown in Figure 3.1.
Manage Projects
Every student account must be associated with a project, in order to do so, a project must be created before adding a student account.
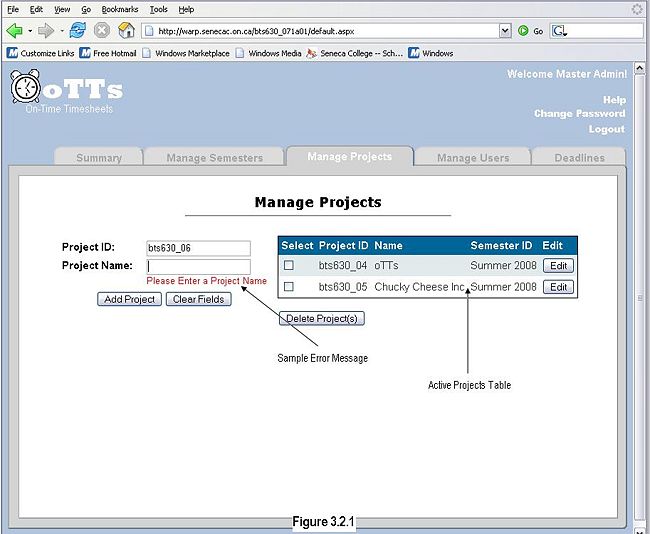
Adding a Project
When adding a project, you must enter a unique project ID, and a name for the project. Once all fields have been validated, you may then click the "Add Project" button. When a project is added it is marked active, and associated with the current semester. Only active projects are displayed in the project table. For reference, see Figure 3.2.1.Editing a Project's Details
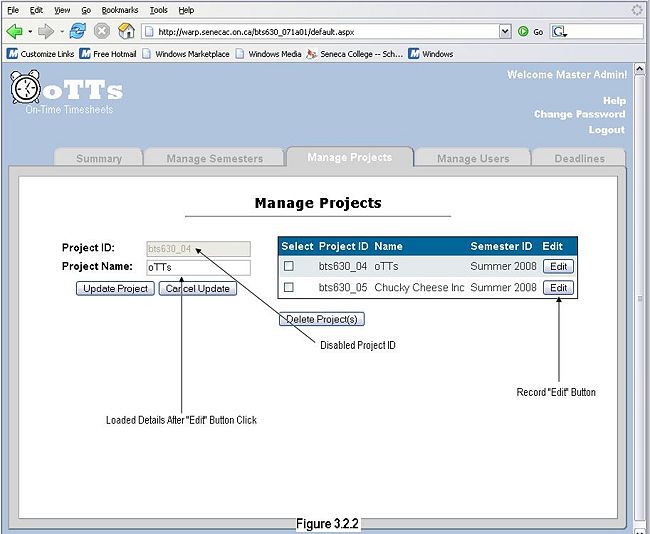
To edit a project's details, press the "Edit" button located to the far right of the project's record. This will load the project's details into the form to the left. The project ID will be disabled; however you will be able to edit the project's name. To change a project's ID, you must delete the entire project (see Section 3.2.1.3 Deleting a Project), and then re-add (see Section 3.2.1.1 Adding a Project) it. For reference, see Figure 3.2.2.Deleting a Project
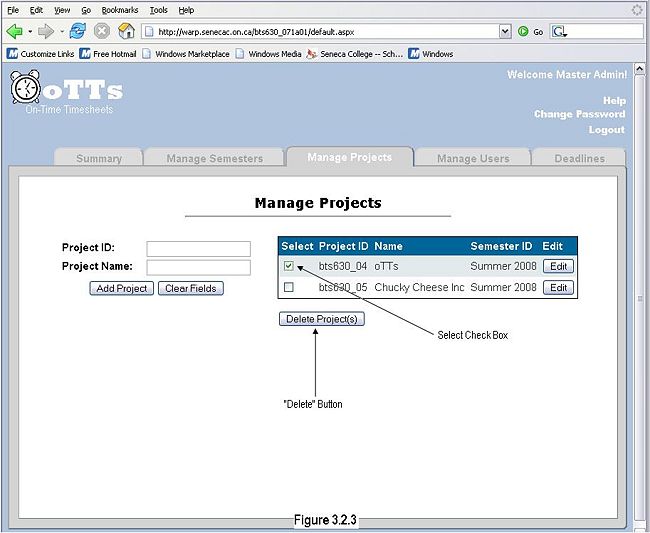
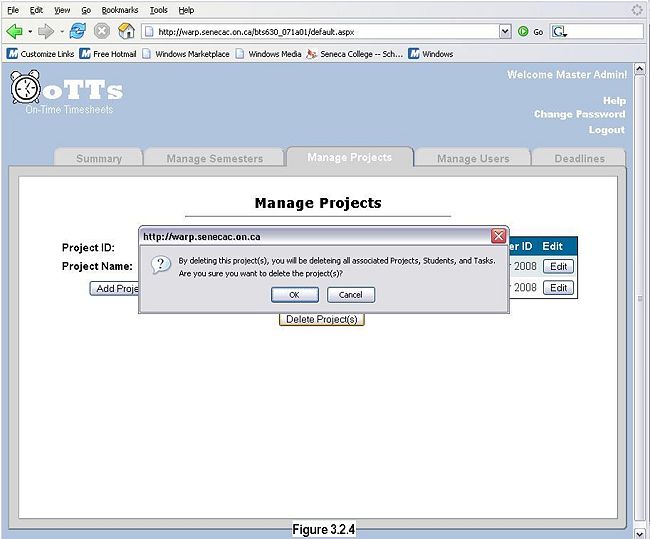
To delete a project, select the check box to the left of the record in the table. You may select more than one project at a time. Once you have selected all of the projects you wish to delete, click the "Delete Project(s)" button. You will be prompted with a confirmation box, if you wish to continue, please click "Ok", if you do not want to continue with the delete, please click "Cancel". When a project is deleted, all associated users, timesheets, and tasks are deleted as well. For reference, see Figure 3.2.3 and 3.2.4.Manage Users
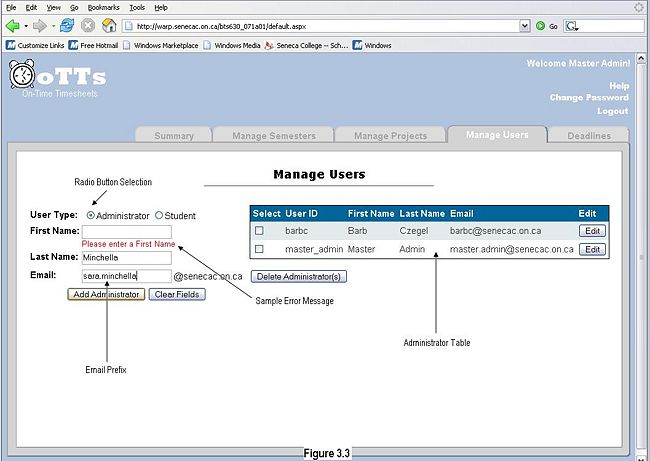
An administrator can add or edit two types of users; other administrators or students. The type of user being added or edited is determined by which radio button is selected. This radio button also determines which user table is displayed to the right. Each user is identified by a user ID, this user ID is automatically assigned by using the prefix of the user's email address. A valid email address must be entered, the prefix can only contain letters (a-z,A-Z), number (0-9), and special characters of (- _ or .), they must also be longer than one character. Administration email addresses are automatically assigned the domain of "senecac.on.ca", and student email addresses are automatically assigned the domain of "learn.senecac.on.ca". Once all of the corresponding fields have been entered and validated, the user is emailed an auto-generated password, this password should be changed as soon as possible using the Change Password function (see Section 3.1.2 Change Password Function). A description of how to add or edit each type of user is listed below.
Adding an Administrator User
To add an administrator, make sure the "Administrator" radio button is selected. You must enter a first and last name of the administrator, each may only be a maximum of fifty characters. An email address prefix must also be entered. Currently on the Seneca College Web Mail, a valid professor email address should be formatted as "first_name.last_name". The email prefix may only be thirty-six characters long. Once all of the required fields have been entered, click the "Add Administrator" button, and the new administrator will be shown in the table to the right. If there are any validation errors, they will be shown below each of the fields. For reference, see Figure 3.3
Adding a Student User
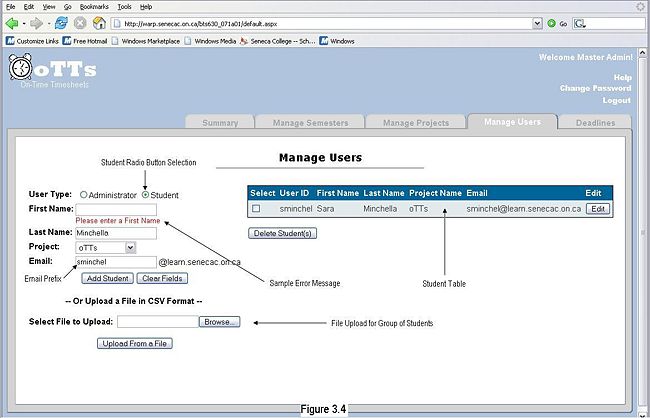
To add a student, make sure the "Student" radio button is selected. You must enter a first and last name of the student; each may only be a maximum of fifty characters. An email address prefix must also be entered; the email prefix may only be twenty characters long. Each student must also be associated with a project. To do this, select a project name from the Project Name drop down list (the project ID is associated within this drop down list). Once all of the required fields have been entered, click the "Add Student" button, and the new student will be shown in the table to the right. If there are any validation errors, they will be shown below each of the fields.
A group of students may be entered at one time by uploading a Comma Separated Value (CSV) File in the file upload section (see Figure 3.4).
The format of the file should be as follows: Last_Name, First_Name, Student_ID, Project_ID, making sure that each field is separated by a comma.
An example of a record in this file would look like the following:
Doe, John, JDoe, bts630_071g01
For reference, see Figure 3.4
Editing a User's Details
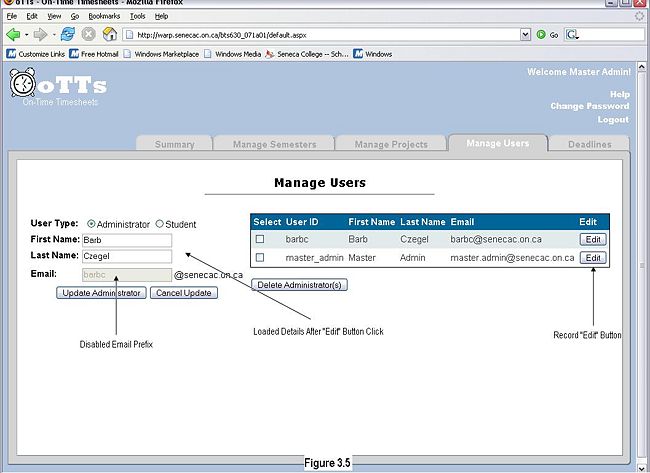
To edit a user's details, press the "Edit" button located to the far right of the user's record. This will load the user's details into the form to the left. The email prefix will be disabled, and you will only be able to edit the enabled fields (first name and last name for an administrator, and first name, last name, and project ID/project name for a student). Once you have edited the details, you can submit the changes by clicking the "Update <User Type>" button.Note: If you would like to change the user's email address, you will have to delete the user, and re-add them. (For deleting instructions please see Section 3.2.2.4 Deleting a User, and for adding instructions please see Section 3.2.2.1 Adding an Administrator or Section 3.2.2.2 Adding a Student). For reference, see Figure 3.5.
Deleting a User
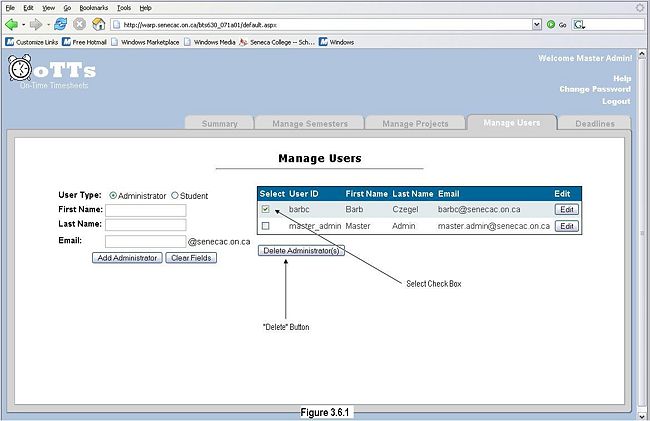
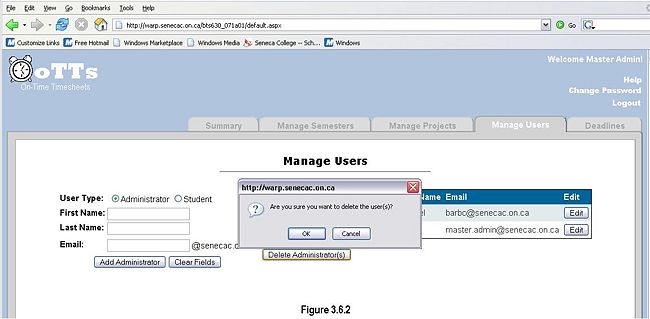
To delete a user, select the check box to the left of their record in the table. You may select more than one user at a time. Once you have selected all of the users you wish to delete, click the "Delete <User Type>" button. You will be prompted with a confirmation box, if you wish to continue, please click "Ok", if you do not want to continue with the delete, please click "Cancel". For reference, see Figure 3.6.1 and 3.6.2.Note: If you are deleting a student, you will also be deleting all associated timesheets and tasks for this student.
Deadlines
The administrator can create two types of deadlines: individual work deadlines for students and project work deadlines that are to be completed by all project members.
Adding a Deadline
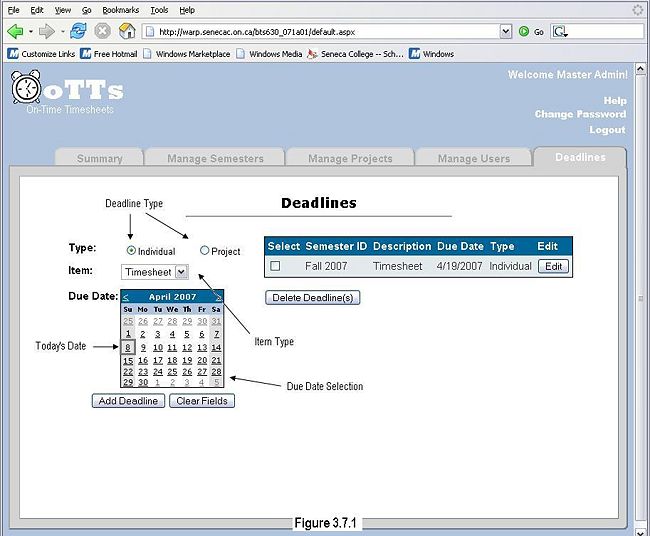
To select a certain type of deadline, select the appropriate radio button, "Individual" or "Project". For an "Individual" deadline, you may select a "Timesheet" or "Other". For a "Project" deadline, you may select a "Project File" or "Other", for reference see Figure 3.7.1.
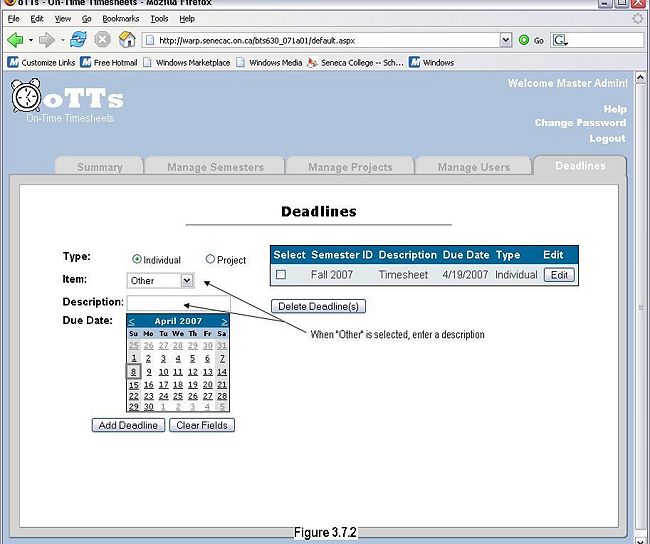
When selecting "Other" for either deadline type, a textbox will appear where you must enter a description for that item. For reference see Figure 3.7.2. Once you have selected your deadline type and item name/description, you must select a due date that falls within the dates of the current semester; the current date is highlighted with a border in light grey. After all fields have been validated, you may click the "Add Deadline" button.
Editing a Deadline
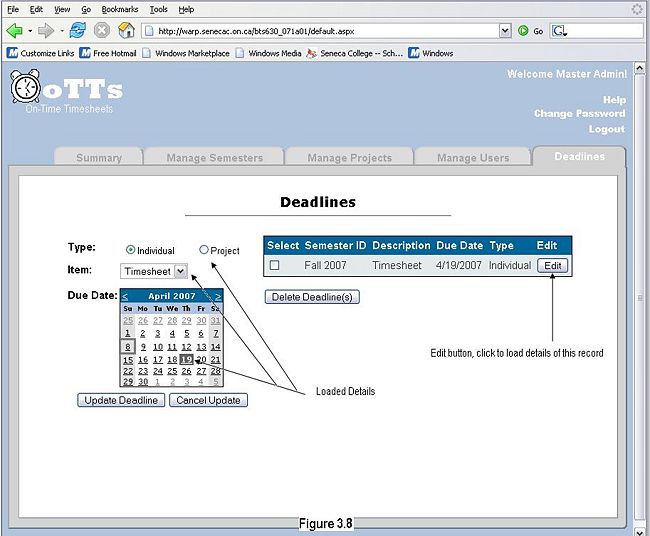
To edit a deadline's details, press the "Edit" button located to the far right of the user's record. This will load the deadline's details into the form to the left. The current due date will be highlighted with a dark grey background. You may make changes and then click the "Update Deadline" button. For reference, see Figure 3.8.Deleting a Deadline
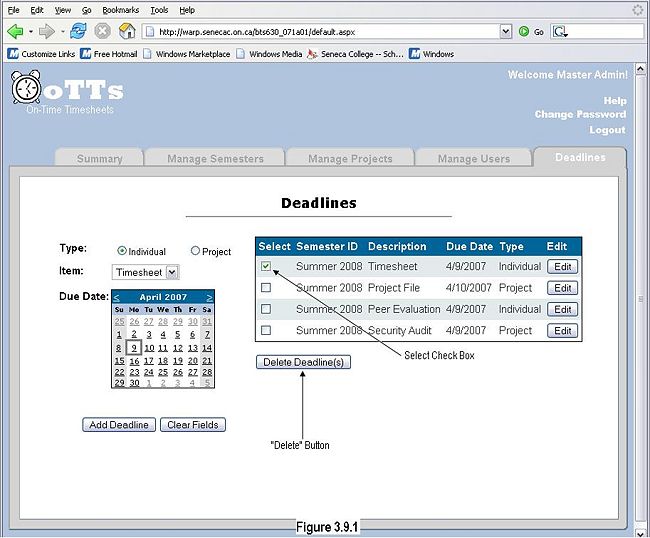
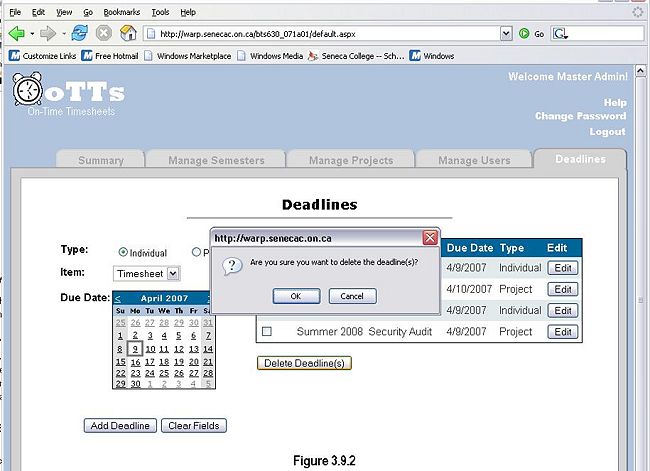
To delete a deadline, select the check box to the left of the record in the table. You may select more than one deadline at a time. Once you have selected all of the deadlines you wish to delete, click the "Delete Deadline" button. You will be prompted with a confirmation box, if you wish to continue, please click "Ok", if you do not want to continue with the delete, please click "Cancel". For reference, see Figure 3.9.1 and 3.9.2.Manage Semester
There must be an active semester, before any other functions can be used. A student may not login if there is no active semester. Administrators are forced to add, or extend a semester if there is no active one. Once a semester has been added, it may not be deleted, only extended. The only time a semester's start date may be edited is when there are no projects (and therefore no students) associated with the semester ID. To edit the semester's start date, make sure to delete all projects associated with the semester (see Section 3.2.1.3 Deleting a Project, and then edit the semester's start date.
Adding a Semester
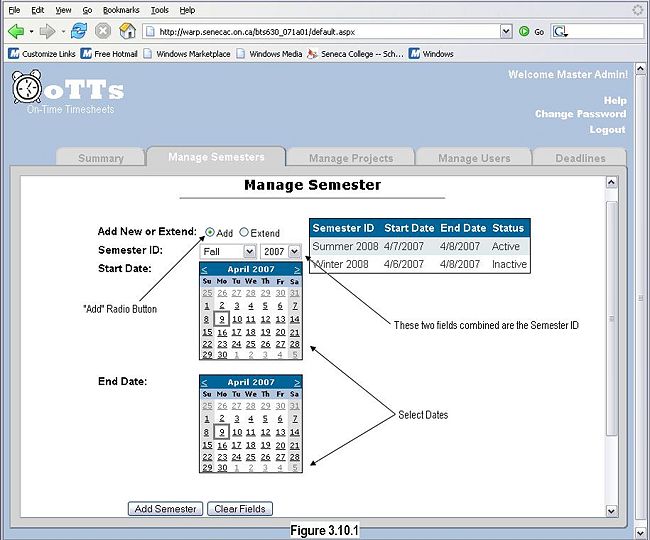
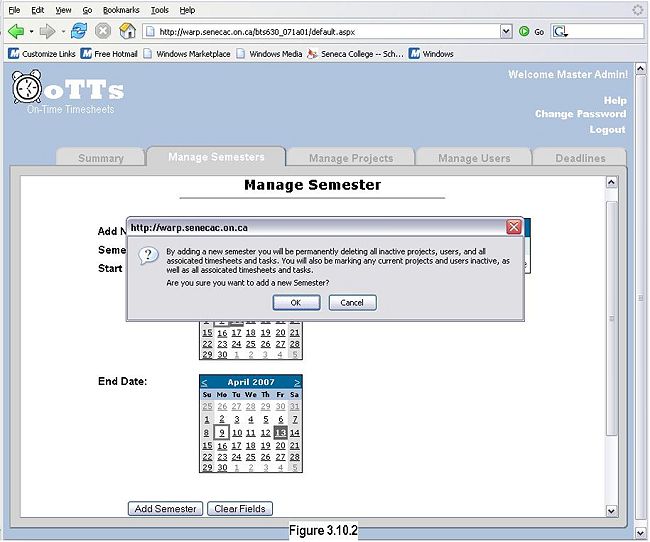
Adding a semester is only permitted if a semester has ended, or there is no active semester. To add a semester, make sure that the "Add" radio button is selected. You may then select a semester ID from the drop down lists, which is unique and does not exist already. You may then select a start date for the semester. The start date must be after the end date of the previous semester (if any), but not later the the selected end date for the newly added semester. You may also select an end date for the semester, which must be later than the start date. Neither dates may be left blank. Once all fields have been validated, you may click the "Add Semester" button. For reference, see Figure 3.10.1.When the "Add" button is click a confirmation box will appear notifying you of the new addition, see Figure 3.10.2.Note: When adding a new semester, the previous semester will be marked as "Inactive", and the old "Inactive" semester will be permanently deleted, and in turn will delete all associated projects, users, timesheets, tasks and deadlines.
Extending a Semester
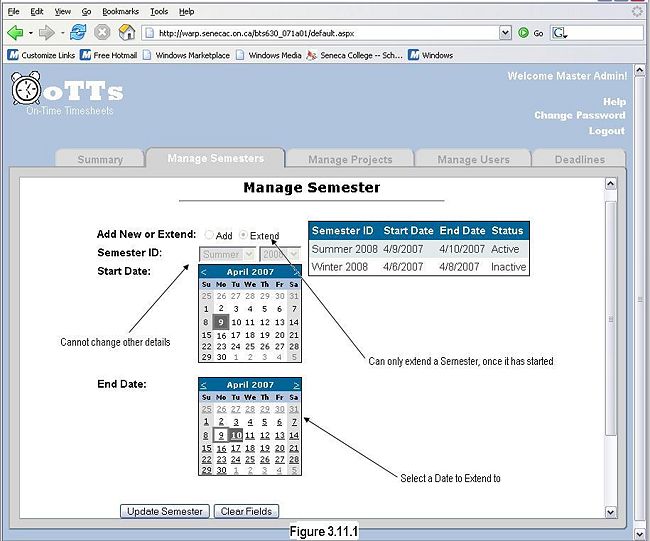
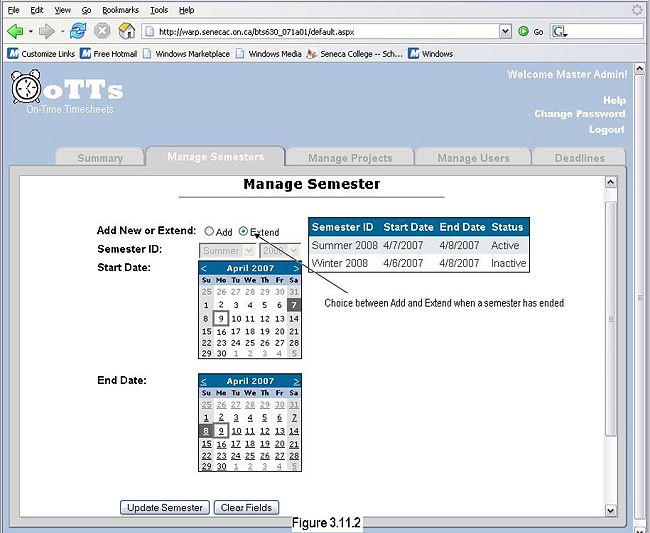
Extending a semester is permitted if there currently is an active semester, or the current semester has ended. A semester's end date may be extended at any time, or when the previous semester has ended. You may extend the semester by choosing an end date that is later than the current semester end date. Once the end date has been validated you may click the "Update Semester" button. To extend a current semester before it ends, see Figure 3.11.1, to extend a semester that has ended, see Figure 3.11.2. The currently select dates are highlighted in dark grey.Summary
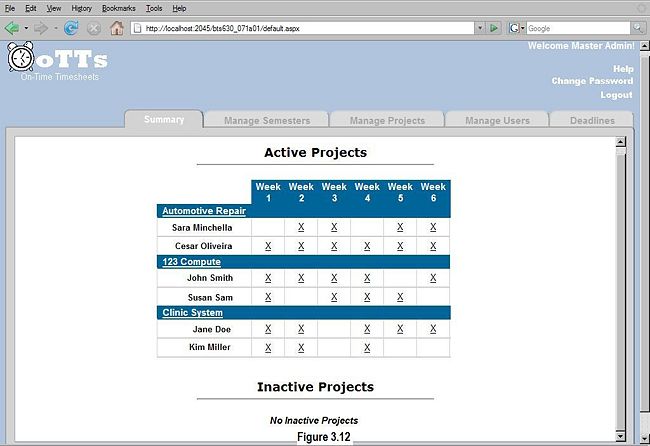
An administrator can view a table that summarizes all projects with their project files, and project members with their timesheets. A description of each view is described below in the following sections: View Timesheet and View Project File. A sample layout of the summary screen is shown in Figure 3.12.View Timesheet
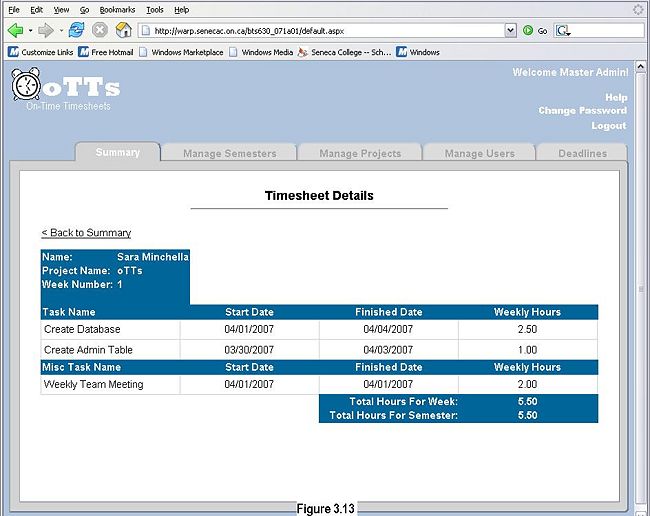
An administrator can view a student timesheet by clicking on the "X" for a selected week. If there is no "X" for a certain week, the student has not submitted a timesheet. If a student has been added after the start of a semester, and has missed some weeks, there will be no entry for those weeks, and it will appear that they have not submitted a timesheet for the missed weeks. For clarification, when the mouse is hovered over a student's week cell, a tooltip is displayed describing its contents. When a timesheet is selected to be viewed, the student's details are shown in the upper left hand corner, their full name, project ID and project name, and the week number for the timesheet. The timesheet lists all tasks that the student had worked on, when it was started and finished and how many hours were spent that week on the task. The timesheet also displays in the bottom right hand corner, the total hours spent that week on the project, as well as the total hours they have spent on the project over the semester. For reference, see Figure 3.13.View Project File
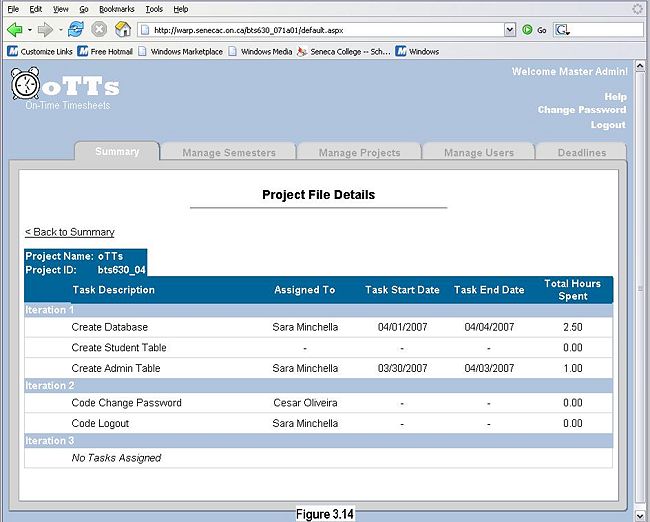
An administrator can view a project's project file by clicking on the project's name in the summary table. When a name is clicked, the project file will be displayed with the project details (name and ID) in the upper left hand corner. The project file contains all tasks for the project grouped in summary tasks. Each task is displayed along with the student assigned to it, date the task was started and finished, and how many hours in total over the semester the task was worked on. For reference, see Figure 3.14.Student
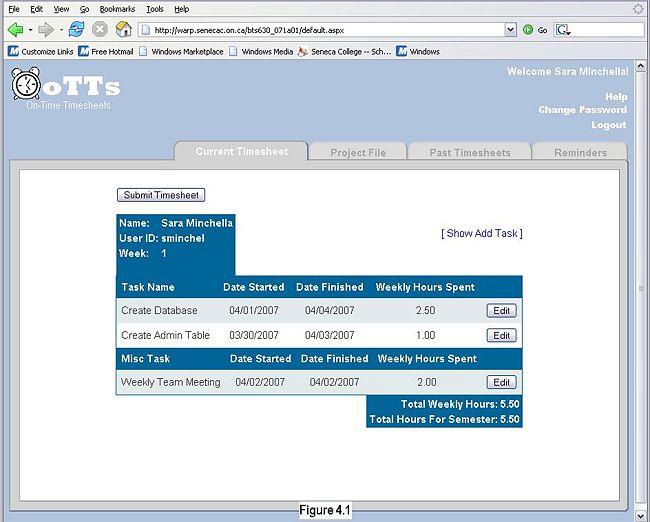
The role of the Student user is to maintain their group's project file, and their personal timesheets for the semester. When a student logs in, the default tabs are Current Timesheet, Project File, Past Timesheets, and Reminders, all of which are described in the following sections. The layout is shown in Figure 4.1.Current Timesheet
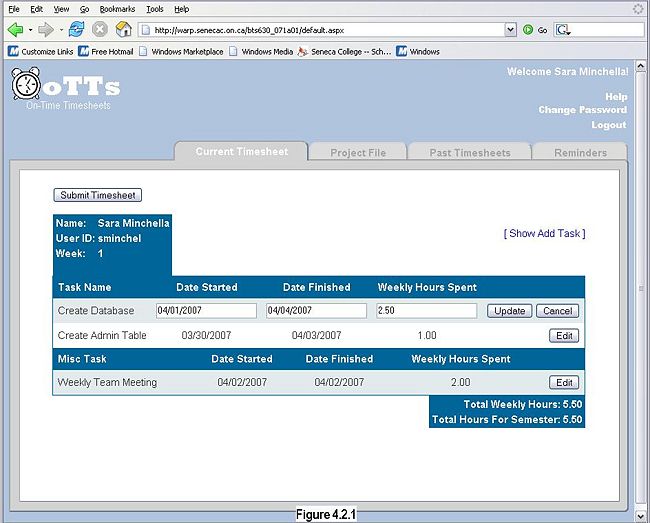
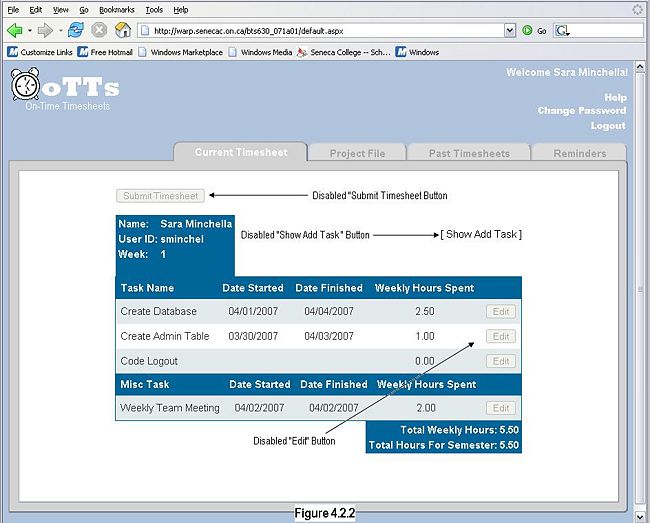
A student may maintain their current timesheet by adding tasks and miscellaneous tasks, editing the start and end dates, and the hours for the current week they have spent on them. Adding and editing task and miscellaneous tasks are described in the following sections Adding a Task, Adding a Miscellaneous Task, Editing a Task, and Editing a Miscellaneous Task. A timesheet is created automatically at the start of every new week. All unfinished tasks from the week before will be carried over into the new timesheet. A timesheet may be submitted manually before the due date by clicking the "Submit Timesheet" button. This will mark the timesheet as submitted, will record the submitted date, and all unfinished tasks will be carried over to the new week. If a timesheet is submitted before the due date, the timesheet cannot be edited further until a new week begins and a new timesheet is created. If a timesheet is not submitted before the due date, after the due date the timesheet will be automatically submitted (however marked as late), and all unfinished tasks will be carried over into the new timesheet for the current week. To see an example of an editable timesheet, see Figure 4.2.1, for a timesheet that cannot be edited, see Figure 4.2.2.Note: Only Assigned Task's will be carried over to the new timesheet, miscellaneous tasks will not.
Adding a Task
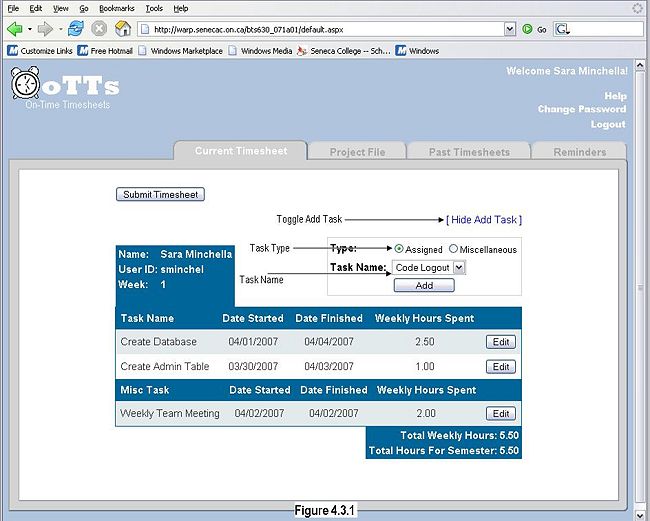
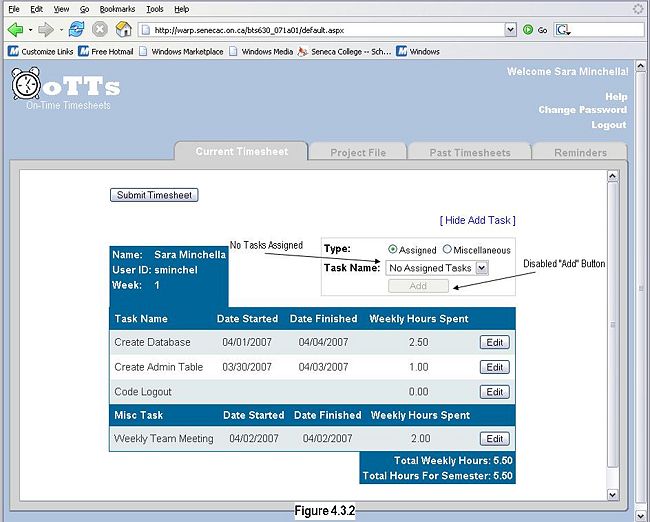
To add a task to your timesheet, click the "Show Add Task" link. A small window will appear above the timesheet. You should select the task type "Assigned", this will show all assigned tasks to you in the drop down list. To add one of these tasks to your timesheet, select it and click the "Add" button. If there are no tasks assigned to you, the drop down list will display "No Assigned Tasks" and the "Add" button will be disabled. For reference, see Figure 4.3.1 and 4.3.2.Adding a Miscellaneous Task
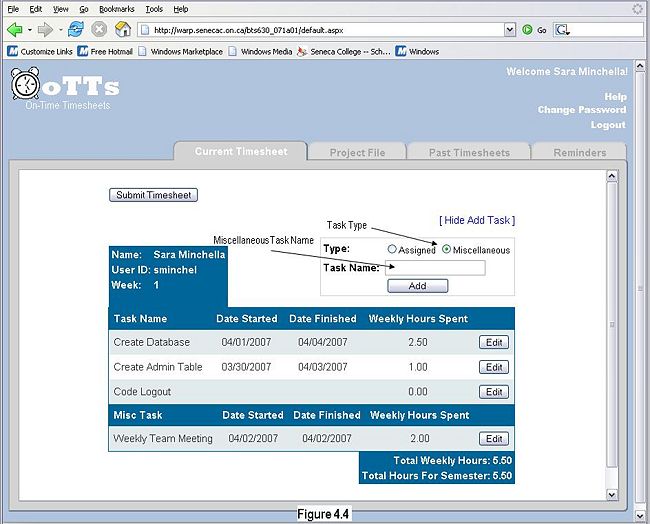
To add a miscellaneous task to your timesheet, click the "Show Add Task" link. A small window will appear above the timesheet. You should select the task type "Miscellaneous", this will show a text box where you can enter a description of the miscellaneous task. Once you have entered a description, you can add the miscellaneous task to your timesheet by clicking the "Add" button. For reference, see Figure 4.4.Editing a Task
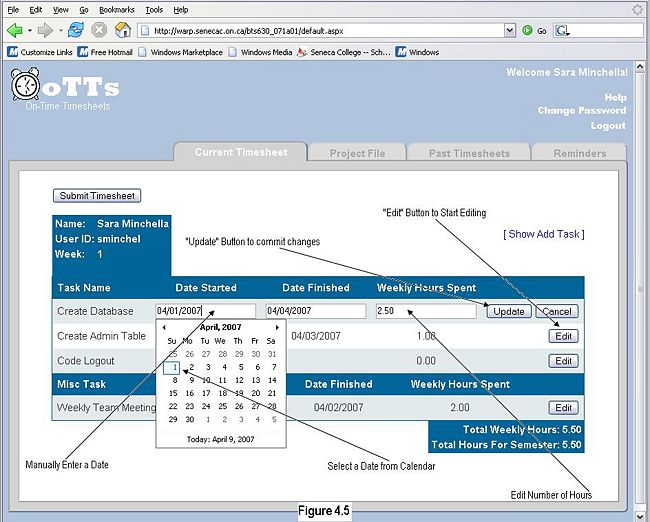
To edit a task, click the "Edit" button to the right of the task record on the timesheet. The row will become editable, text boxes will appear for the editable fields, start and finish date, and the weekly hours spent. To edit either the start or finished date, you may manually type the date into the field in the format of mm/dd/yyyy or you may select the date from the drop down calendar. To edit the weekly hours spent, you may enter the hours spent using numbers, using decimal places if needed. Decimal places must be calculated in the hundreds, to do this you can divide the time you spent in minutes divided by sixty, for example 125/60 = 2.08. If a task has been started, the weekly hours spent can not be equal to zero. If a task is edited with a finished date but no start date, then the start date, finished date and the weekly hours spent are reset to nothing. Once you are done editing the task details and the fields are validated, you may click the "Update" button to the right of the record, and the record will be updated and return to its normal view state. If you do not want to update your changes you may click the "Cancel" button. For reference, see Figure 4.5.Note: A task will be carried over to a new week's timesheet if the task is unfinished.
Editing a Miscellaneous Task
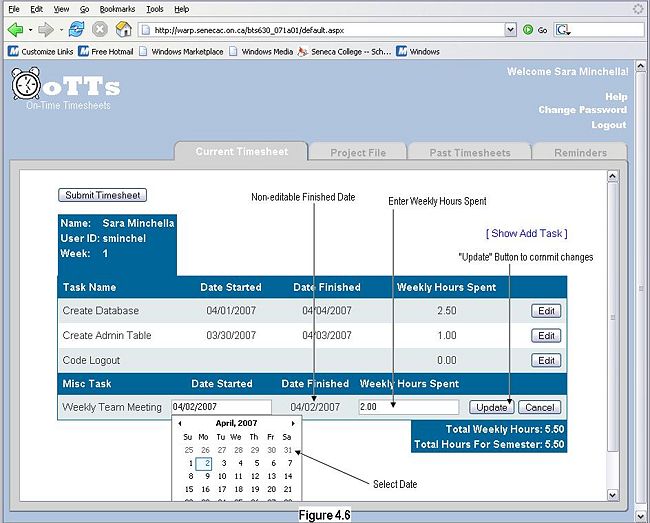
To edit a miscellaneous task, click the "Edit" button to the right of the miscellaneous task record on the timesheet. The row will become editable, text boxes will appear for the editable fields, start date and the weekly hours spent.Note: There will be no editable textbox for the finished date, since a task is only considered a miscellaneous task if the task takes a small amount of time to complete, usually only a day. Therefore the finish date for a miscellaneous task to automatically recorded as the same date as the start date.
To edit the start date, you may manually type the date into the field in the format of mm/dd/yyyy or you may select the date from the drop down calendar. To edit the weekly hours spent, you may enter the hours spent using numbers, using decimal places if needed. Decimal places must be calculated in the hundreds, to do this you can divide the time you spent in minutes divided by sixty, for example 125/60 = 2.08. If a miscellaneous task has been started, the weekly hours spent can not be equal to zero. Once you are done editing the miscellaneous task details and the fields are validated, you may click the "Update" button to the right of the record, and the record will be updated and return to its normal view state. If you do not want to update your changes you may click the "Cancel" button. For reference, see Figure 4.6.
Note: A miscellaneous task is not carried over to a new week's timesheet if it is unfinished.
Past Timesheets
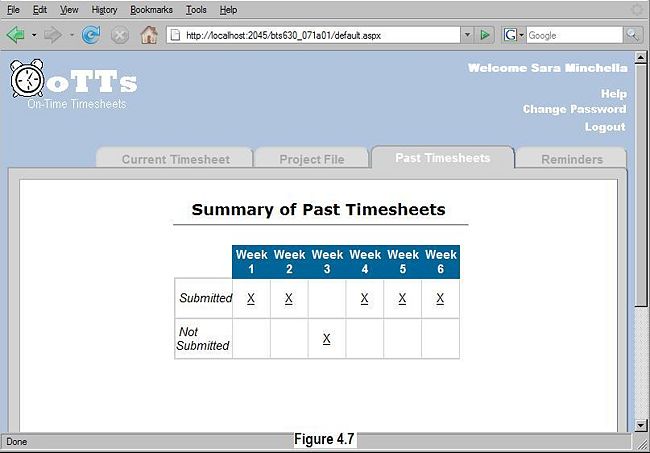
A student may view any past timesheets that are displayed on the Past Timesheet table. The timesheets displayed for every week and are divided into two groups, timesheets that have been submitted on time, as well as timesheets that have not been submitted on time. If a student has been added after the start of a semester, and has missed some weeks, there will be no entry for either "Submitted" or "Not Submitted". For reference, see Figure 4.7.Viewing a Past Timesheet
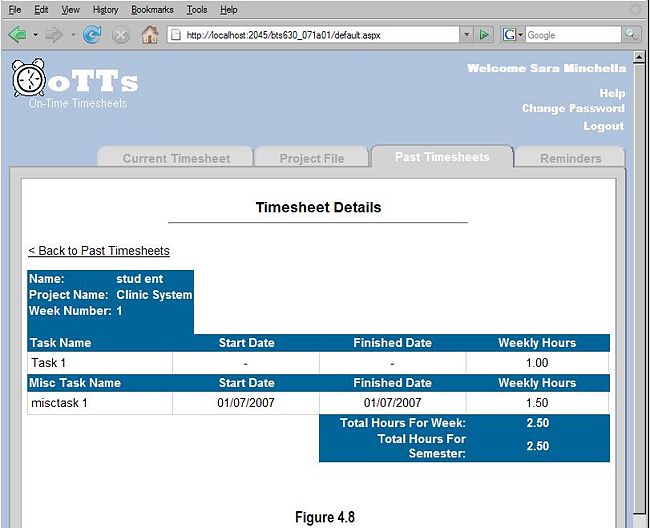
You may view a past timesheet by clicking on the X for the week you wish to view. Your past timesheet will be displayed, with your details in the upper left hand corner, including the week number for the task. All tasks that you have finished during this week and their hours are listed, including miscellaneous tasks. For reference, see Figure 4.8.Project File
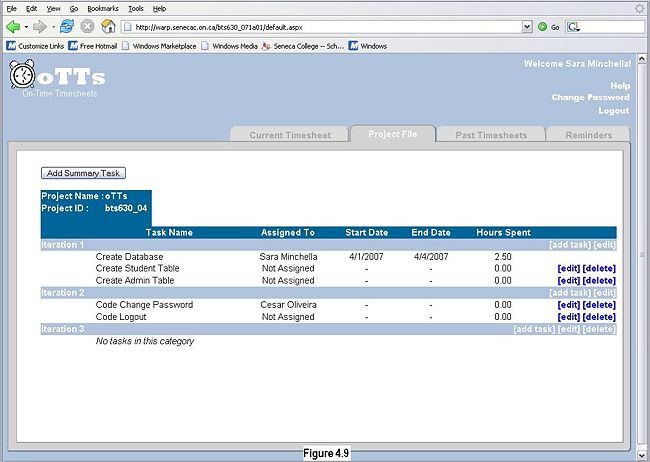
The project file contains all the tasks that a group has completed or is going to complete. All tasks are broken in Summary Tasks that categorizes these tasks. A student may be assigned to a task, or the task may be left unassigned. The total hours spent on a task for the duration of the project is also displayed. A student may edit for a task is assigned to, only if the student has not already started the task. Also, a task may not be deleted if a task has been started. For a sample Project File, see Figure 4.9.Adding a Summary Task
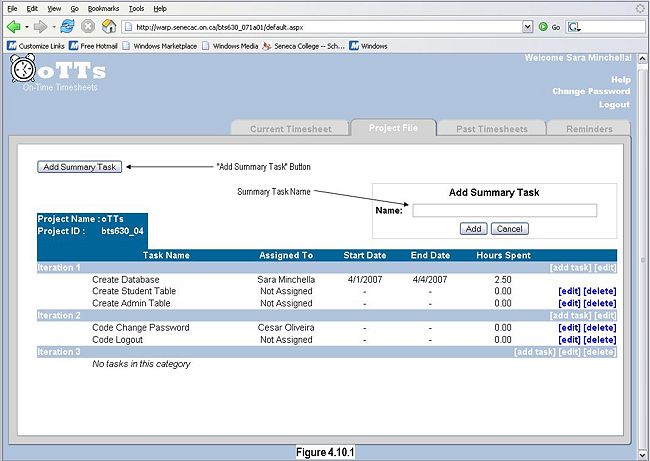
To add a summary task to the project file, click on the "Add Summary Task" button in the upper left hand corner. A box will appear to in the upper right hand corner, you must enter a summary task name, and then click "Add". The box will then disappear.
For reference, see Figure 4.10.1Editing a Summary Task's Details
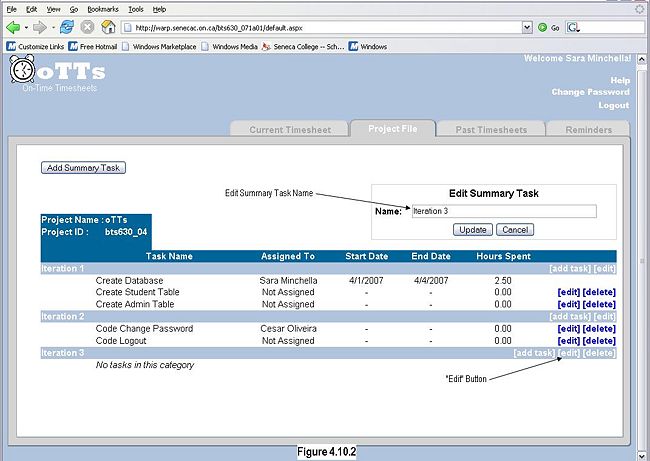
To edit a summary task's details, click on the "Edit" button to the right of the summary take name. A box will appear in the upper right hand corner. To edit the details, change the name in the Task Name field, and then click "Update". The editing box will then disappear.
For reference, see Figure 4.10.2Deleting a Summary Task
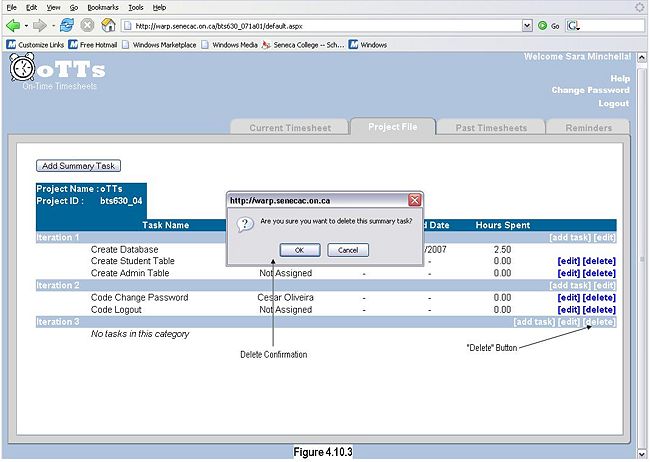
A summary task may only be deleted where there are no tasks associated with it, therefore a "Delete" button will only appear if it is allowed. To delete a summary task, click the "Delete" button to the right of the summary task name. A confirmation box will appear, click "Ok" to confirm the delete, or "Cancel" to cancel the delete. For reference, see Figure 4.10.3Adding a Task
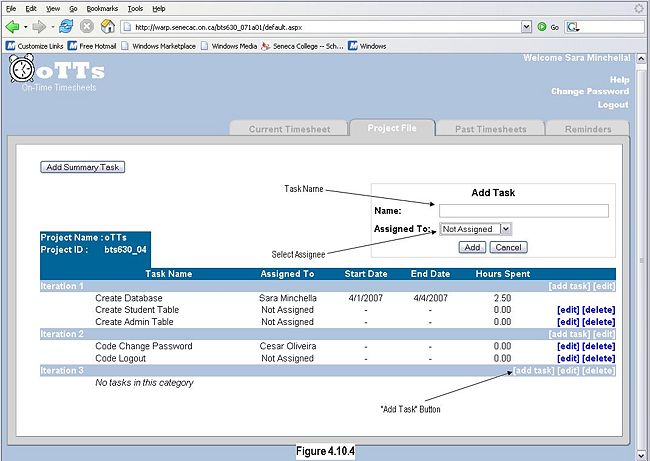
To add a task to the project file, click on the "Add Task" button that is to the right of a summary task name. A popup window will appear to in the upper right hand corner; you must enter a task name, and select a project member to assign it to. If you do not wish to assign the task, select "Not Assigned". Then click "Add" button. The popup box will then disappear. For reference, see Figure 4.10.4Editing a Task's Details
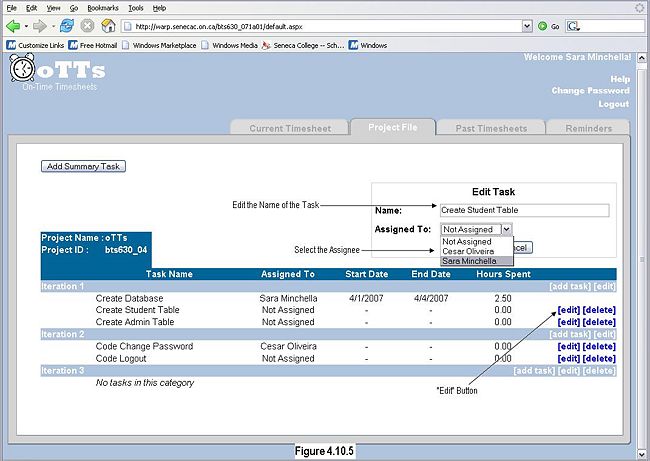
A task may only be edited if the task hasn't been started, therefore a "Edit" button will only appear if it is allowed. To edit a task's details, click on the "Edit" button to the right of the task name. A popup box will appear in the upper right hand corner. To edit the details, change the name in the Task Name field, and/or change the assignee, and then click "Update". The editing popup box will then disappear. For reference, see Figure 4.10.5Deleting a Task
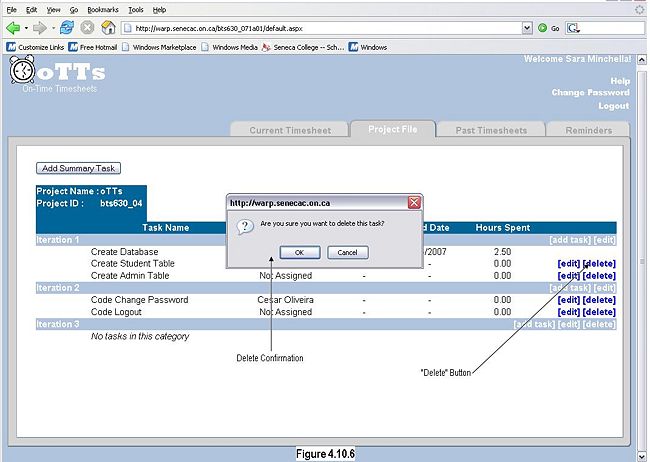
A task may only be deleted if the task hasn't been started, therefore a "Delete" button will only appear if it is allowed. To delete a task, click the "Delete" button to the right of the task name. A confirmation box will appear, click "Ok" to confirm the delete, or "Cancel" to cancel the delete. For reference, see Figure 4.10.6Reminders
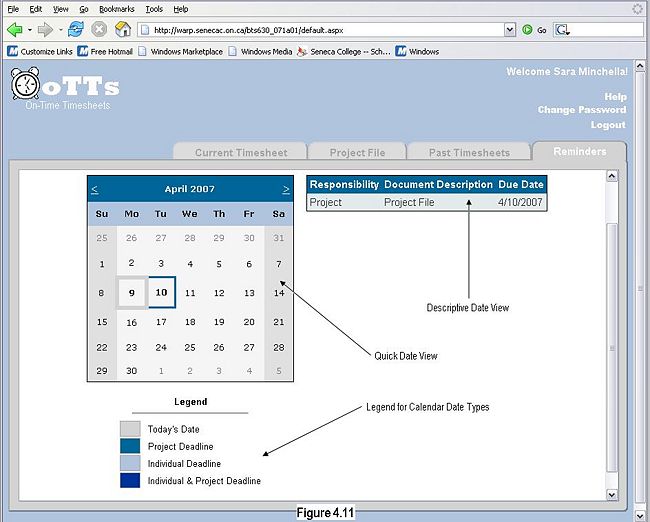
Students are required to meet certain deadlines throughout the duration of the project. Each student is responsible for submitting a weekly timesheet and maintaining their project's project file, as well as several other personal and group deadlines. The calendar to the left visually displays upcoming due dates by highlighting the due dates with a coloured border for quick analysis. A legend for each type of due date is displayed directly below the calendar. The legend colours are described below:
- Today's Date is outlined in Light Grey.
- a Project Deadline is outlined in Bright Light Blue.
- an Individual Deadline is outlined in Light Steel Blue.
- a Project Deadline and an Individual Deadline due on the same day is outlined in Dark Blue.
