Desktop Environment Terminology
Currently, the two most common desktop environment used in Linux are:
- Gnome
- KDE
This tutorial will try to teach the "basics of the Desktop environment". Although this tutorial will focus on the Gnome desktop environment, it will also apply (in loose terms) to the KDE environment. This tutorial will use screen captures of the Gnome desktop environment...
Contents
Purpose of the Desktop Environment
The purpose of a desktop environment is to allow the user to accomplish tasks and to customize their Graphic User Interface preferences. This desktop environment is designed to make it easy for users to interface with the computer system to run applications, and manage their documents, pictures, music, etc...
Just like MS Windows, there are several methods that the user can interface with the computer system:
- Graphic User Interface (GUI)- Use of icons to launch applications or manage files
- Menu-Driven Interface - Use of menus (eg. context menus) to perform operations
- Command Line Interface (CLI) - Command prompt to issue more complex commands or utilities
Elements of the Desktop Environment
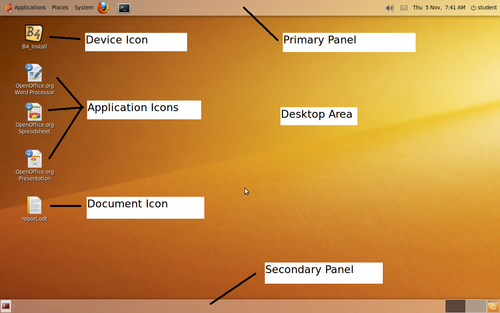
The desktop refers to the main area on your desktop environment. This represents your typical top of your desk. Traditionally when working, people have used their desk to accomplish tasks, temporarily store documents, and later store documents in their drawer. This desktop area is used to represent this...
Icons
Contained on the desktop (located on the left-hand-side) are icons. These icons can represent hardware devices, applications, and other items such as documents, pictures, music, etc... The user can open these files or run these applications by pointing and double-clicking on the icon.
Panels
Usually appearing along the edge of the desktop, panels are areas that contain additional elements to assist the user to operate in the desktop environment. There is usually a primary and secondary panel that is created upon install.
The Primary panel may contains the following:
- Start Menu (to launch applications)
- Program Launchers (launch by clicking on icon)
- Notification Area (Displaying Date and Time, System Updates, etc...)
The Secondary panel may contain the following:
- Windows List (displaying all running application windows)
- Workspace Switcher (Switch to difference desktop)
- Trash Bin (Stores Deleted Files)
NOTE: In other Linux environments, such as the Westminster Computer Lab (LTSP Project), it is using the Gnome desktop, but instead of using Panels, it is using the Avant Window Navigator (awn) which simulates a docking-station interface (similar to Mac OSX).
Certain accounts can allow the user to configure (add / remove) programs from the docking stations.
Other accounts (like jamm accounts) are "locked-down" to prevent users from making changes to the docking station.
Common Mouse Operations
Before we proceed, it is important for the user to understand how to use the mouse effectively in the Linux Graphical environment.
Below is a list of common mouse operations in Gnome/KDE:
- Point (move cursor on object such as an icon, panel, desktop area)
- Left Click (While mouse is pointing on an object, press left mouse button and release)
- Double-Click (While mouse is pointing on an object, press and release left mouse button in rapid succession)
- Right-Click (While mouse is pointing on an object, press right mouse button and release)
- Middle-click (While mouse is pointing on an object, press middle mouse button and release)
(NOTE: If your mouse does not have a middle button, press and release both left and right mouse buttons simultaneously) - Drag (While mouse is pointing on an object, press and hold left mouse button then move mouse to desired location, then release left mouse button)
Customizing Panels
The user can remove or add any number of panels to their desktop. They can also add or remove any elements that appear on the panel. Programs or applications that appear on the panel are referred to as applets.
Adding an Applet to a Panel
To add an applet to/from the panel, simply right-click on an empty area on the panel, and select "Add to Panel" and select an applet from the list of applets that appear.
Removing an Applet from a Panel
To remove an applet from the panel, right click on the applet, and select "Remove From Panel" in the context menu.
Moving an Applet within Panel
To move an applet to another area of the panel, first right click on the applet and make certain that the "Lock to Panel" textbox is unchecked. Then right-click on the applet, select "Move", and then click and drag the applet to the desired location on the panel.
Changing Panel Properties
The user can change various characteristics on an existing panel such as location (top, left, bottom, right), size of panel and transparency.
To change the panel characteristics:
- Right click on the panel
- Select "Properties" in the context menu
- Make certain the "General" tab is selected. You can set the orientation (top, bottom, left, right), as well as the size of the panel. You can set other features such as autohide, or show/hide buttons...
- Click on the "Background" tab. You can select a background color, and set the amount of transparency to allow the panel to "blend-into" the desktop background...
- When you have made your selections, click the "Close" button...

