Teams Winter 2011/team2/lab3
Contents
Tutorial
In this tutorial, we are creating an RCP application to inform the user of current weather temperatures in major cities of North America. We will use our previous lab 2 classes and alter them according to our specification for this lab. For reference material, we are using Eclipse RCP and Eclipse JFace Table tutorial.
Prerequisites
- Download Eclipse RCP & RAP Developer
- Install RCP plug-in
Create a RCP Application
Run a RCP Application
- Run Eclipse
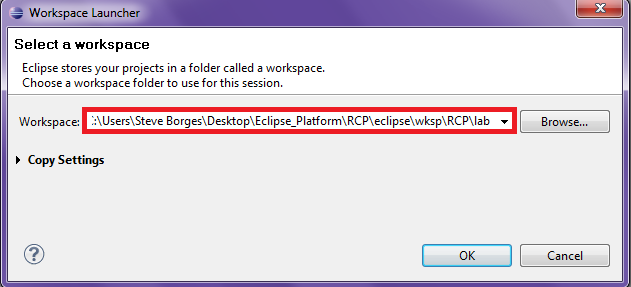
- Select/Enter your preferred workspace in the text box provided and click okay
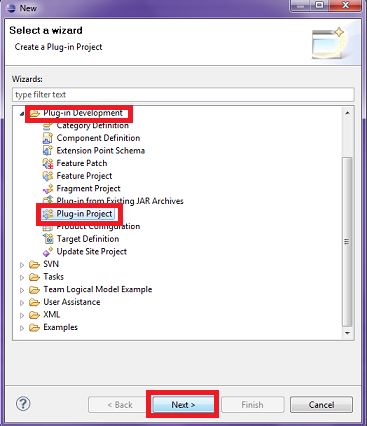
- After Eclipse has completed loaded, create a plug-in project by clicking on "File" on the menu bar then scroll to New->Project->Other. A wizard should pop-up in which you should progress to click on the "Plug-in Development" tree, select "Plug-in Project", and click next.
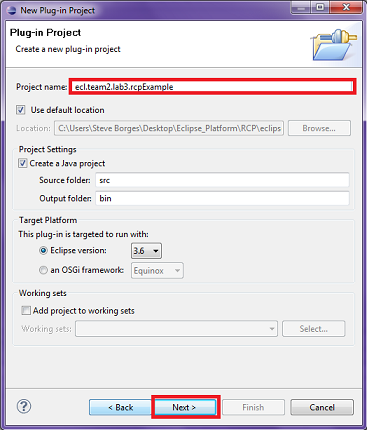
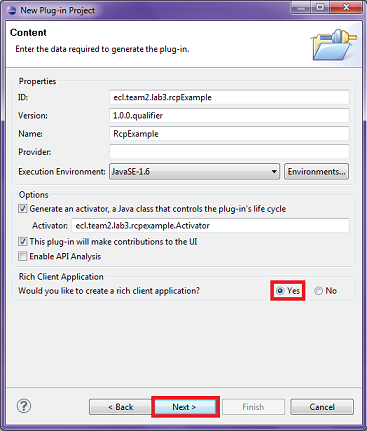
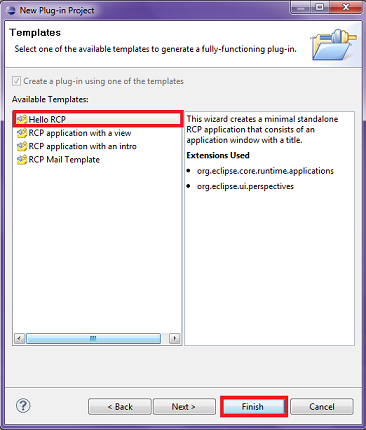
- Enter the following information that is seen in the image below
- Since we decided to use a template to create our first project, there are already a few predefined classes that we will alter to suit our requirements for this lab.
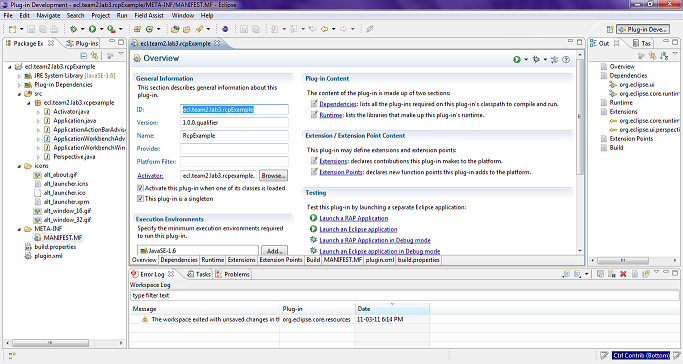
- What you should see in your Eclipse environment is something that looks very similar to the picture below
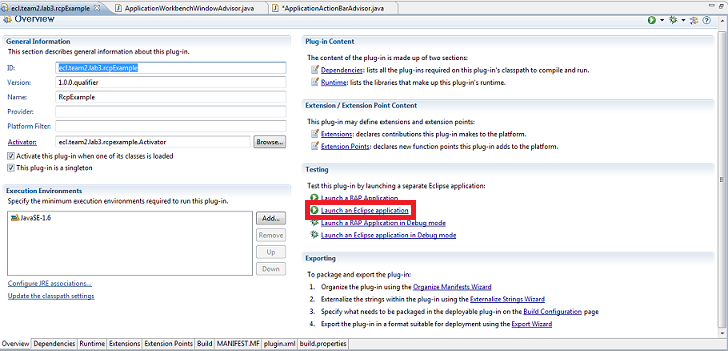
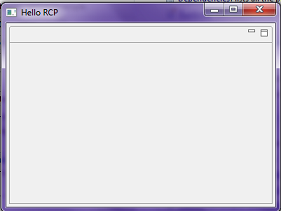
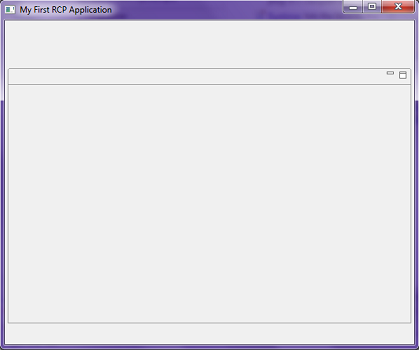
- In the "MANIFEST" file, click on "Launch an Eclipse Application", this will run the "Hello RCP" template program that has not been edited yet. Running this application as is will result in a window to pop-up.
- Lets open "ApplicationWorkbenchWindowAdvisor.java" file so we can alter the window of our application.
- Replace the following method with the one below
public void preWindowOpen() {
     //Retrieves the main window
     IWorkbenchWindowConfigurer configurer = getWindowConfigurer();
     //Sets the size of the window
     configurer.setInitialSize(new Point(600, 500));

     //Header bar becomes available
     configurer.setShowCoolBar(true);

     //Footer bar becomes available
     configurer.setShowStatusLine(true);

     //Title of the window
     configurer.setTitle("My First RCP Application"); //$NON-NLS-1$
}- Redo the same step previously to run the application and your window should be larger and have both header and footer bars.
Configure Your Run
- To ensure your application has all the resources, files, etc. required to run, we need to modify the "Run Configuration" for our application.
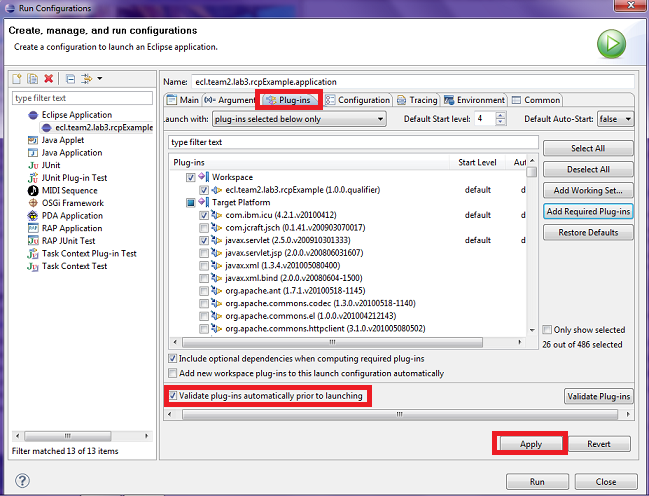
- Right-click the "MANIFEST" file, scroll down to "Run As", and then highlight and click "Run Configurations..."
- The "Run Configurations" window is now present. From here, click on the Plug-in tab and check the box "Validate plug-ins automatically prior to launching" and click Apply. This will essentially provide you with all the plug-ins needed for your program to work during runtime.
Creating a Package and Classes
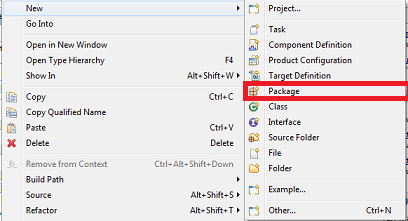
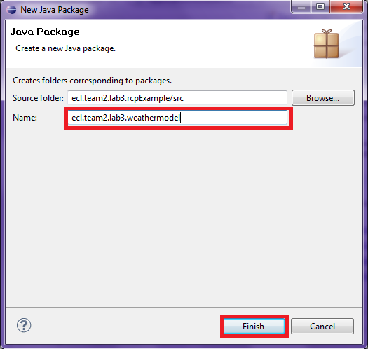
- We are now going to create a package called "ecl.team2.lab3.weathermodel". To do this, right-click the src folder, move the cursor to "New", then click packages. Enter "ecl.team2.lab3.weathermodel" in the "Name" textbox and click Finish.
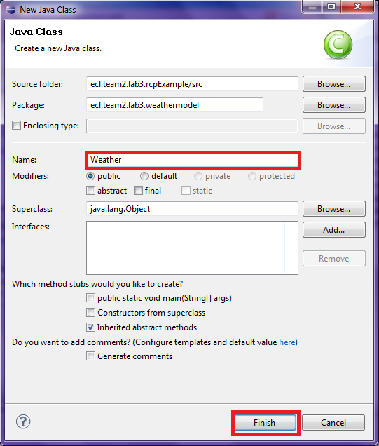
- Now we are going to create classes within this package. To create a class, right-click our newly created package, highlight "New", and scroll down and click "Class". Create a class for "Weather" and "SimpleWeatherSystem".
- Copy and paste the following to their respective file.
Weather.java
package ecl.team2.lab3.weathermodel;

public class Weather {
    private String city;
    private float tempInCelcius;
    private float rainInMM;
    private float snowInMM;
    private float windspeedInKM;
    private char windDirection;

    public Weather(String pcity, float ptemp, float prain, float psnow, float pwspeed, char pwdirection){
        this.setCity(pcity);
        this.setTempInCelcius(ptemp);
        this.setRainInMM(prain);
        this.setSnowInMM(psnow);
        this.setWindspeedInKM(pwspeed);
        this.setWindDirection(pwdirection);
    }

    public void setWindDirection(char windDirection) {
        this.windDirection = windDirection;
    }

    public char getWindDirection() {
        return windDirection;
    }

    public void setWindspeedInKM(float windspeedInKM) {
        this.windspeedInKM = windspeedInKM;
    }

    public float getWindspeedInKM() {
        return windspeedInKM;
    }

    public void setSnowInMM(float snowInMM) {
        this.snowInMM = snowInMM;
    }

    public float getSnowInMM() {
        return snowInMM;
    }

    public void setRainInMM(float rainInMM) {
        this.rainInMM = rainInMM;
    }

    public float getRainInMM() {
        return rainInMM;
    }

    public void setTempInCelcius(float tempInCelcius) {
        this.tempInCelcius = tempInCelcius;
    }

    public float getTempInCelcius() {
        return tempInCelcius;
    }

    public void setCity(String city) {
        this.city = city;
    }

    public String getCity() {
        return city;
    }

    public String toString()
    {
        return city + " " + tempInCelcius + " " + rainInMM + " " + snowInMM + " "
        + windspeedInKM + " " + windDirection;
    }
}
SimpleWeatherSystem.java
package ecl.team2.lab3.weathermodel;

import java.util.ArrayList;
import java.util.Random;

public enum SimpleWeatherSystem {
    INSTANCE;

    ArrayList<Weather> weathers = new ArrayList<Weather>();
    private SimpleWeatherSystem(){
        ArrayList<String> cities = new ArrayList<String>();
        cities.add("Toronto");
        cities.add("New York");
        cities.add("Calgary");
        cities.add("Ottawa");
        cities.add("Vancouver");
        cities.add("Regina");
        cities.add("Winnipeg");
        cities.add("St. John");
        cities.add("Fredericton");
        cities.add("Halifax");
        cities.add("Quebec City");
        cities.add("Whitehorse");
        cities.add("Yellowknife");
        for(String c:cities){
            Random randomGenerator = new Random();
            float temp = randomGenerator.nextFloat()+35;
            float rain = randomGenerator.nextFloat()+10;
            float snow = randomGenerator.nextFloat()+10;
            float windspeed = randomGenerator.nextFloat()+50;
            char winddirection = '.';
            int r = randomGenerator.nextInt(4);
            switch(r){
            case 0:
                winddirection = 'E';
                break;
            case 1:
                winddirection = 'W';
                break;
            case 2:
                winddirection = 'N';
                break;
            case 3:
                winddirection = 'S';
                break;

            }

            Weather w =  new Weather(c, temp, rain, snow, windspeed, winddirection);
            this.weathers.add(w);
            System.out.println(w.toString());
        }
    }

    public Weather getWeather(String city) throws Exception {
        // TODO Auto-generated method stub
        Weather found = null;
        for(Weather w:this.weathers){
            city = city.toLowerCase();
            String wcity =w.getCity().toLowerCase();
            if(city.equals(wcity)){
                found = w;
                return found;
            }
        }
        return found;
    }

    public void addCity(String nCity)
    {
        Random randomGenerator = new Random();
        float temp = randomGenerator.nextFloat()+35;
        float rain = randomGenerator.nextFloat()+10;
        float snow = randomGenerator.nextFloat()+10;
        float windspeed = randomGenerator.nextFloat()+50;
        char winddirection = '.';
        int r = randomGenerator.nextInt(4);
        switch(r){
        case 0:
            winddirection = 'E';
            break;
        case 1:
            winddirection = 'W';
            break;
        case 2:
            winddirection = 'N';
            break;
        case 3:
            winddirection = 'S';
            break;

        }

        Weather w =  new Weather(nCity, temp, rain, snow, windspeed, winddirection);
        this.weathers.add(w);
        System.out.println(w.toString());
    }

    public ArrayList<Weather> getAllWeather()
    {
        return weathers;
    }
}- You will notice that we used a public "enum" type instead of a class. This would make the object in our program a global point for the whole application to access. It's a singleton (static class).
- These classes will be used later on into the tutorial.
Creating and Using Commands/Views
Commands
- Commands are in the most laymen terms, actions. What we mean by action is that we are insisting through some physical representation, whether it be a button or plain-typed text, we are calling an event. That event can be to exit the program or even perform a feature within the application.
- Let's create our first menu for the menu bar that will contain a command to exit the application.
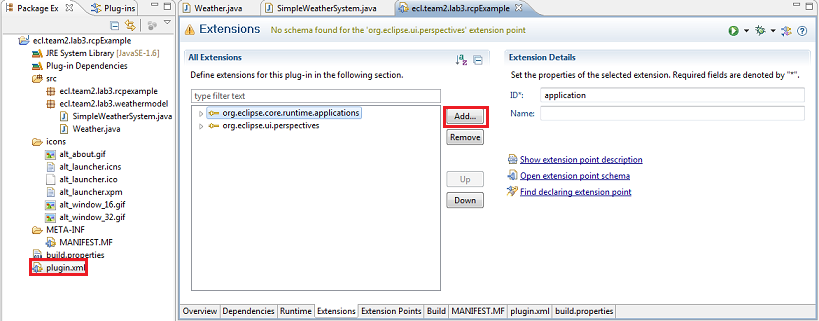
- First open the file plugin.xml, click on the tab "Extensions", and then click on the "Add" button.
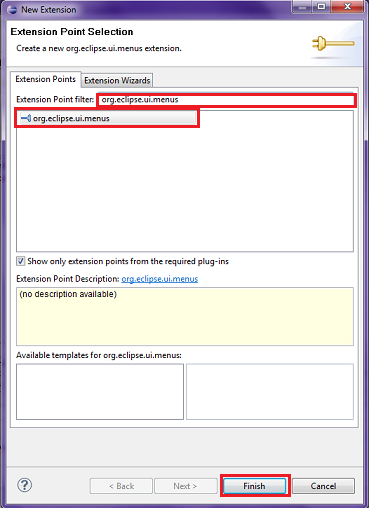
- Now search for "org.eclipse.ui.menus", click it to ensure it's selected, then finish it by clicking on the finish button.
- You should notice the plug-in was added to your extension.
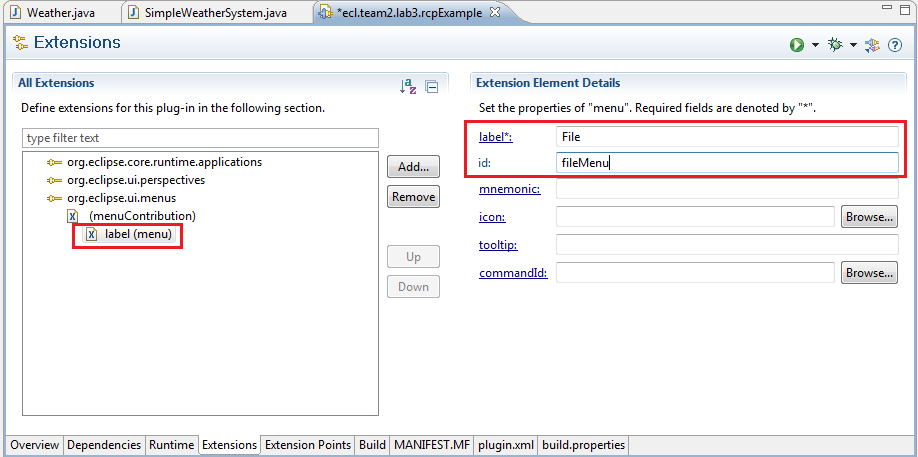
- From your current display, right-click the recently added extension->New->menuContribution. After the item has been added, change the "locationUri" to "menu:org.eclipse.ui.main.menu" (this informs the application to attach it the main ui window that Eclipse makes. Afterwords, right-click that item and perform the following actions New->menu.
- Fill in the necessary based on the picture below
- Before we progress any further with menu, we must create a "Command". We'll first develop the "exit" command. Perform the exact same series of steps done earlier to add a new extension, except this time search for "org.eclipse.ui.commands". Add an item, "Commands", and add the following information based on the picture below.
- As you may recall, I made mention that commands are akin to basically doing an action, which is based on an occurrence of an event. Well, just like an event, you must develop a class that extends a type of handler to inform the application of what actions to take place. That is why you must now create package called "ecl.team2.lab3.commands" and a java file named "ExitHandler".
- Copy and paste this code into the ExitHandler
package ecl.team2.lab3.commands;

import org.eclipse.core.commands.AbstractHandler;
import org.eclipse.core.commands.ExecutionEvent;
import org.eclipse.core.commands.ExecutionException;
import org.eclipse.ui.handlers.HandlerUtil;

public class ExitHandler extends AbstractHandler {

    @Override
    public Object execute(ExecutionEvent event) throws ExecutionException {
        HandlerUtil.getActiveWorkbenchWindow(event).close();
        return null;
    }

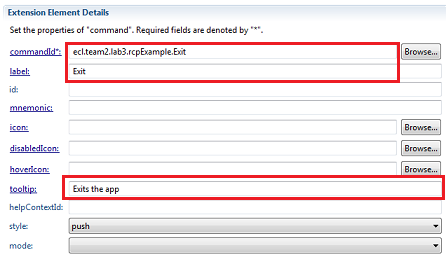
}- Return back to File menu and add a command file to it.
- Enter what is shown in the picture below.
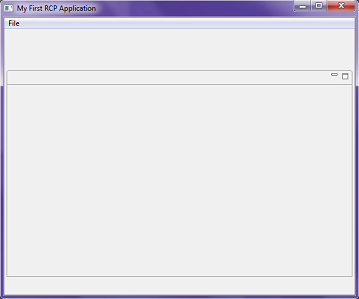
- Save the MANIFEST file and run the application as we've done previously (Overview tab)
- You should see this window pop-up
- Now click on "File" within the menu bar and click "Exit", this will close the program based on the small application we created for that command.
Pre-emptive work for later on
- Given that you now have context of how to create a command, we will now progress to creating commands that will be used later within our application. Please create the following commands along with the required items:
AddCityHandler For Commmand
id: ecl.team2.lab3.rcpExample.AddCity
name: Add City
defaultHandler: ecl.team2.lab3.commands.AddCityHandler
For Menu Command
commandId: ecl.team2.lab3.rcpExample.AddCity
label: Add City
tooltip: Adds a city to list
For AddCityHandler.java
Views
