Install Ubuntu While Running MS Windows (WUBI)
MS Windows users used to fear installing Linux due to loss of data due to partitioning. With the creation of WUBI, that fear has been removed...
What is WUBI? Why Should I Use It?
WUBI stands for "Windows-Based Ubuntu Installer" which is an official and free windows-based installer of Ubuntu Linux.
This installer makes it easy for the user to install Ubuntu Linux. The user (after downloading and burning the Ubuntu CD) can now simply insert the Ubuntu installation CD while MS Windows is running, and then follow the instructions...
Here are some advantages of WUBI:
- No creation of partitions
- No manual resizing of Windows partition
- Works with many versions of MS Windows
- Process to install intuitive, friendly and fast
- linux entry added to windows boot menu (instead of grub bootloader)
- Easy to uninstall
Here are some limitations of WUBI:
- Limited size of Linux partition within Windows (eg. 30 GB)
- Hibernation is not supported
- WUBI filesystem may be more vulnerable to power disruption recoveries
Installing Ubuntu While MS Windows is Running
NOTE: You need to be logged into MS Windows as a user with administrative privileges in order to install Ubuntu Linux.
Steps to Install Ubuntu Linux via WUBI:
- Boot up MS Windows, and log into your account (with admin privileges).
- Insert the Ubuntu Installation CD into the drive.
- Depending on your version of Windows, you may need to run the wubi.exe program, and provide your admin password.
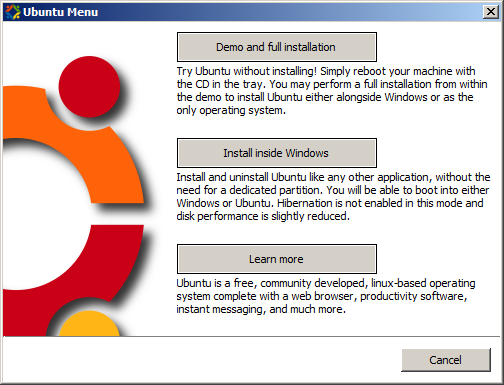
- A Ubuntu Menu dialog box should appear (refer to top diagram on right-side). This dialog box provides various methods of installing Ubuntu Linux. To install inside MS Windows, select "Install Inside Windows".
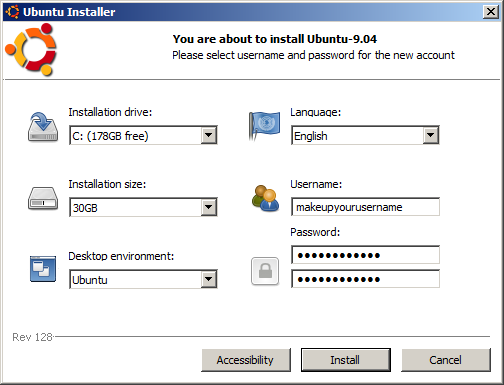
- In the dialog box, check to see if there is enough hard drive space in your windows partition. If not, perhaps you can select another partition that has enough space, or exit the dialog box, free up space and repeat the installation process.
- Select the Installation Size. Normally, the maximum size (30 GB) is more than enough space to run Ubuntu Linux and download additional programs. If you require more space for Linux, then you should consider installing from one of the alterative methods .
- Select your Desktop environment. The desktop Environment is the graphical interface that allows the user to perform their daily computing tasks. You can install and use many different desktop environments (such as KDE, or Gnome). KDE has a more "MS Windows-like" appearance, Gnome is the default desktop environment without the "clutter".
At this dialog box item, you are selecting your default desktop environment: Gnome or KDE. You can install and use other desktop environments at at later date... - Select your Language (the default is English).
- Enter your user account name (called "username"). Linux requires a username or at least one account that can act as an administrator. If you wish, you can set the system to automatically login upon bootup. Also, you can add additional user accounts at a later date (i.e. after the Ubuntu installation process).
- Enter (and re-enter) your user account password.
- Follow the instructions for the remainder of the installation process. It may take some time to perform the installation process (depends on power of your computer), so please be patient. When prompted, remove the installation CD.
NOTE: Although passwords can be changed at a later date, you cannot perform or log into the Ubuntu system if you forget your username and password.
It is recommended to write this information down and store in a safe place...

