MAP524/DPS924 Lecture 6
Contents
SQLite
This is a semi-structured data store from your application on the phone. To store and retrieve data in the database you use SQL-like query strings, but SQLite isn't nearly as powerful as a typical SQL server. Only the very simplest parts of SQL are supported.
There's a lot of good material describing SQLite use on Android on this website.
Command-line
Often the easiest way to create an empty database, insert test data, and test your app's usage of SQLite is the command-line tool sqlite3. On Linux it should be installed by default, on other platforms you can download and install it yourself.
# Create the database
sqlite3 employee.db
-- Now you're inside the sqlite shell, not bash. Press Ctrl+D on an empty line to quit.
-- Create a table:
create table names (ids integer primary key, name text, pay integer);
-- Show your tables
.tables
-- Insert some data
insert into names (name,pay) values('john', 10000);
insert into names (name,pay) values('mary', 20000);
insert into names (name,pay) values('sam', 30000);
-- Display your data
select * from names;
-- Show your databases
.databases
-- Quit
.quitTest data
Eventually you'll write tests for your app with your test data, but during development a really handy website is [1]. You can get data in many formats including CSV which can be imported into sqlite like this:
- Get some data from generatedata.com
- filename is names.txt
- Open database
sqlite3 employee.db- Set your deliminator
.separator ","- Import your data
.import names.txt names- Display your data
select * from names;- Quit
.quitUsing a pre-built DB file
If you want your app to come with some pre-built data in the database then it's probably easiest to follow the example above to create the file, add it to your resources, and copy it into the correct place the first time your app starts. For example:
try
{
    String destPath = "/data/data/" + context.getPackageName() + "/databases/";

    File destPathFile =  new File(destPath);
    if (!destPathFile.exists())
        destPathFile.mkdirs();

    File destFile = new File(destPath + DB_FILE_NAME);
    if (!destFile.exists())
    {
        Log.d(TAG, "First run, copying default database");
        copyFile(context.getAssets().open(DB_FILE_NAME),
                 new FileOutputStream(destPath + "/" + DB_FILE_NAME));
    }
}
catch (FileNotFoundException e) { e.printStackTrace(); }
catch (IOException e) { e.printStackTrace(); }

dbOpenHelper = new DatabaseOpenHelper(context);
Make sure this code runs when your app starts up and don't forget to put your db file in the assets folder.
Not using a pre-built DB file
If you don't need any data in your database to start with: you don't need to do the stuff from the section above, you can simply create the database in the SQLiteOpenHelper's onCreate(). See the Vogella tutorial for sample code.
Here's a basic demo:
- Add a class for your database records - for example
public class Student { ... }- Add private data to the class
- Add constructor methods as needed
- Add setter and getter methods for each item in the database record
- Add a second class to be your database handler. For example:
public class MyDBHandler extends SQLiteOpenHelper { ... }- Add private data for database version and database name
- Add private data for table name
- Add private data for each item in the database record
- Add a constructor as needed
- In the onCreate method execute an SQL statement to create the table
- In the onUpgrade method execute an SQL statement delete the table if it exists and then call onCreate() to make a new table
- Add methods to
- Find an item in the database
- Delete an item from the database
- Add an item to the database
- If needed you could add a method to modify an item in the database
- Now modify your main activity layout to include the following:
- Two EditText views (StudentName and StudentGrade)
- One TextView (ID)
- Three buttons (Add, Delete, Find)
- Add 3 class variables to your main activity
- TextView idView
- EditText studentNameText
- EditText studentGradeText
- In the onCreate method get references to the 3 views
- Add 3 onClick method names in the main layout file. One for each button.
- android:onClick="addStudent"
- android:onClick="deleteStudent"
- android:onClick="findStudent"
- Finally code the three methods in your MainActivity.java class like this
    public void addStudent(View view)
    {
        int grade = Integer.parseInt(studentGradeText.getText().toString());
        Student student = new Student(studentNameText.getText().toString(), grade);
        dbHandler.addStudent(student);
        studentNameText.setText("");
        studentGradeText.setText("");
    }

    public void findStudent (View view)
    {
        Student student = dbHandler.findStudent(studentNameText.getText().toString());
        if (student != null) {
            idView.setText(String.valueOf(student.getID()));
            studentGradeText.setText(String.valueOf(student.getStudentGrade()));
        } else {
            idView.setText("No Student Found");
        }
    }

    public void deleteStudent (View view)
    {
        boolean result = dbHandler.deleteStudent(studentNameText.getText().toString());
        if (result) {
            idView.setText("Student Deleted");
            studentNameText.setText("");
            studentGradeText.setText("");
        }  else {
            idView.setText("No Student Found");
        }
}- You should now be able to run your DB app.
Questoid SQLite Browser
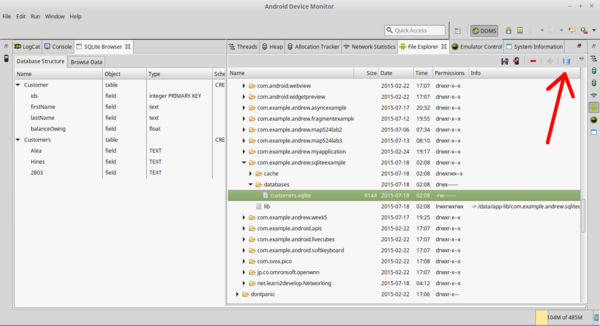
You can download the Questoid SQLite Browser plugin for Android Device Monitor to be able to view your SQLite database directly from the device.
Copy the file to your [YourAndroidSdkDirectory]/tools/lib/monitor-x86_64/plugins/AndroidSQLiteBrowser_1.0.1.jar directory and restart the Android Device Monitor.
Then you can find your database file and click the "Open File in SQLite browser" button:
