OPS235 Lab 1
Contents
LAB PREPARATION
Purpose of Lab 1
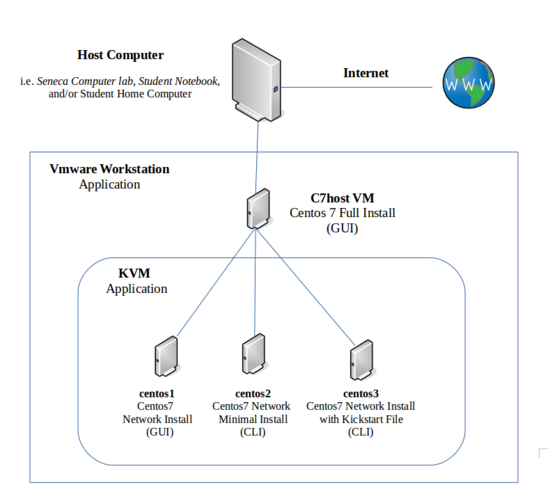
In order to save money and resources when learning to install, to manage, and to connect Linux machines to form networks, we will be using Virtual Machines for this course. In fact, we will be using two virtual machine programs:
- Lab 1: Create a CentOS 7 Host virtual machine (called c7host) in the virtual program called VMware Workstation (this host will be stored on your Solid State External Drive (SSD).
- Lab 2: Install a Virtual program package on your CentOS 7 Host virtual machine called KVM which will be used to create 3 remaining Virtual Machines (VMs) that will be used to learn about Linux system administration for the remainder of this course.
It is ESSENTIAL to have a Solid State Drive (SSD) with a minimum storage capacity of 240 GB to perform your lab sessions and provide a host for your other CentOS 7 host and other VMs that you will create in Lab 2. Due to space requirements, you are NOT permitted to share this SSD drive with any other course material than our OPS235 course.
NOTE: It is feasible to use a notebook computer with sufficient hard disk capacity to perform these labs (as you would for an SSD drive). It would require that your notebook computer can connect to the Internet (including in Seneca's computer labs). You would be required to follow the same instructions for this lab (SSD) Note: It may take one or two weeks before students can obtain their free version of VMware Workstation 12 Pro; therefore, it may be more convenient to purchase an SSD to be able to start lab1 immediately. It is strongly recommended to NOT use VMware Player.
Main Objectives
- Correctly install the CentOS 7 FULL INSTALL DVD (c7host) on your SSD using VMware Workstation.
- Note common Linux commands and record them in your lab1 logbook.
- Use Shell scripts to generate a post-install report for your CentOS 7 host VM.
- Disable Linux Kernel security enhancements to allow easier internal networking connections (to be reactivated in a later lab).
| Minimum Required Materials |
Linux Command Reference | |||
| Package Management
rpm |
Miscellaneous | Matrix on-line tutorials
| ||
INVESTIGATION 1: CREATE AND INSTALL FIRST VIRTUAL MACHINE (c7host)
In this lab, you will learn how to install your CentOS Full Install DVD as a virtual machine using the VMware Workstation application.
Part 1: Using VMware Workstation Pro to Create a New Virtual Machine (VM)
c7host VM Details:
- Name: c7host
- Boot media / Installation: CentOS 7 Full Install DVD
- Download at Seneca College: CentOS 7 Full Install DVD (image file):
http://belmont.senecacollege.ca/pub/centos/7/isos/x86_64/CentOS-7-x86_64-DVD-1804.iso - Download outside Seneca College:
http://mirror.csclub.uwaterloo.ca/centos/7/isos/x86_64/CentOS-7-x86_64-DVD-1804.iso
- Download at Seneca College: CentOS 7 Full Install DVD (image file):
- Disk space: 238GB
- CPUs: 2 (recommended)
Before you can install your CentOS Full Install DVD onto your Virtual Machine, you must first create a storage container which is a virtual machine that will provide a platform for you to install your CentOS operating system.
- Perform the Following Steps:
- Although the images may be a little out of date (i.e. not exact), you can refer to this listing of installation screenshots for general reference:
[installation screen-shots ] - Power up the computer in your Seneca lab in Windows.
- If you haven't already downloaded the CentOS 7 Full Install DVD iso to your USB KEY, then download the following link for the CentOS 7 Full Install DVD image on your USB device: http://belmont.senecacollege.ca/pub/centos/7/isos/x86_64/CentOS-7-x86_64-DVD-1804.iso
- Plug your SSD drive into your computer. Note the drive letter for that device.
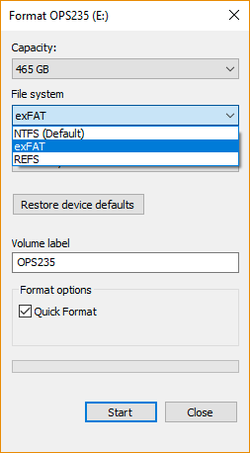
- Format your SSD to use ExFAT, not NTFS. Open My Computer, right-click on the SSD, and select Format.... The dialog box should have the ExFAT option selected, as the example to your right shows. Once selected, click Start.
- Create a folder called: Virtual Machines on your SSD device.
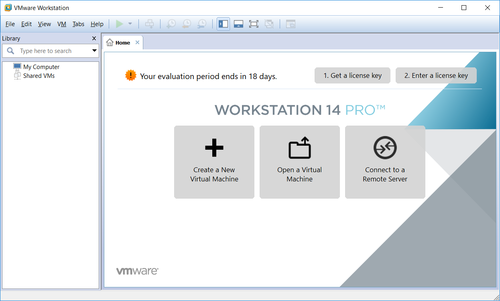
- On your Seneca computer lab workstation, click the Windows Menu button and type VMware.
- There are two VMware products: VMware Workstation Pro and VMware Player.
- Run the VMware Workstation Pro application (do NOT run VMware Player!).
- In your VMware Workstation application window, click the Edit menu, then select Preferences. Under the Default Location For Virtual Machines, enter the pathname for the newly created folder in your SSD device and click OK.
- Click on the item labelled Create a New Virtual Machine.
NOTE: We will just be creating a "shell" for the VM the contain our CentOS 7 Linux operating system.
This will allow us to configure the VM properly so it will boot-up properly in our Seneca labs. - Select the Custom (advanced) for the Virtual Machine Configuration setting and click Next.
- Click Next at the next screen to proceed.
- Select the I will install the operating system later option and click Next.
- In the next screen, select Linux as the Guest Operating System, and CentOS 64-bit for the OS version and click Next.
- Enter c7host for the Virtual machine name and note the location where the image will be stored on your Windows machine and click Next.
NOTE: Since this "virtual machine" will be supporting other virtual machines (i.e. nested VMs), it is recommended to select a higher number or core processors (like 2 or 3).
You can can always change this setting later on to maximize the performance of running the "nested" VMs on your Host VM. - Select the maximum number of processor cores your computer supports and click Next .
- In the following screen, change the Memory from 1GB to 8GB (i.e. 8192 MB) and click Next.
- Click Next to accept the default (i.e. NAT) for the network type.
- Click Next to accept the default (i.e. LSI Logic) for the SCSI Controller type.
- Click Next to accept the default (i.e. SCSI for the virtual disk type).
- Click Next to accept Create New Virtual Disk.
- Change the Maximum Disk Size from 20GB to 238GB and click Next.
- Accept the default Disk File name (i.e. c7host.vmdk) and click Next.
- Quickly review your VM settings in the final setup wizard dialog box and click Finish.
- You should now see a detailed screen for your c7host VM on the right-hand side.
ATTENTION: PRIOR to proceeding, you MUST perform the following step BEFORE starting your Host VM in order to allow your Host VM to run correctly!!!
Students that do not follow these procedures exactly will run in to problems when trying to perform lab2 !!! You have been warned!!!. - Make certain that your Host VM is NOT powered on before proceeding!
- In the right-hand window (below "c7host"), and below "Power on this virtual machine", click the link called Edit virtual machine settings.
- In this setup dialog box, click the options tab and then click the Advanced option at the bottom of the list. On the right-hand side, click the checkbox to enable the option to Boot with EFI instead of BIOS. Then click on the Hardware tab, and then select the CD/DVD (IDE) device and select in the right-side select the radio button for the use ISO Image file. Click the Browse button and specify the path of your downloaded CentOS 7 Full install DVD (most likely file is contained in your Downloads folder). Click Processors, and click the check-box to enable Virtual Intel VT-X/EPT or AMD-V/RVI. When finished, click on the OK button.
- You will return to your c7host VM. Click Power on this virtual machine icon near the top to boot your c7host VM to start your c7host VM, and proceed to Part 2.
Part 2: Install CentOS on your Newly-Created VM
The next step is to perform a custom installation for your CentOS 7 virtual machine using the CentOS 7 Full DVD. Upon creation of your c7host virtual machine, The VMware Workstation application will automatically simulate a "boot" to allow you to complete the installation process to create the CentOS 7 operating system on that virtual machine.
- Perform the following steps:
- Select from the installation menu: Install CentOS 7.
- Next, you will be prompted for a language. In the first screen, select language English with subselection English-Canada and then click the Continue button on the bottom right-hand screen.
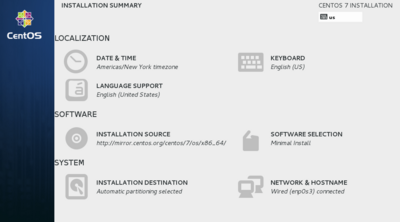
- The Install Summary should now appear. This screen allows the installer to customize their CentOS 7 system prior to installation.
- Configure the following installation settings from the Install Summary Screen:
- DATE & TIME:
- Click on the Map to select Toronto area (you may also select from the drop-down menu section)
- Click the DONE button at the top-left corner to finish and return to the Installation Summary screen.
- SOFTWARE SELECTION:
- Select the software packages labelled: Gnome Desktop
- Click the DONE button at the top-left corner to finish and return to the Installation Summary screen.
- NETWORK & HOSTNAME (you may need to scroll downwards):
- Select the default Ethernet connection and click the button on the top right-hand side to change the setting from OFF to ON.
- Also, at the bottom left-hand corner, type the hostname: c7host (all lowercase letters)
- Review your settings, then click the DONE button at the top-left corner to finish and return to the Installation Summary screen.
- DATE & TIME:
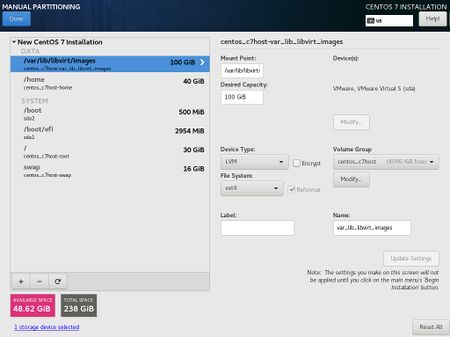 Carefully verify partition mount-names and sizes prior to proceeding with install. Check installation screenshots link for verification. |
- INSTALLATION DESTINATION:
- From the installation summary screen, click Installation Destination.
- In the installation destination screen, select the destination option: I will configure partitioning and then click Done.
- The manual partitioning screen should appear.
- If you have used your hard disk for previous Linux (CentOS) distributions, you should remove them. Click on the distribution, and for each partition, select the partition and click the remove button (minus sign) and confirm deletion.
- Remember that the sizes are recorded in MB (eg. 30 GB = 30000 MB) and you should multiply GB by a factor of 1024 to get the correct size. (eg. 30 GB x 1024 = 30720 MB)
- INSTALLATION DESTINATION:
- We will now create the root (/) partition. Click on the add button (plus) sign.
- In the Add a New Mount Point, click the drop-down button and select /boot/efi for the mount point and type 2954 as the desired capacity, and then click Add mount point.
- When you return to the main screen, make certain that this mount point is a Standard Partition and not LVM.
- Add the /boot mount point with a size of 500. Leave the default settings and file system as xfs.
- Add another mount point, but in the Add a New Mount Point screen, select / as the mount-point (either by typing or selecting from drop-down menu), and enter 30720 in for partition size and click Add Mount Point button.
- You will return to the previous dialog box.
For the / partition, change the file-system type from xfs to ext4 and make certain that the Device Type is set to LVM. - Repeat the same steps above for the /home partition (calculate the equivalent size for 40GB (ext4 file-system type and LVM as device type).
- Add a mount point /var/lib/libvirt/images (type yourself, check spelling!) for size 100GB (file-system type ext 4 and device type LVM).
- Recheck each of the created partitions, and make certain that the file-system type is set to ext4 and the Device Type should be LVM.
- Finally, add a swap partition (Mount Point: swap) for 16 GB.
- Check that your partition settings are correct (you can ask your instructor or lab monitor to confirm), and then click Done (possibly twice) in order to proceed
- A Summary of Changes screen will appear to show the partitioning operations that will be created. Click the Accept Changes and click Begin Installation in the Installation Summary screen to proceed with the installation.
Part 3: Completing the Installation
- Perform the Following Steps:
- During the installation process, you will required to create a root password (for administration access) and create a regular user account. Click on Root Password and enter your root password. Think of an appropriate password and record that password somewhere in case you forget! An indicator will appear to show you how secure your password is. Retype your root password and click Done (you may have to click Done twice if your password is not considered to be a strong password).
- You need to create a regular user account. This account will be used to graphical log into your host machine. It is never recommended to graphically log into a graphical Linux/Unix system as root. It is better to log into a regular user account, then run a command to login as root (you will learn how to do this later in this lab).
- Click User Creation and enter your full name, username, and an appropriate password (and confirm password). Click Done to finish (click twice if password is not considered to be a strong password).
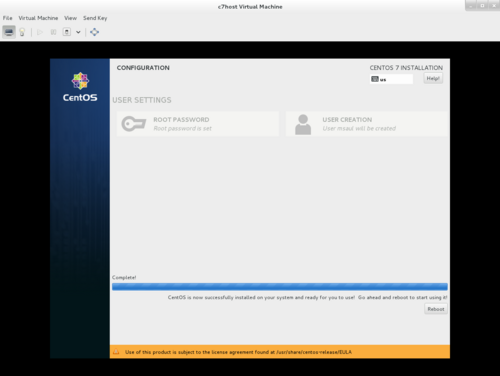
- When installation is complete, you will notice a message at the bottom of the screen stating: CentOS is now successfully installed and ready for you to use!
- Click the Reboot button. Your DVD will briefly open in the DVD drive bay. Make certain to remove this installation DVD so that CentOS will boot from your hard drive.
- After the system reboots, a boot menu should briefly appear, then prompt the user to accept the License Information (this is only a one-time occurrence).
In order to accept the license agreement, Click on License Not Accepted and graphically accept the license and then click FINISH CONFIGURATION to finish the installation process.
NOTE: If you have an older version of CentOS 7, you must perform the alternative steps:
Issue the following keystrokes:
1 followed by ENTER (to select the license agreement prompt
2 followed by ENTER (to accept the license agreement)
c followed by ENTER (to save the selection)
c followed by ENTER (a second time to continue booting into the system) - The system should then graphically prompt the user to login with their regular user account. Click on your regular user account name and enter your regular user password.
- The last phase of the installation process should now run:
- Confirm English as the default input source and click Next.
- Skip the creation of online accounts by clicking Next.
- Start using your installed Linux system by clicking Start Using CentOS Linux.
- Open a web-browser and check to see if you can connect to the Internet.
Answer Investigation 1 observations (all parts and questions) in your lab log book.
INVESTIGATION 2: COMMON POST-INSTALL TASKS
Managing your Virtual Machine
In future labs, you will have to run your VMware Workstation application to boot-up your CentOS 7 host VM. Usually, you are NOT required to use this menu (unless you need to "force-off" the c7host7 machine, but should only be performed if you cannot normally shut-down the c7host VM from the OS.
On the other hand, there are useful short-cut key you should use:
ALT-CTRL-ENTER
- Toggles the VM Workstation application window between full screen mode and window mode.
ALT-CTRL
- Return focus from your c7host VM to your host computer system.
VMware Tools is a collection of utilities to help improve the performance and efficiency of the VM's operating system. Some features include:
- Faster Graphics
- Allow applications running in a VM to be accessed in the host machine (unity interface)
- Sharing folders between host and VM
- Copying and pasting text between host and among VMs
- Clock synchronization among host and VMs
It is recommended to install VMware Tools on your system. Click the VM menu and select Install VM Tools. The installation program will run in the background until the install is complete.
Part 1: Turning Off Locked Screen-saver
Your system automatically enables a screen-saver application which is a useful security tool to prevent unauthorized viewing of information on a terminal after a certain amount of inactivity. Turning-off the locked screen-saver for this (and other) virtual machine can be useful when waiting for your instructor to come over to "sign-off" your computer lab without having to re-issue user passwords.
To Disable the Locked Screen-saver, Perform the following steps:
- Click on the power button at the top right-hand corner of the window.
- Click the Settings icon (bottom left-hand side of menu - looks like a screw-driver and wrench icon.
- Click the Power icon located in the Settings Dialog Box
- Change the amount of time in the Power Saving section to Never or a longer period of time
- Close the Settings Dialog box.
Part 2: Accessing Administrative Privileges
- Perform the following steps:
- Refer to the Information box regarding how to access the admin account from the command line.
- Issue the command
suIssue the pwd and whoami commands to confirm your directory pathname. When finished logout of this account. - Issue the command
su -Issue the pwd and whoami commands to confirm your directory pathname. What do you notice are the main differences between using su versus using su - ? - An installation log file called
/var/log/anaconda/packaging.loghas been created to record the installation of your c7host machine. This file is an ASCII file which can be viewed with themorecommand. - You can make use of this file to determine how many packages have been installed: complete the following command to count the number of packages that are labelled "Installing" in the installation log file:
-
grep -i packaging /var/log/anaconda/packaging.log | wc -l
-
Part 3: Disable SELinux and Perform Software Updates
SELinux stands for Security-Enhanced Linux. It is a component that helps to better secure the system to protect against intrusion (hackers). SELinux is enabled upon the default install of CentOS. SELinux can be a good thing, if you take care of it and know how it works. For this course it is strongly recommended that you disable SELinux by default because we won't have the time to reconfigure it every time the labs make it necessary.
- Perform the following Steps:
- Disabling SELinux is quite simple.
- Edit the file /etc/selinux/config
- In the editing session, set SELINUX to disabled (from enforcing) and save your editing session.
- Restart your VM.
- You can check the status of SELinux at any time at the command line by typing: sestatus
Answer Investigation 2 observations (all parts and questions) in your lab log book.
Part 4: Using Shell Scripting to Generate System Information Reports
It is very common for System Administrators to keep records regarding their installed computer systems. For example, it is necessary to have a record of all the hardware information for each machine in order to help fix computer hardware problems, and to assist when purchasing additional consistent computer hardware.
Therefore, it makes sense to also have a record of the installed computer software as well. This can contain information regarding the Linux operating system, installed software, and network connectivity information.
- Perform the Following Steps:
- Study the Linux commands and their purpose to note computer software information for your installed c7hostVM. You should take time to issue each of these commands to view the output, and record this chart in your lab1 logbook.
- Login to your c7hostVM, open a Bash Shell terminal, and login as root by issuing the command:
su - - Make certain to record output from these commands (except for the ps -ef output) in your lab1 logbook.
| Command(s) | Purpose |
uname -rvhostnameps -ef |
Basic Linux OS information such as kernel version, host-name of Linux server, and all processes that are running on the system after installation. |
rpm -q -a | wc -lrpm -q -a -l | wc -lrpm -q -l gedit | wc -l |
Obtain number of installed packages in the rpm database. Option -q is to "query" informationo, option -a means for all installed packages, option -l means all files installed as opposed to just the application. |
ifconfigroute -nnslookup (at prompt, enter command: server) |
Obtain network connectivity confirmation including: IP ADDRESS, Netmask, routing (default gateway), and the default Domain Name Server. |
- You may have learned about creating and running Bash Shell Scripts in your ULI101 course. Shell scripts help Linux users and system administrators to automate repetitive tasks to become more efficient and to help them save time. You will be reviewing and building a basic Bash Shell script to generate information reports for your newly-installed Linux host machine.
- Refer to the Bash Shell Scripting Guide prior to proceeding with this section. As you continue, you are required to make Bash Shell scripting notes in your lab1 logbook.
- Create a directory called bin in your root home directory to store your shell scripts by issuing the command:
mkdir /root/bin - Change to that newly-created bin directory
- NOTE: Although it is possible to copy and paste, is it highly recommended to manually enter the following Bash Shell scripting content to become familiar with writing Bash Shell scripting code. Remember: you will be required to create a Bash Shell script on your final exam, so you need the practice!
- Launch a text editor (such as
viornano) to create a Bash Shell script called:myreport.bashin your current directory. - Copy and paste the text below into your vi editing session for your file report.bash
(how do you copy and paste efficiently in Linux?)
#!/bin/bash


# Author: *** INSERT YOUR NAME ***

# Date:   *** CURRENT DATE ***

#

# Purpose: Creates system info report

#
# USAGE: ./myreport.bash


if [ $USER != "root" ]   # only runs if logged in as root

then
 echo "You must be logged in as root." >&2

 exit 1

fi
- Save your editing session, assign the myreport.bash file read and execute permissions (at least for the owner) and run by typing:
./myreport.bash - Did it work?
- Reopen your text-editing session for /root/bin/myreport.bash and add the following lines of code to the bottom of the shell script file:
# Create report title


echo "SYSTEM REPORT" > /root/report.txt

echo "Date: $(date +'%A %B %d, %Y (%H:%M:%p)')" >> /root/report.txt

echo  >> /root/report.txt
- Save and run the bash shell script. View the contents of the file called report.txt that was generated (I hope you are using the up arrow key to issue previously issued commands in order to save time!). Notice how the redirection symbol > is used at the beginning of the report, and then the other redirection symbol >> is used to help "grow" the report with the other content.
- The only remaining content of the report would be the system information. We can use a shell scripting trick called "command substitution" $( .. ) in order place results from an command to be used by another command (like echo). Re-edit the shell script and add the following code at the bottom of the shell script file:
echo  >> /root/report.txt

echo "Hostname: $(hostname)"  >> /root/report.txt

echo  >> /root/report.txt

echo "Kernel Version: $(uname -rv)"  >> /root/report.txt

echo  >> /root/report.txt
- Save, run the script, and view the report.txt contents (are you using tip that was given to save time?).
- Edit the shell script and include output from the
ps auxandifconfigcommands (with appropriate titles). Remember to redirect that output to add to the bottom of the file! - Save, run and confirm that the shell script is working correctly.
- What would be the use of keeping this shell script as a Linux system administrator?
- Here are some more "complex" Bash Shell scripts, that perform the same task. Although you are not require to understand some of these other tricks, it is recommended that you view the contents of the scripts and save them for future consideration or exmaples.
- The
wgetcommand can be used to quickly download files from the Internet. Issue the following command:wget https://scs.senecac.on.ca/~murray.saul/text-report.bash - Verify that the file text-report.bash was downloaded to your current directory.
- Assign read and execute permissions for this file by issuing the command:
chmod u+rx text-report.bash - Run this Bash Shell script by issuing the command:
./text-report.bash - Check to see if it created a report in your current directory. What is the purpose of the report?
- Use the vi text editor to view the contents of the file text-report.bash. Can you understand how this script works?
- Use the
wgetcommand to download, study, and run the following shell scripts on-line:https://scs.senecac.on.ca/~murray.saul/report.bash
https://scs.senecac.on.ca/~murray.saul/report3.bash - Try to understand what these Bash Shell scripts do.
- You have completed lab1. Proceed to Completing The Lab, and follow the instructions for "lab sign-off".
Answer Investigation 2 observations (all parts and questions) in your lab log book.
LAB 1 SIGN-OFF (SHOW INSTRUCTOR)
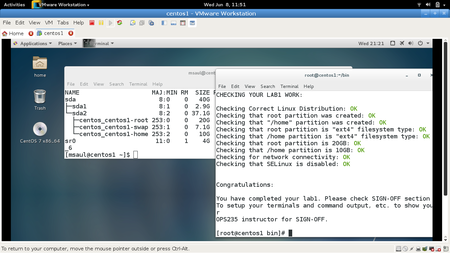
Shell scripting is so essential for Linux administration that this course has created a shell script for every lab for this course that a student must download and run in order to check their work.
If you have performed the lab correctly, then you will get a series of OK messages and you can proceed with the SIGN-OFF for lab1. On the other hand, if there were errors, then a WARNING message will appear with general suggestions that you will need to fix on your c7hostVM in order to have your OPS235 sign-off in this lab in order to proceed to the next lab.
- Perform the Following Steps:
- Make certain that your c7host VM is running, open the Bash Shell terminal and issue the command:
su -and enter root's password. - Change to the /root/bin directory.
- Download the checking script by issuing the following Linux command:
wget http://matrix.senecac.on.ca/~murray.saul/ops235/lab1-check.bash - Give that downloaded shell script file execute permissions (for the file owner).
FYI: Your this checking script will not work unless you issued "su -" instead of just "su". - Run the shell script and if any warnings, make fixes and re-run shell script until you receive "congratulations" message.
- Arrange evidence (command output) for each of these items on your screen, then ask your instructor to review them and sign off on the lab's completion:
- ✓ Run the lab1-check.bash script in front of your instructor (must have all OK messages)
- ✓ Proof that c7host VM is set for virtualization (Refer to: INVESTIGATION 1 - Part 1 - Step #28)
- ✓ Lab1 logbook containing the values for:
- IP address, MAC address, Default route (gateway) and
DNS name server IP Address
- IP address, MAC address, Default route (gateway) and
Practice For Quizzes, Tests, Midterm & Final Exam
- Define the term Virtual Machine.
- List the major screens (steps) in the installation of Centos7 full install DVD.
- What key-combination is used to toggle the view of your running VM from "window-mode" to "full-screen-mode"?
- List the steps for disabling SELinux.
- List 2 ways that you can access your root account
- What is the difference between the commands su and su - ?
- What is the home directory for the user "root"?
- How do you determine the host name of your GNU/Linux workstation?
- What command can display the NIC's MAC address?
- What command is used to get a list of running processes on your newly-installed system?
- Write the Linux command to download the on-line file: http://linux.server.org/package.tar.gz
- Write a Bash Shell Script to prompt the user for a directory, and then display the file types for all files in that specified directory (hint: use the read command and then use the file command and command substitution with the ls command). Test the Bash Shell script by adding execute permissions and run the Bash Shell Script.
- Modify the previously created shell script to perform error checking after prompting for a directory to test if the specified directory does not exist. If it does NOT exist (i.e. true), display an error message indicating that the directory does NOT exist, and issue the command exit 1 to terminate the Bash Shell Script. Test the Bash Shell script by adding execute permissions and run the Bash Shell Script.
