Difference between revisions of "Savy Cat"
(→Rotate90) |
(→Rotate90) |
||
| Line 415: | Line 415: | ||
==== Dependencies ==== | ==== Dependencies ==== | ||
| − | Figuring out how to use the CImg library in a parallel solution was fairly strait forward. In order to do so, I had to isolate any reference to CImg to it's own .cpp file. Trying to include the CImg library in the CUDA .cu file caused compilation errors. We use the function getImage defined in Image.h and available to Rotate.cu in order to retrieve image data as a one dimensional float array. We can do the opposite and pass the float array back to Image.cpp for it to construct a CImg object and display the image to the screen (or | + | Figuring out how to use the CImg library in a parallel solution was fairly strait forward. In order to do so, I had to isolate any reference to CImg to it's own .cpp file. Trying to include the CImg library in the CUDA .cu file caused compilation errors. We use the function getImage defined in Image.h and available to Rotate.cu in order to retrieve image data as a one dimensional float array. We can do the opposite and pass the float array back to Image.cpp for it to construct a CImg object and display the image to the screen (or utilize any other CImg functionality). |
Getting libjpeg to work, (the functionality of reading RGB pixel values from the .jpg file and storing them in a CImg object), took much longer to figure out. Linking the previous windows .lib build did not work, I suspect because our parallel version is being compiled in 64bit and libjpeg is 32bit. My first attempt (which did not work, so I would not recommend trying), was to replace libjpeg with [https://libjpeg-turbo.org/ turbo-jpeg], which is a 64bit library that overloads every libjpeg function so that it should be able to replace libjpeg functionality as-is, and is supposed to run faster due to optimization. By installing turbo-jpeg and moving jpeg62.dll to the project executable folder, I was able to get the solution to compile, however, it froze during run-time upon opening a .jpg file. | Getting libjpeg to work, (the functionality of reading RGB pixel values from the .jpg file and storing them in a CImg object), took much longer to figure out. Linking the previous windows .lib build did not work, I suspect because our parallel version is being compiled in 64bit and libjpeg is 32bit. My first attempt (which did not work, so I would not recommend trying), was to replace libjpeg with [https://libjpeg-turbo.org/ turbo-jpeg], which is a 64bit library that overloads every libjpeg function so that it should be able to replace libjpeg functionality as-is, and is supposed to run faster due to optimization. By installing turbo-jpeg and moving jpeg62.dll to the project executable folder, I was able to get the solution to compile, however, it froze during run-time upon opening a .jpg file. | ||
| − | What finally did work was installing the windows 64bit version of [https://www.imagemagick.org/script/download.php#windows ImageMagick], and then removing the line of code " | + | What finally did work was installing the windows 64bit version of [https://www.imagemagick.org/script/download.php#windows ImageMagick], and then removing the line of code "#define cimg_use_jpeg" which told CImg to use libjpeg. By default, it finds ImageMagick from it's default installation directory, and uses its functionality when initializing a CImg object from file. Oddly enough, I tried to use ImageMagick at the very beginning of the project, and could not get it to work, and thus used libjpeg. Now for the CUDA version, it works. Either way, you will notice the pixel values themselves slightly different than in the first time run example. This simply shows that libjpeg and ImageMagick use different logic to determine colour values. |
| − | #define cimg_use_jpeg" which told CImg to use libjpeg. By default, it finds ImageMagick from it's default installation directory, and uses its functionality when initializing a CImg object from file. Oddly enough, I tried to use ImageMagick at the very beginning of the project, and could not get it to work, and thus used libjpeg. Now for the CUDA version, it works. Either way, you will notice the pixel values themselves slightly different than in the first time run example. This simply shows that libjpeg and ImageMagick use different logic to determine colour values. | ||
=== Assignment 3 === | === Assignment 3 === | ||
Revision as of 00:47, 3 April 2018
GPU610/DPS915 | Student List | Group and Project Index | Student Resources | Glossary
Contents
[hide]Rotate90
Team Members
Progress
Assignment 1
I kept things very simple and created a function that rotates an image 90° clockwise.
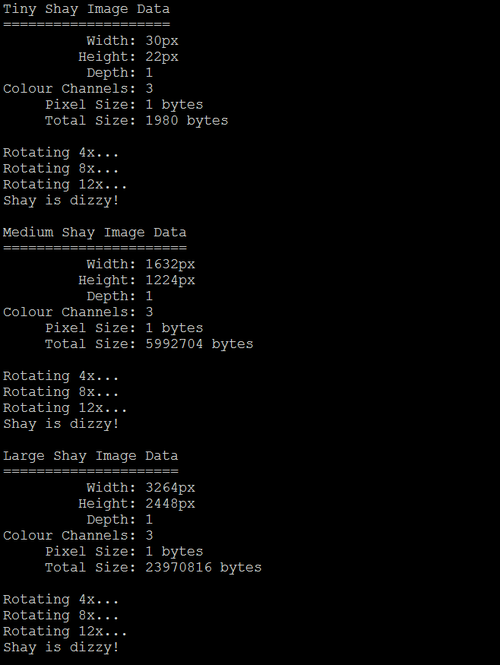
Then, I profile and evaluate performance of rotating a tiny, medium, and large sized image file 12 times each.
Dependencies
Two open-source utilities are required in order to run the project code:
- CImg
- Download and extract the CImg Library (Standard Package). This provides the template class used to store image information. The library contains many useful image manipulation functions and methods, including rotate, but we will only be making use of the CImg class and the Display function. Make sure your project include path can find CImg.h, which should be located in the root of the extracted files.
- libjpeg
- libjpeg provides the functionality of reading .jpg file data into a CImg object. It's not quite as strait forward as getting CImg, as you need to compile libjpeg from source. I used the most recent (Jan 2018) version named jpegsr9c.zip from this listing.
- If you have trouble building the solution, this article on Stackoverflow helped me compile it for Windows 7. I used nmake from the Visual Studio command prompt, which uses the tool win32.mak, which can be acquired from the Windows developer toolkit v7.0.
- Once libjpeg has been built, it should result in creation of "libjpeg.lib". Be sure to link this file with compilation of the project code.
Initial Code
- Rotate.h
// Evan Marinzel - DPS915 Project
// Rotate.h

#pragma once

#define cimg_use_jpeg
#define PX_TYPE unsigned char

#include <CImg.h>
#include <iostream>
#include <iomanip>


// Indexing function for CImg object.
// CImg[x][y][z]
inline int idx(int x, int y, int w, int h, int z) {
  return x + y * w + w * h * z;
}

// Indexing function for accessing pixel location rotated 90 degrees relative to current location
// CImg[h - 1 - y][x][z]
inline int idx90(int x, int y, int w, int h, int z) {
  return (h - 1 - y) + x * h + w * h * z;
}

// Prints colour channel values of img to console.
// Opens image, mouse-over pixels to verify indexing is correct.
// Uses 40 x 40 pixel sample from the top left corner if img is larger than 40 x 40
void display(const cimg_library::CImg<PX_TYPE> img) {

  int height = img.height() > 40 ? 40 : img.height();
  int width = img.width() > 40 ? 40 : img.width();

  for (int i = 0; i < img.spectrum(); i++) {
    if (i == 0)
      std::cout << "Red:" << std::endl;
    else if (i == 1)
      std::cout << "Green:" << std::endl;
    else if (i == 2)
      std::cout << "Blue:" << std::endl;
    for (int j = 0; j < height; j++) {
      for (int k = 0; k < width; k++) {
        std::cout << std::setw(4) << (int)img[idx(k, j, img.width(), img.height(), i)];
      }
      std::cout << std::endl;
    }
    std::cout << std::endl;
  }

  cimg_library::CImg<PX_TYPE> imgCropped(img);
  imgCropped.crop(0, 0, width - 1, height - 1, 0);
  imgCropped.display();

}

// Print image dimensions and size to console.
void imgStats(const char* title, cimg_library::CImg<PX_TYPE> img) {

  std::cout << title << " Image Data" << std::endl;
  std::cout << std::setfill('=') << std::setw(strlen(title) + 11) << "=" << std::setfill(' ') << std::endl;
  std::cout << std::setw(17) << std::right << "Width: " << img.width() << "px" << std::endl;
  std::cout << std::setw(17) << std::right << "Height: " << img.height() << "px" << std::endl;
  std::cout << std::setw(17) << std::right << "Depth: " << img.depth() << std::endl;
  std::cout << std::setw(17) << std::right << "Colour Channels: " << img.spectrum() << std::endl;
  std::cout << std::setw(17) << std::right << "Pixel Size: " << sizeof(PX_TYPE) << " bytes" << std::endl;
  std::cout << std::setw(17) << std::right << "Total Size: " << img.size() << " bytes" << std::endl;
  std::cout << std::endl;

}

// Rotate src image 90 degrees clockwise.
// Works by assigning pixel values from src to dst.
//   - dst must be allocated as valid size
void rotate90(cimg_library::CImg<PX_TYPE> src, cimg_library::CImg<PX_TYPE> &dst) {

  for (int i = 0; i < src.spectrum(); i++) {
    for (int j = 0; j < src.height(); j++) {
      for (int k = 0; k < src.width(); k++)
        dst[idx90(k, j, src.width(), src.height(), i)] = src[idx(k, j, src.width(), src.height(), i)];
    }
  }

}

// Rotate image 360 degrees by calling rotate90 4 times.
void rotate90x4(cimg_library::CImg<PX_TYPE> src, cimg_library::CImg<PX_TYPE> dst) {

  rotate90(src, dst);
  rotate90(dst, src);
  rotate90(src, dst);
  rotate90(dst, src);

}
- Rotate.cpp
// Evan Marinzel - DPS915 Project
// Rotate.cpp

#include "Rotate.h"

int main(int argc, char** argv) {

  // Allocate memory for 3 CImg structures, initializing colour values from speficied files.
  cimg_library::CImg<PX_TYPE> img_tiny("C:\\School\\DPS915\\Project\\CImg-Rotate\\Debug\\Tiny-Shay.jpg");
  cimg_library::CImg<PX_TYPE> img_med("C:\\School\\DPS915\\Project\\CImg-Rotate\\Debug\\Medium-Shay.jpg");
  cimg_library::CImg<PX_TYPE> img_large("C:\\School\\DPS915\\Project\\CImg-Rotate\\Debug\\Large-Shay.jpg");

  // Allocate memory for rotated versions of above, initializing colour values to 0.
  cimg_library::CImg<PX_TYPE> img_tiny90(img_tiny.height(), img_tiny.width(), 1, 3, 0);
  cimg_library::CImg<PX_TYPE> img_med90(img_med.height(), img_med.width(), 1, 3, 0);
  cimg_library::CImg<PX_TYPE> img_large90(img_large.height(), img_large.width(), 1, 3, 0);

  // Un-comment to print pixel values to console and display image for 4 rotations
  /*
  display(img_tiny);
  rotate90(img_tiny, img_tiny90);
  display(img_tiny90);
  rotate90(img_tiny90, img_tiny);
  display(img_tiny);
  rotate90(img_tiny, img_tiny90);
  display(img_tiny90);
  rotate90(img_tiny90, img_tiny);
  display(img_tiny);
  */

  // Display image statistics and rotate 12 times each.
  imgStats("Tiny Shay", img_tiny);

  std::cout << "Rotating 4x..." << std::endl;
  rotate90x4(img_tiny, img_tiny90);
  std::cout << "Rotating 8x..." << std::endl;
  rotate90x4(img_tiny, img_tiny90);
  std::cout << "Rotating 12x..." << std::endl;
  rotate90x4(img_tiny, img_tiny90);
  std::cout << "Shay is dizzy!" << std::endl << std::endl;

  imgStats("Medium Shay", img_med);

  std::cout << "Rotating 4x..." << std::endl;
  rotate90x4(img_med, img_med90);
  std::cout << "Rotating 8x..." << std::endl;
  rotate90x4(img_med, img_med90);
  std::cout << "Rotating 12x..." << std::endl;
  rotate90x4(img_med, img_med90);
  std::cout << "Shay is dizzy!" << std::endl << std::endl;

  imgStats("Large Shay", img_large);

  std::cout << "Rotating 4x..." << std::endl;
  rotate90x4(img_large, img_large90);
  std::cout << "Rotating 8x..." << std::endl;
  rotate90x4(img_large, img_large90);
  std::cout << "Rotating 12x..." << std::endl;
  rotate90x4(img_large, img_large90);
  std::cout << "Shay is dizzy!" << std::endl << std::endl;

  return 0;

}
Running Display Test
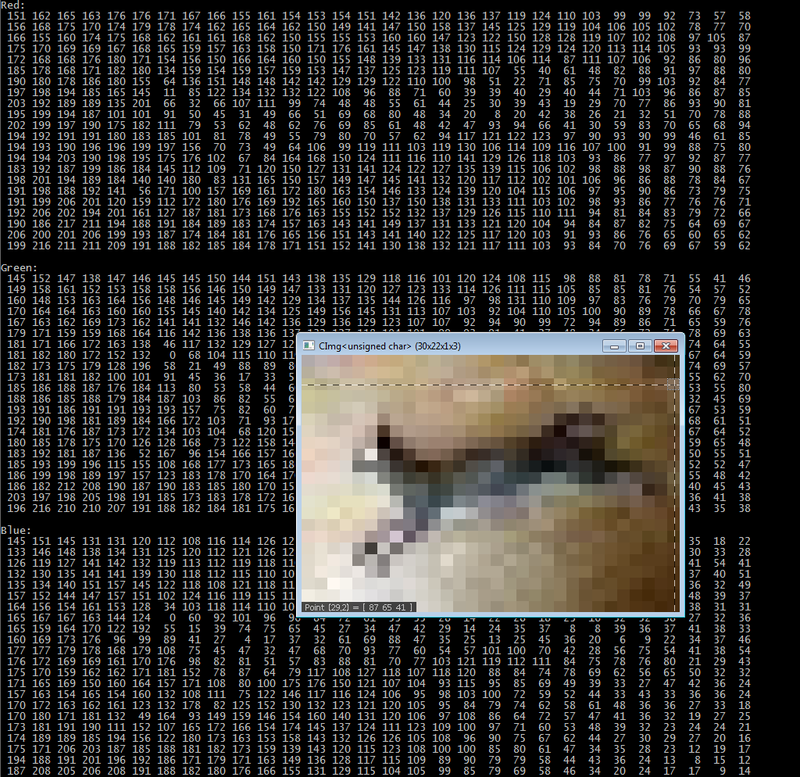
We can un-comment the "test" section in Rotate.cpp to read a .jpg, verify stored colour channel values are correct, and make sure the rotation is working as expected. Here is Tiny-Shay.jpg, 30px x 21px top-down image of my cat laying on the floor. Mousing over a pixel will display the X and Y coordinates, along with the corresponding red, green, blue values.
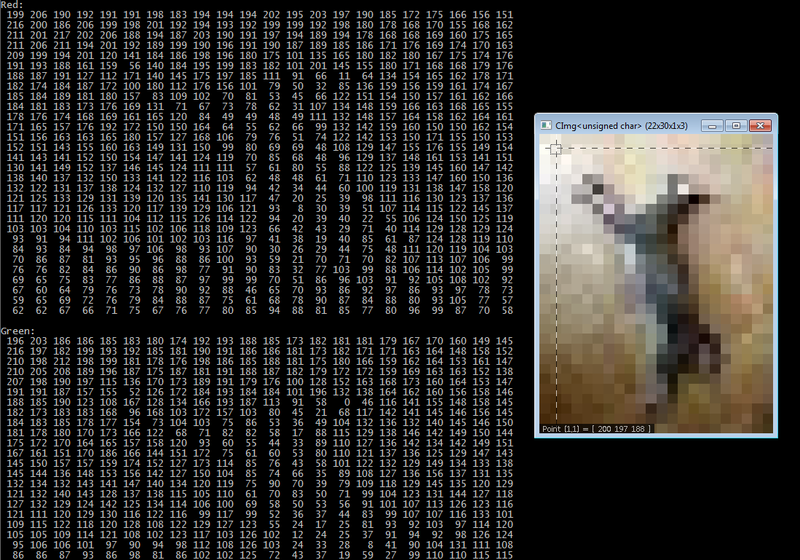
After rotate90:
I verify three more rotations work as expected, resulting in 180°, 270°, and back to the original image with no loss or value changes.
CImg In Memory
To understand how an instance of the CImg class is stored in memory, this article from CImg library site does a very good job explaining it.
Essentially, CImg is a 4 dimensional array of dimensions (image width x image height x depth x colour channels). Multiply this by the size per pixel (one byte in our case) to get overall size of the variable. For 2 dimensional images (which is what we are working with), depth has a value of 1, resulting in a 3 dimensional array. The number of channels is 3, one for each primary colour: (red, green, and blue). This can be visualized as three 2D matrix where the value of each matrix at any specified point represents RGB values of one pixel at that same location. In the following code, we allocate space for the rotated image, knowing its width will become its height, and height become its width. 1 specifies the depth, 3 specifies number of colour channels, and 0 is the default value to initialize each element.
cimg_library::CImg<PX_TYPE> img_tiny90(img_tiny.height(), img_tiny.width(), 1, 3, 0);
Much like any dimensional array, CImg is stored in memory as a single dimensional array. It stores all of the red values, followed by all green values, followed by all blue values. It uses row major indexing, and the first value begins at 0 (not 1).
To access the first red pixel I could write:
img_tiny90(0, 0, 0, 0)
Red pixel at (1, 1):
img_tiny90(1, 1, 0, 0)
First green pixel:
img_tiny90(0, 0, 0, 1)
Third blue pixel:
img_tiny90(2, 0, 0, 2)
For any location at x & y, with width of image, height of image, and z (number of colour channels):
inline int idx(int x, int y, int w, int h, int z) {
  return x + y * w + w * h * z;
}
The first portion of the index equation should look familiar (x + y * w) for indexing a square 2D matrix. Adding the result of (w * h * z) enables this to work for a rectangular matrix of z (3) dimensions.
The Rotate Operation
My rotate operation is simply an assignment operator. We initialize values of the rotated image one pixel at a time from the value stored in the source image. We calculate the new location based on the current location in the source image, using idx90. If we were rotating by any specified angle instead, it would require multiplying indices by a rotation matrix, then rounding values to integers. Since this is a triply nested operation, I suspect very small images will be OK, but Large_Shay.jpg (3264px x 2448px x 3) will require 23,970,816 operations! This should also be an ideal candidate for a parallel solution, as each pixel value assignment does not rely on completion of any prior operation.
for (int i = 0; i < src.spectrum(); i++) {
  for (int j = 0; j < src.height(); j++) {
    for (int k = 0; k < src.width(); k++)
      dst[idx90(k, j, src.width(), src.height(), i)] = src[idx(k, j, src.width(), src.height(), i)];
  }
}
Building On Matrix
In order to get performance information using gprof, copy the CImg folder containing all source files to matrix. CImg is built to be cross-platform library and should work as is. Some background information on what makes that is possible can be found here. Environment variables are automatically set based on OS, routing the program to appropriate paths of logic.
Update Rotate.h to use the relative path:
#include "CImg-2.2.1/CImg.h"
Update Rotate.cpp to use relative paths to the .jpg files:
cimg_library::CImg<PX_TYPE> img_tiny("./Tiny-Shay.jpg");
cimg_library::CImg<PX_TYPE> img_med("./Medium-Shay.jpg");
cimg_library::CImg<PX_TYPE> img_large("./Large-Shay.jpg");
To get the Unix version of the static libjpeg library (libjpeg.a), download the Unix formatted package jpegsrc.v9c.tar.gz from their homepage and copy it to matrix. To extract the contents, issue the command:
tar -xzf jpegsrc.v9c.tar.gz
Next, create a new folder to contain the built solution files.
From the extracted source folder jpeg-9c, run the libjpeg configure script and specify the new folder you created with the following command:
./configure --prefix=/home/username/dps915/project/jpeg-build
The configure script sets the build path, checks system information, compiler settings, required files, and generates a new makefile.
Next, run make:
make
This compiles files within the source folder.
Finally, run the following, which will put libjpeg.a into a 'lib' folder within the build folder we created: jpeg-build/lib/.
make install
Now, build the Rotate90 source for profiling, linking libjpeg.a and X11 resources which are required for CImg Display functionality in a Unix environment. This prevents any errors during compilation, however, if we call the CImg display function, matrix will throw a run-time error of "Failed to open X11 display". I created the following makefile:
# Makefile for Rotate90
#
GCC_VERSION = 7.2.0
PREFIX = /usr/local/gcc/${GCC_VERSION}/bin/
CC = ${PREFIX}gcc
CPP = ${PREFIX}g++

Rotate: Rotate.o
	$(CPP) -pg -oRotate90 Rotate.o -L/usr/X11R6/lib -lm -lpthread -lX11 -l:./jpeg-build/lib/libjpeg.a

Rotate.o: Rotate.cpp
	$(CPP) -c -O2 -g -pg -std=c++17 Rotate.cpp

clean:
	rm *.o
Profiling With gprof
At last we can measure performance. Giving Rotate90 an initial run:
During the run, Tiny_Shay completed seemingly instantly. Medium_Shay had a slightly noticeable latency, but seemed to be less than a second. Large_Shay took a noticeable amount of time, at least a couple seconds.
Generate the gprof .flt file:
gprof -p -b Rotate90 > r90.flt
The results with these parameters group all calls to the rotate90 function together (36 calls total). Together, this accounts for 97.57% execution time, taking a total of 4.02 seconds. The only other call that took longer than .01 seconds was the libjpeg method responsible for initializing CImg pixel values from reading the .jpg files (.10 seconds):
Each sample counts as 0.01 seconds.
  %   cumulative   self              self     total
 time   seconds   seconds    calls  ms/call  ms/call  name
 97.57      4.02     4.02       36   111.67   111.67  rotate90(cimg_library::CImg<unsigned char>, cimg_library::CImg<unsigned char>&)
  2.43      4.12     0.10        3    33.33    33.33  cimg_library::CImg<unsigned char>::_load_pnm(_IO_FILE*, char const*)
  0.00      4.12     0.00       36     0.00     0.00  cimg_library::CImg<unsigned char>::CImg(cimg_library::CImg<unsigned char> const&)
  0.00      4.12     0.00       33     0.00     0.00  cimg_library::cimg::strcasecmp(char const*, char const*)
 ...
At this point I decide to modify Rotate.cpp to accept a filename as command line argument, and perform Rotate90x4 (x3) for each file individually:
// Evan Marinzel - DPS915 Project
// Rotate.cpp

#include "Rotate.h"

int main(int argc, char** argv) {

  if (argc != 2) {
    std::cerr << argv[0] << ": invalid number of arguments\n";
    std::cerr << "Usage: " << argv[0] << "  image.jpg\n";
    return 1;
}

  // Allocate memory for CImg structure, initializing colour values from speficied file.
  cimg_library::CImg<PX_TYPE> img(argv[1]);

  // Allocate memory for rotated versions of above, initializing colour values to 0.
  cimg_library::CImg<PX_TYPE> img_90(img.height(), img.width(), 1, 3, 0);

  // Display image statistics and rotate 12 times.
  imgStats(argv[1], img);

  std::cout << "Rotating 4x..." << std::endl;
  rotate90x4(img, img_90);
  std::cout << "Rotating 8x..." << std::endl;
  rotate90x4(img, img_90);
  std::cout << "Rotating 12x..." << std::endl;
  rotate90x4(img, img_90);
  std::cout << argv[1] << " is dizzy!" << std::endl << std::endl;

  return 0;

}
After a quick search, I find that the sample rate of gprof is determined by the OS and we cannot increase it past 0.01 seconds.
Here is Tiny Shay. In this case, "no time accumulated":
 Each sample counts as 0.01 seconds.
 no time accumulated

  %   cumulative   self              self     total
 time   seconds   seconds    calls  Ts/call  Ts/call  name
  0.00      0.00     0.00       12     0.00     0.00  rotate90(cimg_library::CImg<unsigned char>, cimg_library::CImg<unsigned char>&)
  0.00      0.00     0.00       12     0.00     0.00  cimg_library::CImg<unsigned char>::CImg(cimg_library::CImg<unsigned char> const&)
  0.00      0.00     0.00       11     0.00     0.00  cimg_library::cimg::strcasecmp(char const*, char const*)
...
Medium Shay:
 Each sample counts as 0.01 seconds.
  %   cumulative   self              self     total
 time   seconds   seconds    calls  ms/call  ms/call  name
 94.44      0.34     0.34       12    28.33    28.33  rotate90(cimg_library::CImg<unsigned char>, cimg_library::CImg<unsigned char>&)
  5.56      0.36     0.02        1    20.00    20.00  cimg_library::CImg<unsigned char>::_load_pnm(_IO_FILE*, char const*)
  0.00      0.36     0.00       12     0.00     0.00  cimg_library::CImg<unsigned char>::CImg(cimg_library::CImg<unsigned char> const&)
...
Large Shay:
 Each sample counts as 0.01 seconds.
  %   cumulative   self              self     total
 time   seconds   seconds    calls  ms/call  ms/call  name
 98.11      3.63     3.63       12   302.50   302.50  rotate90(cimg_library::CImg<unsigned char>, cimg_library::CImg<unsigned char>&)
  1.89      3.70     0.07        1    70.00    70.00  cimg_library::CImg<unsigned char>::_load_pnm(_IO_FILE*, char const*)
  0.00      3.70     0.00       12     0.00     0.00  cimg_library::CImg<unsigned char>::CImg(cimg_library::CImg<unsigned char> const&)
...
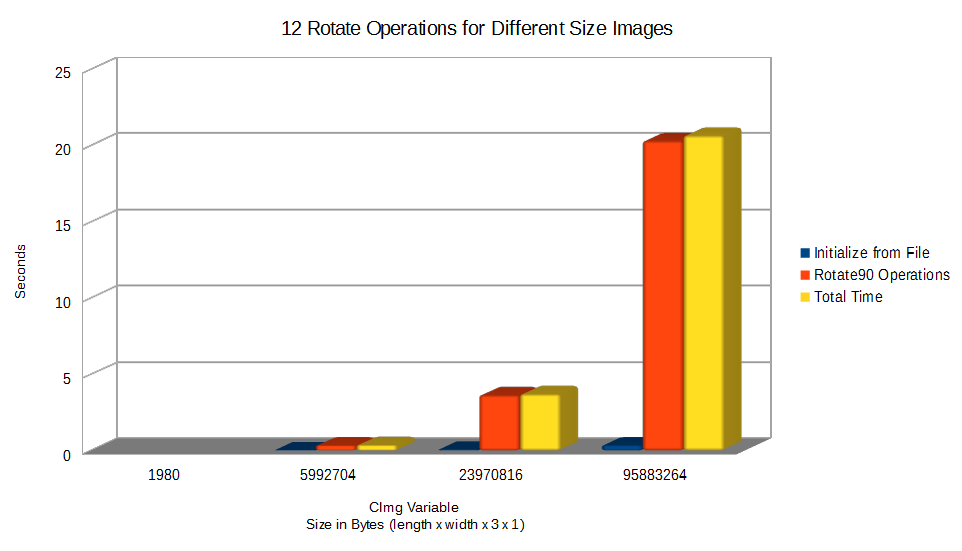
For the sake of science, I created Huge-Shay.jpg (6528 x 4896px), which is double the dimensions of Large Shay, requiring 95,883,264 value assignments:
 Each sample counts as 0.01 seconds.
  %   cumulative   self              self     total
 time   seconds   seconds    calls   s/call   s/call  name
 98.31     20.31    20.31       12     1.69     1.69  rotate90(cimg_library::CImg<unsigned char>, cimg_library::CImg<unsigned char>&)
  1.69     20.66     0.35        1     0.35     0.35  cimg_library::CImg<unsigned char>::_load_pnm(_IO_FILE*, char const*)
  0.00     20.66     0.00       12     0.00     0.00  cimg_library::CImg<unsigned char>::CImg(cimg_library::CImg<unsigned char> const&)
...
Here is a summary of results:
Assignment 2
Time to see how much of a performance increase we can achieve by programming a simple kernel.
Dependencies
Figuring out how to use the CImg library in a parallel solution was fairly strait forward. In order to do so, I had to isolate any reference to CImg to it's own .cpp file. Trying to include the CImg library in the CUDA .cu file caused compilation errors. We use the function getImage defined in Image.h and available to Rotate.cu in order to retrieve image data as a one dimensional float array. We can do the opposite and pass the float array back to Image.cpp for it to construct a CImg object and display the image to the screen (or utilize any other CImg functionality).
Getting libjpeg to work, (the functionality of reading RGB pixel values from the .jpg file and storing them in a CImg object), took much longer to figure out. Linking the previous windows .lib build did not work, I suspect because our parallel version is being compiled in 64bit and libjpeg is 32bit. My first attempt (which did not work, so I would not recommend trying), was to replace libjpeg with turbo-jpeg, which is a 64bit library that overloads every libjpeg function so that it should be able to replace libjpeg functionality as-is, and is supposed to run faster due to optimization. By installing turbo-jpeg and moving jpeg62.dll to the project executable folder, I was able to get the solution to compile, however, it froze during run-time upon opening a .jpg file.
What finally did work was installing the windows 64bit version of ImageMagick, and then removing the line of code "#define cimg_use_jpeg" which told CImg to use libjpeg. By default, it finds ImageMagick from it's default installation directory, and uses its functionality when initializing a CImg object from file. Oddly enough, I tried to use ImageMagick at the very beginning of the project, and could not get it to work, and thus used libjpeg. Now for the CUDA version, it works. Either way, you will notice the pixel values themselves slightly different than in the first time run example. This simply shows that libjpeg and ImageMagick use different logic to determine colour values.


