Difference between revisions of "SenecaNET"
(Created page with "This is how I've set up my Linux Mint 18 laptop to connect to SenecaNET. The process is actually the same as the older SeneNET-Extreme network. SenecaNET is not a hidden netwo...") |
Chris Tyler (talk | contribs) (Tags: Mobile edit, Mobile web edit) |
||
| Line 6: | Line 6: | ||
# Click "Network Settings" | # Click "Network Settings" | ||
# Click "Connect to a Hidden Network" | # Click "Connect to a Hidden Network" | ||
| − | ## Network name: | + | ## Network name: SenecaNET |
## Security: WPA & WPA2 Enterprise | ## Security: WPA & WPA2 Enterprise | ||
## Authentication: Protected EAP (PEAP) | ## Authentication: Protected EAP (PEAP) | ||
Latest revision as of 14:03, 20 December 2016
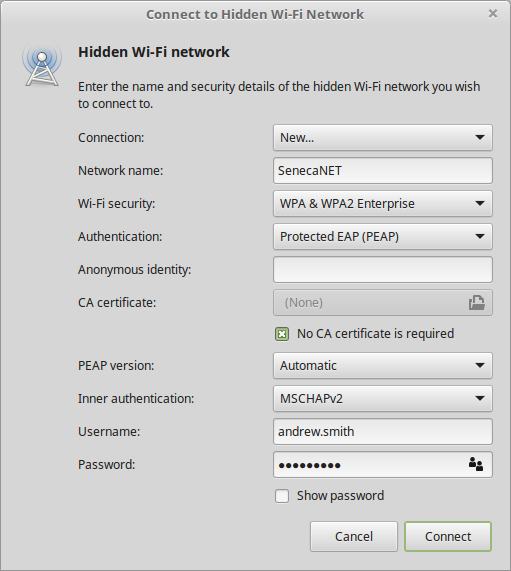
This is how I've set up my Linux Mint 18 laptop to connect to SenecaNET. The process is actually the same as the older SeneNET-Extreme network. SenecaNET is not a hidden network but you clicking on it doesn't seem to do anything.
Steps to set it up:
- Left-click on the NetoworkManager icon. SenecaNET will show up in there but we don't want to use it.
- Click "Network Settings"
- Click "Connect to a Hidden Network"
- Network name: SenecaNET
- Security: WPA & WPA2 Enterprise
- Authentication: Protected EAP (PEAP)
- Anonymous identity: leave this empty
- CA certificate: none
- Check "No CA certificate is required"
- PEAP version: automatic
- Internal authentication: MSCHAPv2
- Username/password: your seneca credentials
Enjoy!
