Difference between revisions of "OPS335 Lab 4"
| Line 98: | Line 98: | ||
|- valign="top" | |- valign="top" | ||
| | | | ||
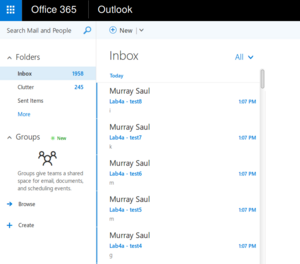
| − | [[Image:outlook-lite-mode.png|thumb|right| | + | [[Image:outlook-lite-mode.png|thumb|right|300px|If your MS outlook application looks like above, then your MS Outlook application is in lite-mode, and needs to be changed to regular-mode). ]] |
| − | [[Image:outlook-regular-mode.png|thumb|right| | + | [[Image:outlook-regular-mode.png|thumb|right|300px|The '''Installation Summary''' screen provides flexibly when configuring to install on your computer. ]] |
|} | |} | ||
Revision as of 15:45, 17 February 2016
Contents
MAIL SERVER RESOURCES
Online References:
- OPS335 Mail Server Notes Course Notes providing Concepts and Overview of mail server setup
- Mail Send Command (examples how to send e-mail using mail command)
- View and Manage Received e-mail Mesages (Common commands to view and manage received email messages)
- Reading Full Email Headers (Explanation of message header information)
OVERVIEW & PREPARATION
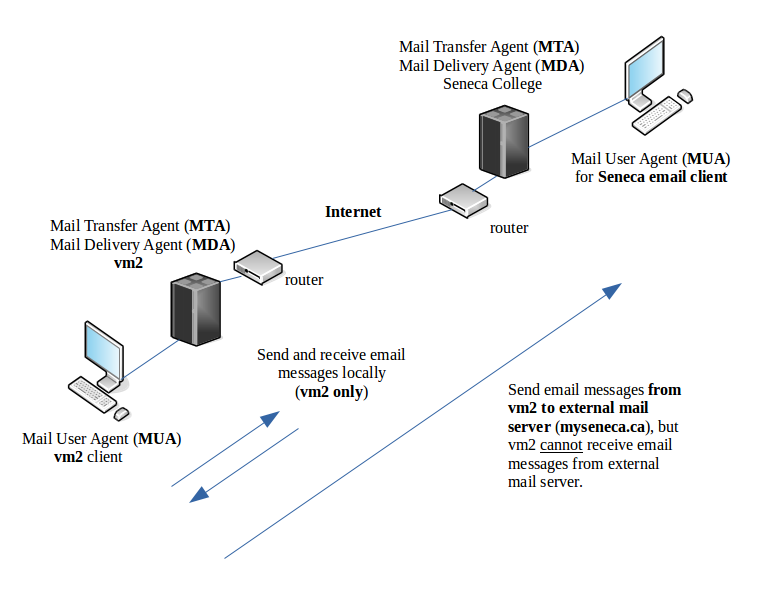
This lab will show you how to set up a Mail User Agent (mailx package) on your VM2 machine to allow users of that VM to send and receive e-mails locally on your VM2 machine, and to send a text-based e-mail to your Seneca mail account (only to send to an external server, but not receive). You will also learn which Mail Transfer Agent (MTA) is allowing messages to be sent locally in your VM2 and externally to your Seneca College account. You will also learn where the message store (MS) is located, and how messages can be saved to other folders.
In order to send e-mail messages between your different VMs, a more complex set-up is required, and will be addressed in the second part of lab4.
The diagram below shows the layout of the what this lab should be able to accomplish:
INVESTIGATION 1: INSTALL, SET-UP, AND USE THE MAIL USER AGENT (mailx Package)
We will be using a simple text-based Mail User Agent (MUA) called mailx in this lab to send and receive mail messages within your VM2 machine and to send mail messages to your Seneca e-mail account.
NOTE: Due to the simplicity of this mail server setup, and the setup of Seneca College's mail server, you cannot send Seneca e-mail messages to your VM2 machine.
Installing the Mail User Agent (MUA)
Perform the following Steps:
- Make certain you are in your vm2 machine.
- Issue the following command to install the mailx application (MUA):
yum install mailx
- NOTE: You can refer to the link below to acquaint yourself on how to send e-mail messages using mailx application:
Mail Send Command Examples
Sending a Mail Message from your VM2 Machine to your Seneca Email Account
We will now test to see if your MTA for your VM2 machine is correctly running by sending email messages from your VM2 machine to your Seneca e-mail account.
Perform the following steps:
- Make certain you are still in your vm2 machine.
- Test email from your machine by sending an email to your Seneca email account using the following command:
mail -s "Lab4a - test1" <Your Seneca email address>
NOTE: after you type in the body of the mail message, move to an empty line, type period "." and press the ENTER key to send the message. - Check your Seneca email account to see if you got the email (note that it may take a few minutes to arrive, so you may also wish to try an alternate email account if you have one like gmail, etc). When you do receive that email, make a note of the return address.
- If you did not receive the mail, check the mail logs on your vm2 machine to determine any errors messages that would indicate a mail server setup problem.
- Test email from your Host Machine by sending an email to your Seneca account using the following command:
mail -r "hacker.com (Canadian Revenue Agency)" -s "Lab4a - test2" <Your Seneca email address> - Check your Seneca email to see if you got the email. If you did, make a note of the return address. How would you think that including the -r option could be used by penetration hackers to gain access to a computer system? What sort of steps do you think should be taken to help prevent this type of attack from happening?
Sending a Mail Message within your VM2 Machine (vm2)
We will now test both your MUA (mailx) and MTA (postfix) by sending and receiving e-mail messages on the local VM2 machine only.
Perform the following Steps:
- Send an email message locally (i.e. only within) your VM2 machine by issuing the command:
mail -s "Lab4a - Local - Test1" <yourSenecaID> - After you type in the body of the mail message, move to an empty line, type period "." and press the ENTER key to send the message.
- Issue the following command: cat /var/log/spool/mail/<yourSenecaID>
What do you see? What does this show you in terms of where mail is stored on your e-mail server? - Issue the following command to read the mail message you send to yourself:
mail
NOTE: You can refer to the link below to view a reference chart on how to read and delete received e-mail messages at the mail command prompt:
Commands to View and Manage Received e-mail Mesages - If you received an e-mail message, the message and subject line should appear as a listing in your mail command.
If you did not receive a mail message, check your mail server settings, check to see if you mail server is running and also check /var/log/messages. - Type the mail message number that is displayed in your e-mail message list in the prompt and press ENTER. You should be able to confirm the message body that you sent.
- Exit the mail program by typing the letter q and press ENTER.
- Re-issue the mail command. What happened?
- Exit the mail command.
Checking the Message Store (MS) of Received Mail Messages
We will now view the Message Store where messages are sent to be retrieved from the mail program. We will also show you how to save mail messages into another message store file in another directory.
Perform the following Steps:
- Create a directory in your home directory called: mail.
- Re-issue the mail command, and enter the following command at the mail prompt: save 1 mail/msg1
Use the cat command to check the contents of /var/spool/mail<yourSenecaID> and ~/mail/msg1. Exit the mail command. - Try sending another e-mail from your VM2 account to yourself, but using your first name instead by issuing the following command:
mail -s "Lab4a - Local - Test2" <yourFirstName> - Issue the mailq command on your VM2 machine (you will need to be root) to view the mail queue. Why would this command be useful for an administrator?
- Now, issue the mail command to see if you received that e-mail message. Did it work? If so, why?
Record your observations in your OPS335 lab logbook.
Record steps, commands, and your observations in INVESTIGATION 1 in your OPS335 lab log-book
INVESTIGATION 2: DETERMINING THE DEFAULT MAIL TRANSFER AGENT (MTA)
Obviously the Mail Transfer Agent must be running in order to send e-mail messages locally or to external mail server (like myseneca.ca). In this section, we will determine information relating to Seneca College's MTA when email messages are sent via your VM2 machine.
Viewing Email Headers
Normally, email headers are seldom seen with our e-mail applications such as web-mail, MS Outlook, or Thunderbird. There are way in order to view detailed header information for each email we send that provides information how the email message was sent, including the name of the program that is running as the Mail Transfer Agent and its IPADDR. Although these email headers may look complicated, they can trace the steps of sending the e-mail messages among the MTAs to gain a better understanding of the email transmission process.
Perform the following Steps:
|
|
- Make certain you are in your vm2 machine.
- Send another email message from your VM2 machine to your Seneca email account using the command:
mail -s "Lab4a - Header Message" <Your Seneca email address>
NOTE: after you type in the body of the mail message, move to an empty line, type period "." and press the ENTER key to send the message. - View your e-mail message in your Seneca email account.
NOTE:
- If you are using web-mail to read your Seneca e-mail message, then your Mail User Agent is probably using the MS Outlook program. This program can run in regular-mode or lite-mode. If it runs in lite-mode, the email should appear on the left-most image displayed to the right. If it appears that your MS Outlook program is using regular-mode, then you can skip the procedure to switch from lite-mode to regular-mode.
- To switch from lite-mode to regular mode, perform the following steps:
- x
- x
- x
Record steps, commands, and your observations in INVESTIGATION 2 in your OPS335 lab log-book
COMPLETING THE LAB
Arrange proof that you can send e-mail from your VM2 machine to your Seneca College e-mail account, and than you can send and receive e-mail messages locally on your VM2 machine only.
EXPLORATION QUESTIONS
- Briefly list the students to install the MUA on your server for text-based messaging.
- Briefly list the steps to trouble-shoot your server if you could not send e-mail messages from your VM2 machine to an external e-mail server.
- Write the command to send an e-mail message from your VM2 to your Seneca College e-mail account.
- What are the commands to issue in the mail prompt to:
- Read the first e-mail message displayed
- Save the 4th e-mail message to the file pathname: ~/maildir/3.msg.txt
- Delete the 3rd e-mail message displayed
- Exit the mail command prompt and return to the shell
- What were the results of sending emails locally on your VM2 machine? Show log segments to verify your answers.
- List the steps to show your email header to trace the transmission between Mail Transfer Agents among different mail servers.


