Difference between revisions of "OPS335 Lab 6"
m (Allowing samba access to home directories with SELinux enabled.) |
m (Using the Windows machines in the lab, not a VM.) |
||
| Line 78: | Line 78: | ||
This investigation will configure your VM2 machine to act as a Samba File server to allow Windows OS Users access to the Linux Samba server files. | This investigation will configure your VM2 machine to act as a Samba File server to allow Windows OS Users access to the Linux Samba server files. | ||
| − | |||
| − | |||
| − | |||
| − | |||
| − | |||
| − | |||
| − | |||
| − | |||
| − | |||
| − | |||
| − | |||
| − | |||
| − | |||
| − | |||
===Accessing Files on a Linux Samba Server via Windows Explorer === | ===Accessing Files on a Linux Samba Server via Windows Explorer === | ||
| Line 100: | Line 86: | ||
# Make certain that both your '''VM2''' and '''Windows''' virtual machines are running. | # Make certain that both your '''VM2''' and '''Windows''' virtual machines are running. | ||
| − | # | + | # Power up a Windows system in the lab and login. |
| + | # Add the prerouting and forwarding rules to your host's iptables necessary to redirect samba traffic from outside your network to your VM 2. | ||
# Open the Windows Explorer application. | # Open the Windows Explorer application. | ||
| − | # At the top of the application, enter the following:<br>'''\\ | + | # At the top of the application, enter the following:<br>'''\\IPADDR_OF_HOST_MACHINE\home''' |
{| width="40%" align="right" cellpadding="10" | {| width="40%" align="right" cellpadding="10" | ||
| Line 110: | Line 97: | ||
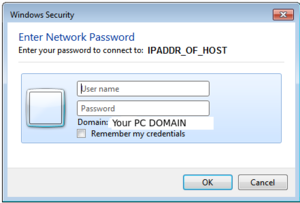
[[Image:samba-login.png|thumb|right|300px|You will be prompted (once only) for the Samba user-name and password for your '''VM2''' machine). ]] | [[Image:samba-login.png|thumb|right|300px|You will be prompted (once only) for the Samba user-name and password for your '''VM2''' machine). ]] | ||
| | | | ||
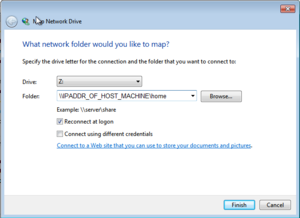
| − | [[Image:samba3-map-drive.png|thumb|right|300px|You can create a '''mapped network drive (z:)''' for your Linux Samba server network share) | + | [[Image:samba3-map-drive.png|thumb|right|300px|You can create a '''mapped network drive (z:)''' for your Linux Samba server network share). ]] |
|} | |} | ||
| − | <ol><li value="5"> You will be prompted to enter your VM2 username and password (one time only). Refer to diagram on right.<br><br>'''NOTE:''' It may take approximately 30 seconds to display the file contents.<br><br></li><li>Where your successful? If not, try to troubleshoot the problem first, then ask your lab assistant or instructor for assistance.</li><li>Close the Windows Explorer application window.</li><li>Click on the '''START''' menu, and click on '''Computer'''.</li><li>Click on the Map Network Drive button, and create a '''mapped network drive''' (called it drive '''Z:''') which is a Samba share of your VM2 machine for the home directory | + | <ol><li value="5"> You will be prompted to enter your VM2 username and password (one time only). Refer to diagram on right.<br><br>'''NOTE:''' It may take approximately 30 seconds to display the file contents.<br><br></li><li>Where your successful? If not, try to troubleshoot the problem first, then ask your lab assistant or instructor for assistance.</li><li>Close the Windows Explorer application window.</li><li>Click on the '''START''' menu, and click on '''Computer'''.</li><li>Click on the Map Network Drive button, and create a '''mapped network drive''' (called it drive '''Z:''') which is a Samba share of your VM2 machine for the home directory.</li><li>When finished, click on '''Network''' in Windows file manager to confirm that the network share is present.</li><li>Try to create a file on Windows on your Linux Samba machine. Were you able to create a save a file?</li><li>Switch to your VM2 machine and check to see if that file was created in your home directory.</li></ol> |
'''Record steps, commands, and your observations in INVESTIGATION 2 in your OPS335 lab log-book''' | '''Record steps, commands, and your observations in INVESTIGATION 2 in your OPS335 lab log-book''' | ||
| − | |||
==COMPLETING THE LAB== | ==COMPLETING THE LAB== | ||
Revision as of 03:33, 12 July 2016
Contents
SAMBA SERVER RESOURCES
Online References:
- (Course Notes on Samba Server)
- Samba Server Setup (Simple setup guide for samba server]
OVERVIEW
According to the samba.org website:
"Samba is the standard Windows interoperability suite of programs for Linux and Unix. Samba is Free Software licensed under the GNU General Public License, the Samba project is a member of the Software Freedom Conservancy."
Although a Samba server can provide many features such as printer sharing and backups, this lab's primary focus is to set up a Samba server on a Linux server in order to allow MS Windows users to share common files from the Linux's Samba server.
This lab will first install, setup, and enable a Samba server. Then another virtual machine will be created for a Windows operating system. Finally, within the Windows virtual machine, users will access files from the Linux Samba server (both graphically and command line).
INVESTIGATION 1: INSTALLING & CONFIGURING A SAMBA SERVER
In this investigation, we will set up a Samba server on our VM2 machine. We will first install, configure and enable the samba server on our virtual machine, and then we will quickly test to see if the Samba server works.
Perform the following steps:
- Make certain that both your VM1 and VM2 machines are running.
- Switch to your VM2 machine as the root user.
- Issue the following Linux command to install Samba server utlity:
yum install samba samba-client - Copy the file /etc/samba/smb.conf to another filename by issuing the following command:
cp /etc/samba/smb.conf /etc/samba/smb.conf.original - Clear the contents of the configuration file by running cat /dev/null > /etc/samba/smb.conf
- Edit /etc/samba/smb.conf so that the file that contains the following lines:
[global]
workgroup = WORKGROUP
server string = "put your real name here without the quotes"
encrypt passwords = yes
smb passwd file = /etc/samba/smbpasswd

[home]
comment = "put your real name here without the quotes"
path = /home/<yourSenecaID>
public = yes
writable = yes
printable = no
create mask = 0765
- Append (add) the following parameter to the bottom of the [global] section that will limit access to the share so that only machines in your virtual network and those in the lab room will be able to access it:
hosts allow = 192.168.x. 127.0.0.1
- Append (add) the following parameter to the [home] section so that only your user account can access that share:
valid users = <yourSenecaID>
- Create a Samba account and password for yourSenecaID by issuing the following command:
smbpasswd -a <yourSenecaID>
- Confirm the user you created has been added using the following command:
pdbedit -L -v - Test and review your configuration with the command:
testparm - Use the systemctl command to start the smb.service and enable the service to run on boot-up
- If you are in one of the sections with SELinux set to enforcing, you will need to tell it to allow samba access to home directories: setsebool -P samba_enable_home_dirs 1
- Install the netstat command by issuing the following command:
yum install net-tools - Issue the netstat -nautp command to see with port Samba is running on.
- Use the information in the previous step to modify the firewall on VM2 machine to allow samba traffic.
- Test to see that you can connect to your Samba server (locally) by issuing the following command:
smbclient -U <yourSenecaID> -L 127.0.0.1 - When prompted, enter your Samba account password.
- The output from that issued command show appear similar to example displayed below:
Sharename       Type       Comment
---------       ----       -------
home             Disk      Your Name
IPC$             IPC       IPC Service ("Your Name")
Domain=[WORKGROUP] OS=[Windows 6.1] Server=[Samba 4.2.3]

Server                Comment
------                -------

WorkGroup             Master
---------             ------
- To access the Samba client shell on your local Samba share, issue the following command:
smbclient '\\127.0.0.1\home' -U <yourSenecaID> - Enter your Samba account password.
- Issue the help command to note common commands (dir, cd, ls, put, get). Note how similar they are to sftp commands.
- Enter exit to terminal your local Samba session.
Although you can use smbclient to access, browse and share files within other Linux and Windows servers, it is more practical to setup a Samba server to allow MS Windows Users to access a common file share on a Linux machine, and will be demonstrated in Investigation 2.
Record steps, commands, and your observations in INVESTIGATION 1 in your OPS335 lab log-book
INVESTIGATION 2: CONNECTING TO A SAMBA SERVER FROM A WINDOWS CLIENT
This investigation will configure your VM2 machine to act as a Samba File server to allow Windows OS Users access to the Linux Samba server files.
Accessing Files on a Linux Samba Server via Windows Explorer
With some additional "tweaking" to your Linux Samba server configuration file, you should be able to access files on that file from a Windows machine on the same network. You will be creating a Samba share for your home directory of your regular user account.
Perform the following tasks:
- Make certain that both your VM2 and Windows virtual machines are running.
- Power up a Windows system in the lab and login.
- Add the prerouting and forwarding rules to your host's iptables necessary to redirect samba traffic from outside your network to your VM 2.
- Open the Windows Explorer application.
- At the top of the application, enter the following:
\\IPADDR_OF_HOST_MACHINE\home
- You will be prompted to enter your VM2 username and password (one time only). Refer to diagram on right.
NOTE: It may take approximately 30 seconds to display the file contents. - Where your successful? If not, try to troubleshoot the problem first, then ask your lab assistant or instructor for assistance.
- Close the Windows Explorer application window.
- Click on the START menu, and click on Computer.
- Click on the Map Network Drive button, and create a mapped network drive (called it drive Z:) which is a Samba share of your VM2 machine for the home directory.
- When finished, click on Network in Windows file manager to confirm that the network share is present.
- Try to create a file on Windows on your Linux Samba machine. Were you able to create a save a file?
- Switch to your VM2 machine and check to see if that file was created in your home directory.
Record steps, commands, and your observations in INVESTIGATION 2 in your OPS335 lab log-book
COMPLETING THE LAB
Arrange evidence (command output) for each of these items on your screen, then ask your instructor to review them and sign off on the lab's completion:
- ✓ Proof of network share of VM2 machine from Windows VM via Windows Explorer application
- ✓ Firewall settings on your Windows VM to allow Linux Samba network share
- ✓ Display contents of /etc/samba/smb.conf file on VM2 machine
- ✓ Firewall exceptions (both machines) to allow Samba traffic
- ✓ Lab logbook completed
EXPLORATION QUESTIONS
- What does SMB?
- What is the purpose of the testparm command?
- What does the text inside square brackets in the smb.conf file mean? (e.g., "[home]").
- Explain the meaning of the line "create mask = 0765" in the smb.conf file?
- What does the smbpasswd command do?

