Difference between revisions of "Using Pitivi Non-Linear Video Editor"
| (15 intermediate revisions by the same user not shown) | |||
| Line 101: | Line 101: | ||
:It is recommended to build the video as you go along. First start with a screen-cast of your title (eg. OpenOffice slideshow), then add video clips, and then end with the credits (also, an Open Office slideshow screen-cast). | :It is recommended to build the video as you go along. First start with a screen-cast of your title (eg. OpenOffice slideshow), then add video clips, and then end with the credits (also, an Open Office slideshow screen-cast). | ||
| + | <table width="100%"> | ||
| + | <tr> | ||
| + | <td> | ||
=====Marking "Cut-Points"===== | =====Marking "Cut-Points"===== | ||
| Line 114: | Line 117: | ||
:'''You can click and drag video elements to "join together".''' | :'''You can click and drag video elements to "join together".''' | ||
| − | + | </td> | |
| + | <td>[[Image:pitiviCutPoint1.png|thumb|300px|Select cut point. Note video area is darkened indicating cut-point will relate to video, and not extra audio track below. ]]</td> | ||
| + | <td>[[Image:pitiviCutPoint2.png|thumb|200px|'''Cut<br />Point''' button ]]</td> | ||
| + | <td>[[Image:pitiviCutPoint3.png|thumb|200px| '''Delete''' button ]]</td> | ||
| + | </tr> | ||
| + | </table> | ||
=====Marking "Key-Frames"===== | =====Marking "Key-Frames"===== | ||
| − | + | <table width="100%"> | |
| + | <tr> | ||
| + | <td> | ||
:A keyframe allows the user to manipulate a characteristic of an object: for a video the characteristic could be fade to black, or fade between video clips. On the other hand, for audio or music, it could indicate volume fade-in or volume fade-out. | :A keyframe allows the user to manipulate a characteristic of an object: for a video the characteristic could be fade to black, or fade between video clips. On the other hand, for audio or music, it could indicate volume fade-in or volume fade-out. | ||
| − | :To set a key-frame, point and click the mouse on the video clip, and click the key-frame button on the Marker toolbar. In order to change the level of the video, simply click and drag the key-frame handle up or down. You can create multiple key-frames in order for fade-ins and fade-outs. You can preview the edited video clip to verify the result. Note: The user can always UNDO the editing change by clicking EDIT -> UNDO, or press the shortcut keys CTRL-z. | + | :'''To set a key-frame, point and click the mouse on the video clip, and click the key-frame button on the Marker toolbar'''. In order to change the level of the video, simply '''click and drag the key-frame handle up or down. You can create multiple key-frames in order for fade-ins and fade-outs'''. You can preview the edited video clip to verify the result. Note: The user can always UNDO the editing change by clicking '''EDIT''' -> '''UNDO''', or press the shortcut keys '''CTRL-z'''. |
| − | + | </td> | |
| + | <td>[[Image:keyframe1.png|thumb|300px|'''Selection of key-frames''' ]]</td> | ||
| + | <td>[[Image:keyframe2.png|thumb|200px|'''Key-<br />frame''' Button ]]</td> | ||
| + | <td>[[Image:keyframe3.png|thumb|300px|'''Manipulation of key-frames''' (ie. "fade-to-black") ]]</td> | ||
| + | </tr> | ||
| + | </table> | ||
===Adding / Editing Audio or Music=== | ===Adding / Editing Audio or Music=== | ||
| Line 128: | Line 143: | ||
::*'''MP3''' | ::*'''MP3''' | ||
::*'''OGG''' | ::*'''OGG''' | ||
| + | ::*'''WAV''' | ||
:To add the audio clip into the project area, '''simply click and drag the object into the area below the Timeline Ruler'''. | :To add the audio clip into the project area, '''simply click and drag the object into the area below the Timeline Ruler'''. | ||
| + | :'''The procedure to cut or manipulate audio tracks is the same as in the "editing video" area above, except you select the cut-points or key-frames in the audio area instead of the video area...''' | ||
===Rendering the Final Product=== | ===Rendering the Final Product=== | ||
| − | : | + | :In order for your video project to run on a media player, or be played in YouTube, it must be mixed down into the appropriate file format. '''This process of mixing down several types of media into a single file is referred to as "rendering"'''. |
| + | |||
| + | :The user needs to provide information pertaining to the file such as: | ||
| + | ::*Name of file | ||
| + | ::*Resolution of video (eg. NTSC instead of PAL, 720i, 1080p, etc) | ||
| + | ::*Type of audio/video encoding scheme | ||
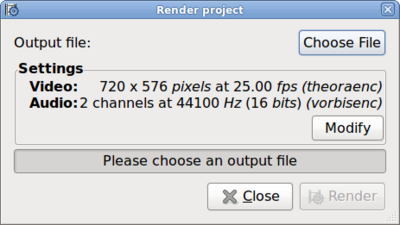
| + | [[Image:pitiviRender1.png|thumb|400px| Mixing down or rendering project into single video file format]] | ||
| + | Note: For this tutorial, we will be rendering to an AVI file which is considered to be very YouTube Friendly. | ||
| + | |||
| + | '''STEPS TO RENDER A VIDEO:''' | ||
| + | ::#Click on the '''RENDER PROJECT''' button in the Tools toolbar. | ||
| + | ::#When the Render Project dialog box appears, click '''Choose File and enter an appropriate filename''' (note location for storing file). | ||
| + | ::#When back in the Render Project dialog box, click '''Modify''', and set "Video Output" to '''480P''', '''720P''' or '''1080p''' (depending on your video resolution preference). | ||
| + | ::# In '''"Export to - Container"''' change the setting to: '''Avi Muxer [avimux]''' | ||
| + | ::# '''Click OK to start the rendering process'''. | ||
| + | |||
| + | |||
| + | |||
Latest revision as of 21:51, 29 June 2011
Contents
- 1 Purpose
- 2 Using Pitivi
- 3 Additional Resources
Purpose
- This tutorial will show the user how to use the Pitivi non linear editor to produce a simple video.
- If you user wants to produce more complex videos (with special effects), then the user should consider using Cinelerra. On the other hand, there is a short learning-curve with Pitivi.
Using Pitivi
YouTube Video
- If you want to see the visual steps for "Powering Up Computer Lab", here is a link to a customized YouTube video: http://www.youtube.com/watch?v=USHcMvzFToc
Written Instructions
- Below are the written instructions (in case you prefer to have a printout of these procedures):
Launching Pitivi
- In order to launch Pitivi, the user click on menu in the docking station panel, and selects SOUND & VIDEO -> VIDEO PRODUCTION -> Pitivi Video Editor.
Main Elements of Pitivi Application Window
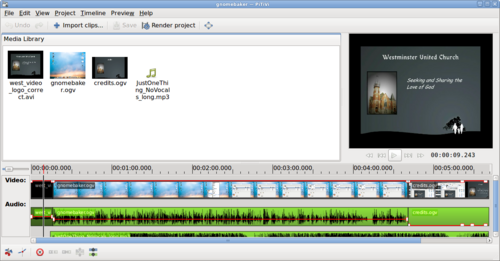
- The Pitivi application window has several elements. It is important to take some time to study and experiment with these areas in order to be more flexible and efficient when using the Pitivi application.
Saving Your Work
- It seems strange to be discussing the topic of saving your video project prior to creating or editing the project, but it is important to save your changes as often as possible when using this program. For time-to-time, this application may "freeze" while working in it, but if you have saved consistently, then you can close the Pitivi application (ie. "force a quit"), and then launch Pitivi and load your saved project...
- In order to save your project, you click on the save button. It is recommended to click SAVE after each editing process you do!
Adding a Screencast / Video Clip into Pitivi
- In order to add video clips into your Pitivi project, simply click on IMPORT CLIPS and select the appropriate video file. Note: video file clips can also relate to screen-casts created with gtk-recordmydesktop. The Pitivi video editor accepts many different video clip file formats.
- Examples of Accepted File Formats:
- MPEG
- AVI
- MP4
- OGV (Ogg Theora Vorbis)
- To add the video clip into the project area, simply click and drag the object into the area below the Timeline Ruler.
- NOTE: Although the Pitivi video editor does not have the capability of generating titles, a user could use the gtk-recordmydesktop to perform a "screen-cast" of a running OpenOffice slide show.
- Here is a link to the gtk-recordmydesktop screen-cast YouTube video: http://www.youtube.com/watch?v=Mj1BySzRTAU
- View the YouTube video on how to import a screen-cast into Pitivi: http://www.youtube.com/watch?v=USHcMvzFToc
Editing the Pitivi Video Project
- It is recommended to build the video as you go along. First start with a screen-cast of your title (eg. OpenOffice slideshow), then add video clips, and then end with the credits (also, an Open Office slideshow screen-cast).
Marking "Cut-Points"
- Unfortunately, the screen-cast and video clips may contain extra portions that require cutting-out. In order to remove portions of your video, you need to first mark it for deletion, move to area to be deleted, and then delete it. Remember to save your project as often as possible!
- Here are the steps for deleting a portion of your video clip:
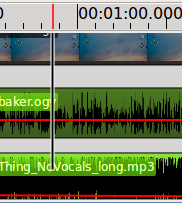
- Move to the area where you want to mark the "cut-point", and click inside the video area to select that area (a straight line should appear).
- In the Marker toolbar, click the CUT BUTTON to set the "cut-point".
- Point and click the mouse in the area of the video to be deleted (You can use arrow keys if the portion to be removed is very small).
- In the Marker toolbar, click the DELETE BUTTON.
- NOTE: If you made a mistake you can select EDIT -> UNDO or use CTRL-Z to undo previous editing actions.
- You can click and drag video elements to "join together".
Marking "Key-Frames"
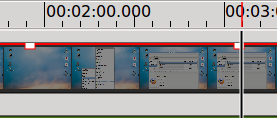
- A keyframe allows the user to manipulate a characteristic of an object: for a video the characteristic could be fade to black, or fade between video clips. On the other hand, for audio or music, it could indicate volume fade-in or volume fade-out.
- To set a key-frame, point and click the mouse on the video clip, and click the key-frame button on the Marker toolbar. In order to change the level of the video, simply click and drag the key-frame handle up or down. You can create multiple key-frames in order for fade-ins and fade-outs. You can preview the edited video clip to verify the result. Note: The user can always UNDO the editing change by clicking EDIT -> UNDO, or press the shortcut keys CTRL-z.
Adding / Editing Audio or Music
- In order to add audio or music clips into your Pitivi project, simply click on IMPORT CLIPS and select the appropriate audio file. The Pitivi video editor accepts many different audio clip file formats.
- Examples of Accepted File Formats:
- MP3
- OGG
- WAV
- To add the audio clip into the project area, simply click and drag the object into the area below the Timeline Ruler.
- The procedure to cut or manipulate audio tracks is the same as in the "editing video" area above, except you select the cut-points or key-frames in the audio area instead of the video area...
Rendering the Final Product
- In order for your video project to run on a media player, or be played in YouTube, it must be mixed down into the appropriate file format. This process of mixing down several types of media into a single file is referred to as "rendering".
- The user needs to provide information pertaining to the file such as:
- Name of file
- Resolution of video (eg. NTSC instead of PAL, 720i, 1080p, etc)
- Type of audio/video encoding scheme
Note: For this tutorial, we will be rendering to an AVI file which is considered to be very YouTube Friendly.
STEPS TO RENDER A VIDEO:
- Click on the RENDER PROJECT button in the Tools toolbar.
- When the Render Project dialog box appears, click Choose File and enter an appropriate filename (note location for storing file).
- When back in the Render Project dialog box, click Modify, and set "Video Output" to 480P, 720P or 1080p (depending on your video resolution preference).
- In "Export to - Container" change the setting to: Avi Muxer [avimux]
- Click OK to start the rendering process.
Additional Resources
- Using Pitivi User Guide: http://www.pitivi.org/manual/
