Difference between revisions of "File Management"
(Created page with '== Introduction / Purpose == To be completed... == Procedures for Managing Workstations == === YouTube Video === : '''If you want to see the visual steps for "File Managemen…') |
|||
| (50 intermediate revisions by the same user not shown) | |||
| Line 1: | Line 1: | ||
== Introduction / Purpose == | == Introduction / Purpose == | ||
| + | [[Image:files1.png|thumb|500px|The '''Nautilus''' application which is used for file management operations.]] | ||
| + | Although the Westminster Computer Has a relatively large hard disk (250 GB), it is important to monitor, transfer and remove unwanted files in order to prevent clutter on the computer system. | ||
| − | |||
| + | Back in the days of Window 3.1 an '''"80% Rule" was a rough guideline to indicate a which point "clutter" or un-removed files could affect computer system performance'''. Although that percentage is considered much higher on newer operating systems, performing periodic file management is highly recommended. | ||
| − | == | + | |
| + | '''There are several methods of preserving file space in the computer lab:''' | ||
| + | :* '''Run the "Grab Work" program''' to automatically transfer student work to USB drive. | ||
| + | :* '''Copy work from workstation directory to plugged in USB drive'''. | ||
| + | :* '''Manually remove work using the Nautilus File Manager application'''. | ||
| + | |||
| + | |||
| + | == How to Perform File & Folder Management == | ||
=== YouTube Video === | === YouTube Video === | ||
| Line 14: | Line 23: | ||
:'''Below are the written instructions (in case you prefer to have a printout of these procedures):''' | :'''Below are the written instructions (in case you prefer to have a printout of these procedures):''' | ||
| + | |||
| + | ====Using Nautilus==== | ||
| + | |||
| + | '''The application used for file management in this computer lab is called Nautilus'''. This application is considered to be VERY similar to MS Windows Explorer (not to be confused with MS Internet Explorer which is a web-browser). | ||
| + | |||
| + | To launch Nautlius, the user simply clicks on the folder icon that is located in the docking panel at the bottom of the screen. | ||
| + | <br /><br /> | ||
| + | Next, a '''context menu should appear in a similar fashion below:''' | ||
| + | <br /><br /> | ||
| + | <table border="1" cellpadding="2"> | ||
| + | <tr> | ||
| + | <td>'''Computer'''</td> | ||
| + | <td>Displays all of the storage devices on the computer</td> | ||
| + | </tr> | ||
| + | <tr> | ||
| + | <td>'''Home'''</td> | ||
| + | <td>The location where the user can store their own work. Subdirectories in their home directory can help better organize and access files</td> | ||
| + | </tr> | ||
| + | <tr> | ||
| + | <td>'''Desktop'''</td> | ||
| + | <td>The visual areas in the Graphical User Interface that resembles your work desk</td> | ||
| + | </tr> | ||
| + | <tr> | ||
| + | <td>'''Trash'''</td> | ||
| + | <td>The area that contains work that is deleted, but can still be recovered or permanently removed from the system.</td> | ||
| + | </tr> | ||
| + | <tr> | ||
| + | <td>'''File System'''</td> | ||
| + | <td>The entire file system starting with the highest or starting directory which is called "/" or "root"</td> | ||
| + | </tr> <tr> | ||
| + | <td>'''CD/DVD Drive'''</td> | ||
| + | <td>Removable storage devices. USB Devices would also be displayed below as a separate category if plugged in</td> | ||
| + | </tr> <tr> | ||
| + | <td>'''Network'''</td> | ||
| + | <td>Connect to another computer server in the same location. This is not activated for this computer lab</td> | ||
| + | </tr> | ||
| + | <tr> | ||
| + | <td>'''Connect to Server'''</td> | ||
| + | <td>Ability to connect to remote computer servers over the Internet and perform file management operations</td> | ||
| + | </tr> | ||
| + | <tr> | ||
| + | <td>'''Documents'''</td> | ||
| + | <td>Area to store user's document files. Examples would include OpenOffice Wordprocessing files, spreadsheet files, and slide-show files.</td> | ||
| + | </tr> <tr> | ||
| + | <td>'''Music'''</td> | ||
| + | <td>Area to store music files including auditory products.</td> | ||
| + | </tr> | ||
| + | <tr> | ||
| + | <td>'''Pictures'''</td> | ||
| + | <td>Area to store pictures. Subdirectories may include webcam picture storage.</td> | ||
| + | </tr> | ||
| + | <tr> | ||
| + | <td>'''Videos'''</td> | ||
| + | <td>area to store video files.</td> | ||
| + | </tr> | ||
| + | <tr> | ||
| + | <td>'''Downloads'''</td> | ||
| + | <td>Default area where all downloaded files are stored.</td> | ||
| + | </tr> | ||
| + | </table> | ||
| − | + | '''WARNING: IT IS ABSOLUTELY NECESSARY TO SAVE YOUR WORK IN THE DEFAULT LOCATION SPECIFIED BY YOUR APPLICATION. MANY PROGRAMS SUCH AS "GRAB WORK" DEPEND ON TRANSFERRING FILES AT THESE IMPORTANT LOCATIONS. PLEASE DO NOT DEVIATE FROM THIS PROCEDURE.''' | |
| − | In | + | '''NOTE: In certain accounts (such as the jamm accounts), the system has been configured NOT to permit files saved to the DESKTOP (in order to avoid clutter).''' |
| − | + | ====Viewing Features in Nautilus==== | |
| − | + | <table> | |
| − | + | <tr valign="top"> | |
| + | <td> | ||
| + | There are a number of viewing features that can be modified in Nautilus to meet the needs of the user while managing files: | ||
| + | :*'''Change size and details of file/folder icons''' | ||
| + | :*'''Display hidden files''' | ||
| + | :*'''Open additional pane to assist in copying/moving files''' | ||
| − | |||
| + | =====Change Size and Details of file/folder===== | ||
| − | + | The user can change the size of file/folder icons in Nautilus by Selecting the View menu and selecting either '''"Icon"''', '''"List"''', or '''"Compact"'''. | |
| − | |||
| − | |||
| − | + | </td> | |
| + | <td>[[Image:fileView1.png|thumb|250px|Nautilus - '''Icons''' View ]]</td> | ||
| + | <td>[[Image:fileView2.png|thumb|250px|Nautilus - '''List''' View ]]</td> | ||
| + | <td>[[Image:fileView3.png|thumb|250px|Nautilus - '''Compact''' View ]]</td> | ||
| + | </tr> | ||
| + | </table> | ||
| − | + | '''Description of Viewing Properties:''' | |
| − | :* | + | :* '''Icon''' View displays files/folders as LARGE icons. In this type of view, the user can only navigate to sub-folders by pointing and clicking on to the folder. It does not provide any additional information regarding the file/folder except for name. |
| − | + | :* '''List''' View displays files/folders as SMALL icons. The user can navigate to sub-folders or files by expanding the folder. This type of view also provides information regarding a file/folder including name, size (in bytes), date of creating/modification. | |
| − | :* | + | :*'''Compact''' View displays files/folders as SMALL icons. In this type of view, the user can only navigate to sub-folders by pointing and clicking on to the folder. It does not provide any additional information regarding the file/folder except for name. |
| − | |||
| + | [[Image:files4.png|thumb|400px|The '''Nautilus''' application display '''extra pane''' to simplify movement or copying of files.]] | ||
| − | |||
| − | + | =====Display Hidden Files===== | |
| − | |||
| − | |||
| + | When creating files and folder, beginning the file or folder name with a period "." will hide it from default view. The idea behind this concept of "hiding" files is "out of sight, out of mind", meaning that people will not go to the trouble of viewing hidden files or folders, so they are generally unnoticed. | ||
| − | + | General users of the Westminster computer lab will not have any reason to hide their files or folders. Files are usually hidden if they are configuration files, and are designed to be generally ignored and left-alone. | |
| + | To view both hidden and non-hidden files and folders, you would select the '''View''' menu, and select '''"show hidden files"''' option. | ||
| − | ==== | + | =====Open Extra Pane for Transferring Files===== |
| − | |||
| − | |||
| + | If the user opens the '''View''' menu and selects the option '''"open pane"''', an additional pane displaying folder contents will appear in the right-hand-side. | ||
| − | + | This feature is useful for the user if they want to move or copy files without having to launch another Nautilus application. | |
| − | |||
| − | |||
| − | |||
| − | |||
| − | |||
| − | |||
| − | |||
| − | |||
| + | =====Creating Folders===== | ||
| − | + | Creating folders allows a user to better organize their work. | |
| − | + | :'''WARNING: It is not recommended for users of Westminster Computer lab to create folders to save their work (documents) since applications like "Grab Work" since that application only transfers or "grabs" files in the designated and default directory when saving a document.''' | |
| − | |||
| − | |||
| − | |||
| − | |||
| − | + | To create a folder, simple click on the '''File''' menu, and select '''"Create Folder"'''. An icon labelled ''"Untitled Folder"'' will appear to allow you to rename this newly-created folder. Simply '''type the desired folder name, and press ENTER'''. | |
| − | |||
| − | + | ====Common File Management Operations==== | |
| − | + | Below are the most common types of File Management Operations: | |
| − | |||
| − | |||
| + | <table border="1" cellpadding="2"> | ||
| + | <tr> | ||
| + | <td>'''Selecting files/folders'''</td> | ||
| + | <td> To select a file or folder, simply point and click (pointing and clicking on a selected file/folder will unselect that item. To select a range of adjacent (i.e. "side-by-side") files or folders, point and click on the first file/folder, press the SHIFT KEY while clicking on the last file/folder. If this was performed correctly, all files/folders between the first and last one will be selected.</td> | ||
| + | </tr> | ||
| + | <tr> | ||
| + | <td>'''Moving files/folders'''</td> | ||
| + | <td>Although Westminster Computer lab users are not encouraged to move their files, a user can move files by simply dragging the selected file(s) to a new folder.</td> | ||
| + | </tr> | ||
| + | <tr> | ||
| + | <td>'''Copying files/folders'''</td> | ||
| + | <td>Although Westminster Computer lab users are not encouraged to copy their files, a user can move files by holding down the CTRL key while dragging the selected file(s) to a new folder. This is useful to copying the file directly to a USB storage device. Teachers can simply use the Grab Work program in the Teacher account to simplify the process of transferring all student work to their USB storage device.</td> | ||
| + | </tr> | ||
| + | <tr> | ||
| + | <td>'''Removing files/folders'''</td> | ||
| + | <td>To remove the selected files/folders, the user presses the DELETE key. This moves the selected files/folders to Trash.</td> | ||
| + | </tr> | ||
| + | <tr> | ||
| + | <td>'''Renaming files/folder'''</td> | ||
| + | <td>When a single file/folder is selected, the user right-clicks the mouse, and selects rename from the context menu. The file/folder will be highlighted in order for the user to type the new name and press ENTER to save.</td> | ||
| + | </tr> | ||
| + | </table> | ||
| − | |||
| − | ==== | + | ====Concept of "Document-Centric"==== |
| − | |||
| − | |||
| − | |||
| − | |||
| − | + | The term "document-centric" has been used for a number of years. This term means that the focus is on the file, and is the task of the operating system to determine and launch the application that created the document so it can be automatically loaded for the user to edit. | |
| − | + | Other terms are also related to this term including ''"File Association"''. The major purpose is to provide convenience for the user, and to help increase their productivity by double-clicking on the file icon to edit a file, as opposed to launching the application, and manually loading the document into that application. | |
| − | + | Sometimes there are documents that can be edited or used by several applications. For example, a graphic file can be both edited and viewed. '''If the user does not want the default application to launch and load in a document, they can right-click and select "Open with Other Application"'''. Then they simply select the application that will launch (in this single instance), and load in that document. | |
| + | [[Image:files5.png|thumb|400px|The '''Trash-bin''' can be used to either restore files/folders that were mistakenly deleted, or the trash-bin can be "emptied" to signal to the operating system that this marked space can now be available for use (whenever required).]] | ||
| − | |||
| − | + | ====Working With the Trash Bin==== | |
| − | + | The '''Trash-bin''' is a feature of the Nautilus application that gives the user a "second chance" in case they deleted a file/folder by mistake. Deleted items are stored in this "collection area" (thus still taking up hard-disk space), until the user "empties" the trash-bin. | |
| − | + | Contrary to general end-user assumption, emptying a trash-bin does NOT permanently remove the file/folder, but changes a file/folder characteristic setting (commonly referred to a "flag") to inform the operating system, that this space once reserved for the file/folder is not available if required. Opportunity for business has been created for professionals (or investigative agencies) to potentially recover these files using the "tools of the trade". | |
| + | For the average user, it can be assumed that once the trash-bin has been emptied, that the file/folder has been permanently removed from the computer system. | ||
| − | + | Prior to emptying the trash-bin, the user can '''right-click on the file/folder''' and select '''"Recover"''' to transfer the file from the trash-bin to its location prior to deletion. | |
| − | + | ====Properly Removing a USB Device==== | |
| − | |||
| − | |||
| − | |||
| − | |||
| − | + | Similar to MS Windows, it is dangerous to remove a USB storage device unless it is properly disconnected from the computer system. | |
| − | |||
| − | |||
| − | + | '''In Linux, the term to disconnect a storage device from the computer system is called "un-mounting"'''. | |
| − | + | To un-mount the USB device prior to removal, view the device in the left-hand side of the Nautilus application. '''Point and click on the eject button that is located immediately to the right of the USB name (label)'''. During this process, the user may encounter an error. This may occur since an application that has saved work to that USB storage device is still running, thus still is using the USB storage device. In that case, close the application, and then point and click on the eject button. | |
| − | + | '''Occasionally, the Nautilus application may give an error message, although there are no applications that are currently using the USB device. If this occurs, you can plug-in the device and open the file to confirm that the document was saved, and then eject and then remove the USB drive.''' | |
| − | ''' | ||
| − | |||
| − | |||
| − | + | == Additional Resources == | |
| − | * | + | :* File Management Tips (MS Windows): [http://www.microsoft.com/atwork/productivity/files.aspx http://www.microsoft.com/atwork/productivity/files.aspx] |
| + | :* Nautilus Web-page: [http://live.gnome.org/Nautilus http://live.gnome.org/Nautilus] | ||
Latest revision as of 17:21, 18 June 2011
Contents
[hide]- 1 Introduction / Purpose
- 2 How to Perform File & Folder Management
- 3 Additional Resources
Introduction / Purpose
Although the Westminster Computer Has a relatively large hard disk (250 GB), it is important to monitor, transfer and remove unwanted files in order to prevent clutter on the computer system.
Back in the days of Window 3.1 an "80% Rule" was a rough guideline to indicate a which point "clutter" or un-removed files could affect computer system performance. Although that percentage is considered much higher on newer operating systems, performing periodic file management is highly recommended.
There are several methods of preserving file space in the computer lab:
- Run the "Grab Work" program to automatically transfer student work to USB drive.
- Copy work from workstation directory to plugged in USB drive.
- Manually remove work using the Nautilus File Manager application.
How to Perform File & Folder Management
YouTube Video
- If you want to see the visual steps for "File Management", here is a link to a customized YouTube video: http://www.youtube.com/watch?v=_DsoidBjbjY
Written Instructions
- Below are the written instructions (in case you prefer to have a printout of these procedures):
Using Nautilus
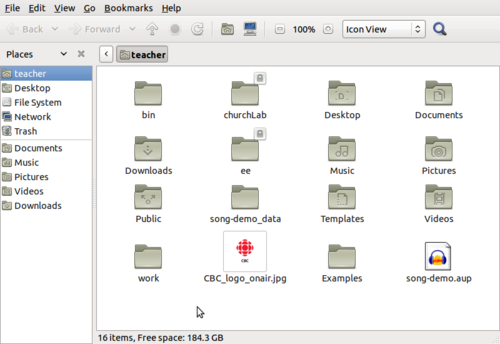
The application used for file management in this computer lab is called Nautilus. This application is considered to be VERY similar to MS Windows Explorer (not to be confused with MS Internet Explorer which is a web-browser).
To launch Nautlius, the user simply clicks on the folder icon that is located in the docking panel at the bottom of the screen.
Next, a context menu should appear in a similar fashion below:
| Computer | Displays all of the storage devices on the computer |
| Home | The location where the user can store their own work. Subdirectories in their home directory can help better organize and access files |
| Desktop | The visual areas in the Graphical User Interface that resembles your work desk |
| Trash | The area that contains work that is deleted, but can still be recovered or permanently removed from the system. |
| File System | The entire file system starting with the highest or starting directory which is called "/" or "root" |
| CD/DVD Drive | Removable storage devices. USB Devices would also be displayed below as a separate category if plugged in |
| Network | Connect to another computer server in the same location. This is not activated for this computer lab |
| Connect to Server | Ability to connect to remote computer servers over the Internet and perform file management operations |
| Documents | Area to store user's document files. Examples would include OpenOffice Wordprocessing files, spreadsheet files, and slide-show files. |
| Music | Area to store music files including auditory products. |
| Pictures | Area to store pictures. Subdirectories may include webcam picture storage. |
| Videos | area to store video files. |
| Downloads | Default area where all downloaded files are stored. |
WARNING: IT IS ABSOLUTELY NECESSARY TO SAVE YOUR WORK IN THE DEFAULT LOCATION SPECIFIED BY YOUR APPLICATION. MANY PROGRAMS SUCH AS "GRAB WORK" DEPEND ON TRANSFERRING FILES AT THESE IMPORTANT LOCATIONS. PLEASE DO NOT DEVIATE FROM THIS PROCEDURE.
NOTE: In certain accounts (such as the jamm accounts), the system has been configured NOT to permit files saved to the DESKTOP (in order to avoid clutter).
Viewing Features in Nautilus
|
There are a number of viewing features that can be modified in Nautilus to meet the needs of the user while managing files:
Change Size and Details of file/folderThe user can change the size of file/folder icons in Nautilus by Selecting the View menu and selecting either "Icon", "List", or "Compact". |
Description of Viewing Properties:
- Icon View displays files/folders as LARGE icons. In this type of view, the user can only navigate to sub-folders by pointing and clicking on to the folder. It does not provide any additional information regarding the file/folder except for name.
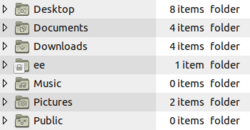
- List View displays files/folders as SMALL icons. The user can navigate to sub-folders or files by expanding the folder. This type of view also provides information regarding a file/folder including name, size (in bytes), date of creating/modification.
- Compact View displays files/folders as SMALL icons. In this type of view, the user can only navigate to sub-folders by pointing and clicking on to the folder. It does not provide any additional information regarding the file/folder except for name.
Display Hidden Files
When creating files and folder, beginning the file or folder name with a period "." will hide it from default view. The idea behind this concept of "hiding" files is "out of sight, out of mind", meaning that people will not go to the trouble of viewing hidden files or folders, so they are generally unnoticed.
General users of the Westminster computer lab will not have any reason to hide their files or folders. Files are usually hidden if they are configuration files, and are designed to be generally ignored and left-alone.
To view both hidden and non-hidden files and folders, you would select the View menu, and select "show hidden files" option.
Open Extra Pane for Transferring Files
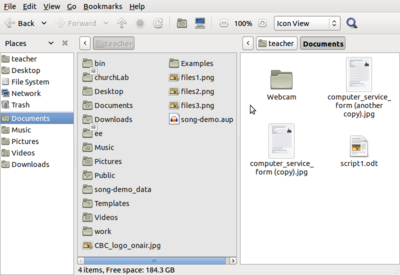
If the user opens the View menu and selects the option "open pane", an additional pane displaying folder contents will appear in the right-hand-side.
This feature is useful for the user if they want to move or copy files without having to launch another Nautilus application.
Creating Folders
Creating folders allows a user to better organize their work.
- WARNING: It is not recommended for users of Westminster Computer lab to create folders to save their work (documents) since applications like "Grab Work" since that application only transfers or "grabs" files in the designated and default directory when saving a document.
To create a folder, simple click on the File menu, and select "Create Folder". An icon labelled "Untitled Folder" will appear to allow you to rename this newly-created folder. Simply type the desired folder name, and press ENTER.
Common File Management Operations
Below are the most common types of File Management Operations:
| Selecting files/folders | To select a file or folder, simply point and click (pointing and clicking on a selected file/folder will unselect that item. To select a range of adjacent (i.e. "side-by-side") files or folders, point and click on the first file/folder, press the SHIFT KEY while clicking on the last file/folder. If this was performed correctly, all files/folders between the first and last one will be selected. |
| Moving files/folders | Although Westminster Computer lab users are not encouraged to move their files, a user can move files by simply dragging the selected file(s) to a new folder. |
| Copying files/folders | Although Westminster Computer lab users are not encouraged to copy their files, a user can move files by holding down the CTRL key while dragging the selected file(s) to a new folder. This is useful to copying the file directly to a USB storage device. Teachers can simply use the Grab Work program in the Teacher account to simplify the process of transferring all student work to their USB storage device. |
| Removing files/folders | To remove the selected files/folders, the user presses the DELETE key. This moves the selected files/folders to Trash. |
| Renaming files/folder | When a single file/folder is selected, the user right-clicks the mouse, and selects rename from the context menu. The file/folder will be highlighted in order for the user to type the new name and press ENTER to save. |
Concept of "Document-Centric"
The term "document-centric" has been used for a number of years. This term means that the focus is on the file, and is the task of the operating system to determine and launch the application that created the document so it can be automatically loaded for the user to edit.
Other terms are also related to this term including "File Association". The major purpose is to provide convenience for the user, and to help increase their productivity by double-clicking on the file icon to edit a file, as opposed to launching the application, and manually loading the document into that application.
Sometimes there are documents that can be edited or used by several applications. For example, a graphic file can be both edited and viewed. If the user does not want the default application to launch and load in a document, they can right-click and select "Open with Other Application". Then they simply select the application that will launch (in this single instance), and load in that document.
Working With the Trash Bin
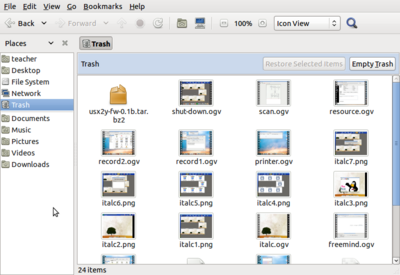
The Trash-bin is a feature of the Nautilus application that gives the user a "second chance" in case they deleted a file/folder by mistake. Deleted items are stored in this "collection area" (thus still taking up hard-disk space), until the user "empties" the trash-bin.
Contrary to general end-user assumption, emptying a trash-bin does NOT permanently remove the file/folder, but changes a file/folder characteristic setting (commonly referred to a "flag") to inform the operating system, that this space once reserved for the file/folder is not available if required. Opportunity for business has been created for professionals (or investigative agencies) to potentially recover these files using the "tools of the trade".
For the average user, it can be assumed that once the trash-bin has been emptied, that the file/folder has been permanently removed from the computer system.
Prior to emptying the trash-bin, the user can right-click on the file/folder and select "Recover" to transfer the file from the trash-bin to its location prior to deletion.
Properly Removing a USB Device
Similar to MS Windows, it is dangerous to remove a USB storage device unless it is properly disconnected from the computer system.
In Linux, the term to disconnect a storage device from the computer system is called "un-mounting".
To un-mount the USB device prior to removal, view the device in the left-hand side of the Nautilus application. Point and click on the eject button that is located immediately to the right of the USB name (label). During this process, the user may encounter an error. This may occur since an application that has saved work to that USB storage device is still running, thus still is using the USB storage device. In that case, close the application, and then point and click on the eject button.
Occasionally, the Nautilus application may give an error message, although there are no applications that are currently using the USB device. If this occurs, you can plug-in the device and open the file to confirm that the document was saved, and then eject and then remove the USB drive.
Additional Resources
- File Management Tips (MS Windows): http://www.microsoft.com/atwork/productivity/files.aspx
- Nautilus Web-page: http://live.gnome.org/Nautilus
