Difference between revisions of "Team1/Preparing Eclipse"
| (3 intermediate revisions by the same user not shown) | |||
| Line 1: | Line 1: | ||
| − | === Preparing Eclipse === | + | === 1. Preparing Eclipse === |
| − | '''1. Installing Eclipse''' | + | '''1.1. Installing Eclipse''' |
| − | 1.1. Create local directory Eclipse.<br /> | + | 1.1.1. Create local directory Eclipse.<br /> |
| − | 1.2. Go to [http://www.eclipse.org/downloads Eclipse downloads] and click on the required ''Eclipse Classic'' version (32Bit or 64Bit).<br/> | + | 1.1.2. Go to [http://www.eclipse.org/downloads Eclipse downloads] and click on the required ''Eclipse Classic'' version (32Bit or 64Bit).<br/> |
[[Image: Eclipse_Download.jpg|800px ]] | [[Image: Eclipse_Download.jpg|800px ]] | ||
| − | <br/>1.3. Unzip it in the created Eclipse folder. | + | <br/>1.1.3. Unzip it in the created Eclipse folder. |
| − | '''2. Preparing environment''' | + | '''1.2. Preparing environment''' |
| − | 2.1. Go to the ''Eclipse'' folder created during the installation and launch eclipse (Click eclipse.exe located in Eclipse/eclipse folder).<br /> | + | 1.2.1. Go to the ''Eclipse'' folder created during the installation and launch eclipse (Click eclipse.exe located in Eclipse/eclipse folder).<br /> |
[[Image: Eclipse_EXE.jpg | 300px]] | [[Image: Eclipse_EXE.jpg | 300px]] | ||
| − | <br />2.2. In the appeared ''Workspace'' window type in the name of the workspace. In order to keep all projects in Eclipse folder, use the relative path for the workspace (Start with ".\"). Leave ''"Use this as the default"'' option unchecked.<br /> | + | <br />1.2.2. In the appeared ''Workspace'' window type in the name of the workspace. In order to keep all projects in Eclipse folder, use the relative path for the workspace (Start with ".\"). Leave ''"Use this as the default"'' option unchecked.<br /> |
[[Image: Workspace.jpg | 450px]] | [[Image: Workspace.jpg | 450px]] | ||
| − | <br />2.3 Close the ''Welcome'' Window.<br/> | + | <br />1.2.3 Close the ''Welcome'' Window.<br/> |
| − | 2.4 Go to ''Windows -> Prefirences'' and in the ''Java'' section select ''Installed JREs''<br/> | + | 1.2.4 Go to ''Windows -> Prefirences'' and in the ''Java'' section select ''Installed JREs''<br/> |
[[Image: Eclipse_Preferences.jpg | 600px]] | [[Image: Eclipse_Preferences.jpg | 600px]] | ||
| − | <br/>2.5. Click Add and in the ''Add JRE'' window leave ''Standard VM'' checked. Click ''Next''<br/> | + | <br/>1.2.5. Click Add and in the ''Add JRE'' window leave ''Standard VM'' checked. Click ''Next''<br/> |
[[Image: Eclipse_Preferences2.jpg | 450px]] | [[Image: Eclipse_Preferences2.jpg | 450px]] | ||
| − | 2.6. In the ''JRE Definition'' screen select the directory where Java SE is installed (e.g. C:\Java\jdk1.6.0_23). When JRE system libraries are uploaded click Finish.<br/> | + | 1.2.6. In the ''JRE Definition'' screen select the directory where Java SE is installed (e.g. C:\Java\jdk1.6.0_23). When JRE system libraries are uploaded click Finish.<br/> |
| − | 2.7. In the ''Preferences'' screen select just added JRE.<br/> | + | 1.2.7. In the ''Preferences'' screen select just added JRE.<br/> |
[[Image: Eclipse_Preferences3.jpg | 300px]] | [[Image: Eclipse_Preferences3.jpg | 300px]] | ||
| − | 2.8 Click ''OK''. | + | 1.2.8 Click ''OK''. |
Latest revision as of 08:03, 1 February 2011
1. Preparing Eclipse
1.1. Installing Eclipse
1.1.1. Create local directory Eclipse.
1.1.2. Go to Eclipse downloads and click on the required Eclipse Classic version (32Bit or 64Bit).
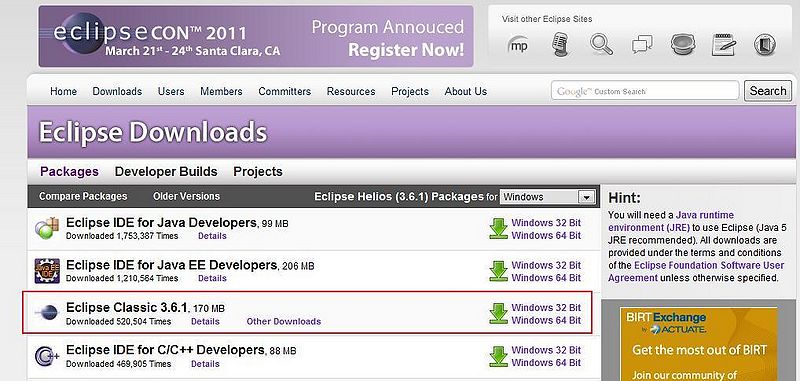
1.1.3. Unzip it in the created Eclipse folder.
1.2. Preparing environment
1.2.1. Go to the Eclipse folder created during the installation and launch eclipse (Click eclipse.exe located in Eclipse/eclipse folder).
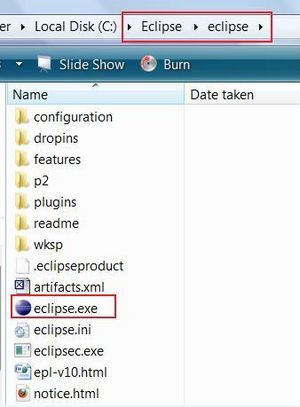
1.2.2. In the appeared Workspace window type in the name of the workspace. In order to keep all projects in Eclipse folder, use the relative path for the workspace (Start with ".\"). Leave "Use this as the default" option unchecked.
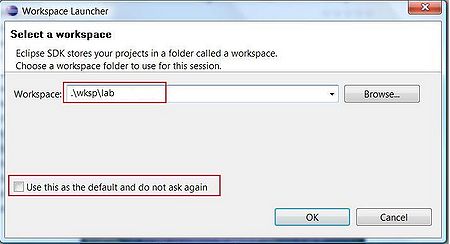
1.2.3 Close the Welcome Window.
1.2.4 Go to Windows -> Prefirences and in the Java section select Installed JREs
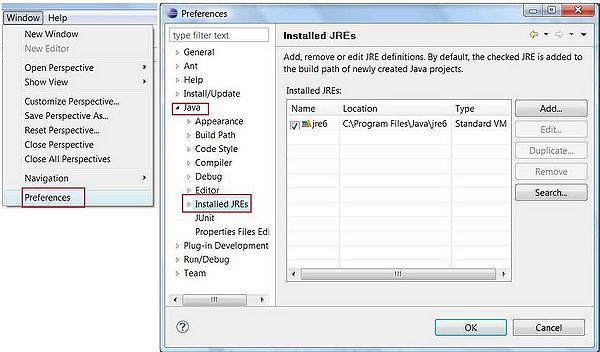
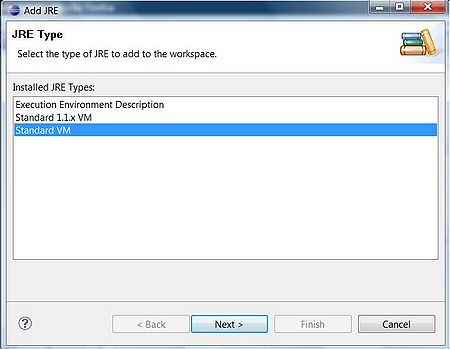
1.2.5. Click Add and in the Add JRE window leave Standard VM checked. Click Next
1.2.6. In the JRE Definition screen select the directory where Java SE is installed (e.g. C:\Java\jdk1.6.0_23). When JRE system libraries are uploaded click Finish.
1.2.7. In the Preferences screen select just added JRE.

1.2.8 Click OK.