Difference between revisions of "OPS705 Lab 2"
(→SSH Listen Port) |
(→Switching to SSH keypair authentication:) |
||
| (6 intermediate revisions by the same user not shown) | |||
| Line 256: | Line 256: | ||
=== SSH Listen Port === | === SSH Listen Port === | ||
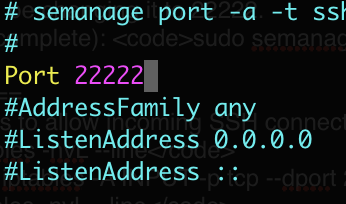
[[Image:Ops705_sshd_listenport_custom.png|right|400px|thumb|Figure 10: Setting the custom listen port for SSHd.]] | [[Image:Ops705_sshd_listenport_custom.png|right|400px|thumb|Figure 10: Setting the custom listen port for SSHd.]] | ||
| − | # From the command line, run the following (it will take a few minutes): <code>semanage port -a -t ssh_port_t -p tcp 22222</code> | + | # From the command line, run the following (it will take a few minutes): <code>sudo semanage port -a -t ssh_port_t -p tcp 22222</code> |
# Using vim, open the SSH configuration file: <code>sudo vim /etc/ssh/sshd_config</code> | # Using vim, open the SSH configuration file: <code>sudo vim /etc/ssh/sshd_config</code> | ||
# Find the line (near the top) containing the words: '''Port 22''' | # Find the line (near the top) containing the words: '''Port 22''' | ||
| Line 284: | Line 284: | ||
# With a second terminal, verify that you can login to your VM's SSH from your personal computer without a password (keypair authentication). Do not move on to the next step until you’re sure. | # With a second terminal, verify that you can login to your VM's SSH from your personal computer without a password (keypair authentication). Do not move on to the next step until you’re sure. | ||
#* Login the same way as before. '''If you aren't asked for a password, then keypair authentication has succeeded.''' | #* Login the same way as before. '''If you aren't asked for a password, then keypair authentication has succeeded.''' | ||
| + | # Save both keys (''id_rsa'' and ''id_rsa.pub'') to secondary, portable location. This can be online storage like OneDrive or Dropbox, or to a USB drive. You will need your keys when you come to class to log in to your Linux VM going forward. | ||
=== Adding Your Professor's Public Key === | === Adding Your Professor's Public Key === | ||
| Line 306: | Line 307: | ||
#* If you can't reconnect, use your control terminal window to find any mistakes you may have made. Remember, don't disconnect from your control terminal until you're sure you can reconnect! Use as many test terminal windows as you need. | #* If you can't reconnect, use your control terminal window to find any mistakes you may have made. Remember, don't disconnect from your control terminal until you're sure you can reconnect! Use as many test terminal windows as you need. | ||
| − | = INVESTIGATION 4: Updating Windows Server 2019 = | + | = INVESTIGATION 4: Confirming Your Linux Work = |
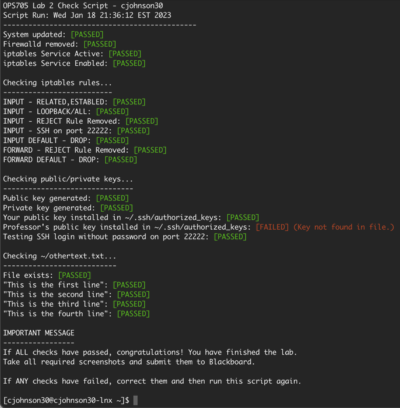
| + | [[Image:script-check-lab2.png|thumb|right|400px|If all checks pass, then user performed task correctly and can continue.]] | ||
| + | ===Running a Shell Script to Check Your Work=== | ||
| + | |||
| + | Although you have been double-checking your work (right?), you ''might'' have made some mistakes. | ||
| + | |||
| + | For example: | ||
| + | * Forgetting to enable iptables. | ||
| + | * Missing a firewall rule. | ||
| + | * Forgetting to update Linux. | ||
| + | |||
| + | To check for mistakes, a '''shell script''' has been created to check your work. '''If the checking shell script detects an error''', then it will tell you and offer constructive feedback on how to fix that problem so you can re-run the checking shell scripts until your work is correct. | ||
| + | |||
| + | Perform the following steps: | ||
| + | # Change directories to ~/bin: <code>cd ~/bin</code> | ||
| + | # Make sure you have the most recent lab files: <code>git pull</code> | ||
| + | # Change back to your home directory: <code>cd ~</code> | ||
| + | # Run the checking script for your Linux work in this lab: <code>labcheck2.sh</code> | ||
| + | #* If you encounter errors, then view the feedback to make corrections, and then re-run the checking script. | ||
| + | #* If all checks pass, then proceed to the next part. | ||
| + | # Assuming you passed all checks, take a screenshot of the full script output. You'll need it for later. | ||
| + | |||
| + | = INVESTIGATION 5: Updating Windows Server 2019 = | ||
Updating your Windows Server VM in Azure is a little bit easier. It takes advantage of the cloud infrastructure to allow point-and-click updates. | Updating your Windows Server VM in Azure is a little bit easier. It takes advantage of the cloud infrastructure to allow point-and-click updates. | ||
Latest revision as of 14:36, 19 January 2023
Contents
- 1 LAB PREPARATION
- 2 KEY CONCEPTS
- 3 INVESTIGATION 1: Update Linux
- 4 INVESTIGATION 2: Configuring Your Firewall
- 5 INVESTIGATION 3: Securing SSH
- 6 INVESTIGATION 4: Confirming Your Linux Work
- 7 INVESTIGATION 5: Updating Windows Server 2019
- 8 Lab Submission
LAB PREPARATION
Purpose / Objectives of Lab 2
In this lab, you will conduct several Linux system administration tasks to secure your system against would-be attackers and gain preliminary experience with the command line interface.
If you encounter technical issues, please contact your professor via e-mail or in your section's Microsoft Teams group.
Minimum Requirements
Before beginning, you must have:
- Successfully completed Lab 1
- Attended the Week 2 lecture
- Read through the Week 2 slides, and have them handy as a reference for concepts
- Your Seneca Azure login credentials
- Your linked mobile device for 2FA
KEY CONCEPTS
Security: From the Beginning
In the not-too-distant past, companies would focus on getting their product and systems working and relegating security as their last step, often as an afterthought. When security is only considered at the end of a project, it's very difficult to remember all the ways in which your product interacts and things can get missed.
This created several high-profile breaches in the 90s and early 2000s, and our approach to security had to be reconsidered.
As a result, we now consider security from the beginning. As you create applications, add users to databases, create links between services, you must keep security in mind at every step of development. Securing as you go is the best method, but even something as simple as simply documenting unsecured parts of your code as you go can be enough (assuming you go back and fix them!)
Generally, we apply the concept of Principle of Least Privilege to security. Essentially, this boils down to locking everything down as much as possible and only allowing what and who you need through. Open access makes you a target. You'll be applying this principle to the firewall later in this lab.
We also take a look at defaults. Most systems and software come with pre-configured defaults to make out-of-the-box setup easy. This can take the form of a default username and password, default ports, etc. In a well secured system, these are often changed to avoid hack attempts. If you know the default, there's a high chance that hackers know it as well. You'll be changing some defaults in this lab.
This is not an exhaustive list of applied security, but it does give use a bit of working knowledge. You'll need it for this lab as well as in our AWS work.
Firewalls
In short, a firewall is a utility that sits on your computer between your network connection and the rest of your system.
Any application, services, or other data that is sent or received by your computer goes through your firewall first. The dominant network protocol is TCP/IP, which means we’re dealing with packets. A firewall looks at these packets. To be clear, the firewall doesn’t look inside packets, but just at the outside data like IP address and/or port destination, etc. The actual transmitted data is still secure and unread.
Generally with firewalls, we apply the Principle of Least Privilege by dropping all new connections by default, and allowing a few exceptions. This is known as whitelisting.
SSH Keypair Authentication
When you connect to a computer with an SSH server, you’re presented with a login screen. You are prompted for your username and password, and then allowed access if your credentials are correct. However, if your username and password are stolen (or guessed), someone else impersonating you can login. How do we prevent this?
We use public and private keys to make users prove who they say they are.
This is known as public-key cryptography.
On your client machine, we generate a public/private key pair. Using cryptography, this method creates a public key and a private key. The public key is used to encrypt messages, and only the private key can decode them. We can then install the public key on our SSH server. This public key is used to uniquely identify your specific user on your specific client computer. With this method, you log in to the SSH server, the keys calculate your identity transparently, and you are logged on without having to provide a password.
- Think of the public key like a lock you're installing on a door. Everyone can see this lock, it's public. But they can't open it.
- Your private key is exactly that: a key. It's what's used to open that lock.
- By installing your public key on your Linux VM, you are creating a secure lock that only you can open with your key.
You'll create and install keys in this lab and later in our AWS labs as your only method to access those AWS VMs.
Editing Text Files
As you will be working in the Linux command line environment, it is useful to learn a least one common command-line text editors.
Although programmers and developers usually use graphical IDE's to code and compile programs (Visual Studio, Sublime, Eclipse, etc), they can create source code using a text editor and compile their code directly on the server to generate executable programs (without having to transfer them for compilation or execution).
Developers very often use a text editor to modify configuration files. In this course, you will become familiar with the process of installing, configuring, and running network services. Text editors are an important tool to help this setup, but are also used to "tweak" or make periodic changes in service configurations.
The two most readily-available command line text editors in Linux are nano and vi.
The nano text editor would seem like an easier-to-use text editor, but vi (although taking longer to learn) has outstanding features and allow the user to be more productive with editing text files.
INVESTIGATION 1: Update Linux
This investigation simply has you update your CentOS installation. This includes operating system packages, as well as any other packages that have been installed using yum.
Part 1: Privilege Escalation
Updating the operating system, by its very nature, changes the system. Any command or utility that performs system-wide changes can only be run by a system administrator. Remember that.
To update the operating system, you'll need to have administrative access. There are two ways to do this:
- logging in to an admin account from your regular account
- running a command as your regular user with temporary admin powers
We call this privilege elevation or elevating your privileges. Only regular user accounts that belong to the system's administrator group can do this. The name of the admin group changes depending on the distribution of Linux; for CentOS, it's the wheel group. The first user account you created as part of your VM installation was automatically added to this group as part of the Azure VM deployment process.
Let's go through a few examples.
First, let's login:
- Start your Linux VM in Azure (this may take a few minutes)
- Connect to the VM remotely via SSH using your regular account. (Refer to Lab 1)
Using Sudo
We can run administration-level commands by using sudo. Sudo allows you to run a command as an administrator (root) from your standard account. For the duration of the command's run, you are root. When the command completes, you are back to being a regular user.
Normally, the shell environment will ask you for your account password as an extra security precaution when using sudo. However, cloud-based Linux VMs typically have password-less sudo access. The idea is that identity management and security is handled by the cloud infrastructure. We'll explore that in detail later in the course.
Run the following commands:
-
whoami -
sudo whoami -
whoami
The whoami command responds by printing out your username. Notice how, by using the command in combination with sudo, the response is root. While the second command is running, you are root. But the moment it ends, you drop back down to your standard user. This is why the third command responds with your standard user again.
Sudo is the preferred method of running admin-level commands, especially when you only have one command to run, or just a few. Only run commands with sudo that require it. Remember, the root user can do anything on the system, including accidentally delete all files. Only use it when you need it.
Logging Into Root
To run administration-level commands, we can also log into the root admin account from our standard user. This is primarily done when a user knows they'll be running many admin-level commands during a session to complete a task.
From your standard user, elevate to the root account with the following command: sudo su -
Notice that your command prompt has immediately changed. It no longer prints out your username at the beginning of each line, but the name of the root account. This is a good visual aid to let you know how you're logged in.
Run the same commands from the sudo subsection:
-
whoami -
sudo whoami -
whoami
Notice that each command returns the output root. This is in contrast to using the sudo command from your regular user account. When you are logged into the root account directly as you are now, all commands you issue will run as root. Be very careful! With great power comes great responsibility.
To log out of root and drop back down to your regular user, run: exit
Part 2: Update CentOS
As mentioned in the Week 2 lecture, keeping your Linux system up to date is an incredibly important task and must be done regularly. You are the administrator of this system, you must keep it running well. While updating is a graded part of this lab, you should run the command again regularly to check for new updates while you continue to work with this virtual machine over the next several weeks.
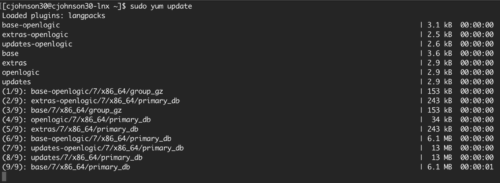
Run the command to update CentOS: sudo yum update
Running this as a regular user will give you an error, which is why you temporarily elevate your privileges for the duration of a command with sudo.
There will likely be further user interaction for this update command, mostly asking you to confirm an action. For updates, you can type y and hit Enter safely. That said, do get in the habit of reading warnings and when it asks for your confirmation.
The update command will look for updates, download the install files, and then update the system. Most updates don't require a restart (unlike Windows!), except for kernel updates. The kernel is the very basic building block of the system; sort of the heart. It's responsible for many of the most basic functions a computer performs. If a kernel update is installed, you need to restart the system to use the new kernel. As this is your first update, you'll likely have a kernel upgrade installed.
- When the yum update command completes, restart the system with the following command:
sudo reboot
You'll be disconnected from your remote session as the SSH server inside your VM shuts down along with the rest of the system.
It may take a few minutes for the VM to restart. You can track its progress through the Azure DTL Overview page. Once back up and running, log back in to confirm everything still works.
INVESTIGATION 2: Configuring Your Firewall
In this investigation, you'll replace the default firewall with another and follow security best practices in constructing your firewall rules.
Part 1: Replacing firewalld with iptables
The default firewall for CentOS, firewalld is more complex than we need. We'll be reverting to the easier to use iptables standard. This will require the removal of the firewalld package, the installation of the iptables-services package, and working with systemd services to turn on your new firewall.
Make sure you follow these instructions in order. If you don't, you may be locked out of your Linux VM forever. If you encounter errors on any step, stop and ask for help. Do not continue!
As we are going to run several admin-level commands, we will log in as root for this section:
- From your regular user, elevate to the root account:
sudo su - - Install the iptables-services package:
yum install iptables-services - Stop the firewalld service and start the iptables service in a single, chained command:
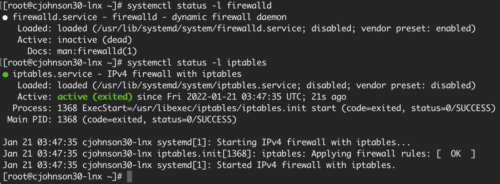
systemctl stop firewalld; systemctl start iptables - Check the status of the firewalld service. It should tell you it's stopped:
systemctl status -l firewalld - Check the status of the iptables service. It should tell you it's active:
systemctl status -l iptables - View your current iptables firewall rules:
iptables -L -vn --line-numbers - Refer to Figure 5. If your rules at this stage look different, stop and contact your professor for help. (Values in the pkts and bytes column may vary.)
- Set iptables to start with the system:
systemctl enable iptables - Remove firewalld completely, including all unused files:
yum autoremove firewalld(Note: If you don't remove firewalld and both firewalls are set to start with the system, firewalld will always start instead of iptables. This can lead to much frustration. Make sure you remove it!)
Part 2: Securing Your Firewall
There are a few standard security practices to follow when dealing with firewalls. In this section, we will changes our firewall rules to follow those practices. For more detail, refer to the Week 2 lecture and material.
- Set your default policy for the INPUT chain to DROP:
iptables -P INPUT DROP - Remove the reject rule from the INPUT chain to hide our server from scans:
iptables -D INPUT 5 - Set your default policy for the FORWARD chain to DROP:
iptables -P FORWARD DROP - Remove the reject rule from the FORWARD chain to hide it from scans:
iptables -D FORWARD 1 - Verify your changes by running the list rules command again:
iptables -nvL --lineRefer to Fig. 6 as a reference. - To confirm you haven't locked yourself out, log out of SSH and log back in. If you don't encounter any login issues, you're good to go.
- Assuming the step above works, in your Linux VM, save your rule changes:
service iptables save - Congratulations, you've secured your firewall!
INVESTIGATION 3: Securing SSH
In this investigation, you will be editing configuration text files to change the port the SSH service listens on. You will be using the vim utility to make some of these changes.
Part 1: Text Editing with vim
You will now learn basic editing skills using the vi (vim) text editor including creating, editing, and saving text files. As mentioned, the vim text editor (although taking longer to learn) has outstanding features to increase coding productivity.
(Vim is a newer version of vi with expanded features. We will be using vim in this course. In most cases, vi and vim can be used interchangeably here.)
The big thing to remember with vim is that it starts in COMMAND mode. You need to issue letter commands to change modes (including to enter plain text into the document). Also, you can press colon “: ” in COMMAND mode to enter more complex commands.
Resource: vi Cheat Sheet (PDF)
An interactive tutorial has been created to give you "hands-on" experience on how to use vi text editor. It is recommended that you run this interactive tutorial in your Linux account to learn how to create and edit text files with the vi text editor.
- Run the interactive tutorial:
vi-tutorial - In the tutorial menu, select the first menu item labelled "USING THE VI TEXT EDITOR"
- Read and follow the instructions in the tutorial. Eventually, it will display a simulated vi environment and will provide you with "hands-on" practice using the vi text editor.
- When you have completed that section, you will be returned to the main menu.
- If you want to get extra practice, you can select the menu item labelled "REVIEW EXERCISE".
- When you want to exit the tutorial, select the menu option to exit the tutorial.
After you have completed the tutorial:
- Using vim, create a new text file called othertext.txt in your home directory.
cd ~; vim othertext.txt - Write the text shown in Figure 8 to your new othertext.txt file, save, and quit.
- Confirm the contents of your text file match Figure 8:
cat othertext.txt
You can also manage, view or manipulate the display of text files. This is HIGHLY ADVISED in case you only want to view contents and NOT edit text file contents which can cause accidental erasure of data.
Refer to the following table of Text File Management Commands:
| Linux Command | Purpose | Example |
|---|---|---|
| touch | Create empty file(s) / Updates Existing File's Date/Time Stamp | touch otherfile.txt
|
| cat | Display text file's contents without editing (small files) | cat otherfile.txt
|
| more , less | Display / Navigate within large text files without editing | less otherfile.txt
|
| cp | Copy text file(s) | cp otherfile.txt uli101xx/otherfile.txt
|
| mv | Move / Rename text files | mv otherfile.txt uli101xx/otherfile.txt
|
| rm | Remove text file(s) | rm otherfile.txt
|
| sort | Sorts (rearranges) order of file contents when displayed. Content is sorted alphabetically by default. The -nItalic text option sorts numerically, -r performs a reverse sort | sort otherfile.txt
|
| head | Displays the first 10 lines of a text file by default. An option using a number value will display that number of lines (e.g. head -5 filename will display first 5 lines). |
head -2 otherfile.txt
|
| tail | Displays the last 10 lines of a text file by default. An option using a number value will display that number of lines (e.g. tail -5 filename will display last 5 lines). |
tail -2 otherfile.txt
|
| grep | Displays file contents that match a pattern | grep "third" otherfile.txt
|
| uniq | Displays identical consecutive lines only once | uniq otherfile.txt
|
| diff file1 file2 | Displays differences between 2 files | diff otherfile.txt otherfile2.txt
|
| file | Gives info about the contents of the file (e.g. file with no extension). | file othertext.txt
|
Part 2: Adding a Custom Port to SELinux
SELinux is an extra security system that looks for unusual patterns of behaviour in programs. While SELinux is a large topic of its' own, we will only work with it briefly here. In this part, we will tell SELinux it's alright for it to allow SSH connections on a custom port. The default is port 22, we will be changing it to 22222.
- Run the following command (it will take a few seconds to complete):
sudo semanage port -a -t ssh_port_t -p tcp 22222
Part 3: Adding a Firewall Rule for the Custom SSH Port
As mentioned, we want to change what port the system uses to allow incoming SSH connections. To do that, we have to add an extra rule to our firewall to allow it through:
- Review your current rules for reference:
sudo iptables -nvL --line - Add a new rule to our firewall for port 22222:
sudo iptables -A INPUT -p tcp --dport 22222 -j ACCEPT - Confirm your new rule has been added:
sudo iptables -nvL --line - If it has, save your new rules:
sudo service iptables save
Part 4: Modifying the SSH Service Listen Port
In this section, you will change what port the SSH service listens on for new connections.
The Two-Terminal System
When working with cloud-based systems, your remote connection to the system must be protected at all costs. If you make a change that removes your ability to connect, this is usually permanent. This includes anything that changes your network, firewall, and SSH service. Careless modifications can result in a total loss of access. In these cases, the only way to recover is to delete the entire VM and start from scratch.
Luckily, most of these fatal mistakes only affect new remote connections. While you're still connected you can still fix your mistakes.
Whenever you are modifying any of these (as you will below), you should use the Two-Terminal System. This involves opening two separate remote SSH terminals to your Linux system:
- Control Terminal: This is the terminal you use to make changes to the system. Do not log out of this terminal.
- Testing Terminal: This is the terminal you use to test your ability to reconnect after you make a change. Log out and log back in. If you're unable to log back in, you've broken something. Use your Control Terminal to find the problem and fix it. Continue using your Testing Terminal to log back in as you fix problems and make changes.
Make sure to follow this method during Investigation 2 and Investigation 3.
SSH Listen Port
- From the command line, run the following (it will take a few minutes):
sudo semanage port -a -t ssh_port_t -p tcp 22222 - Using vim, open the SSH configuration file:
sudo vim /etc/ssh/sshd_config - Find the line (near the top) containing the words: Port 22
- Change this line to read: Port 22222
- Save and quit vim.
- Restart the sshd service:
sudo systemctl restart sshd - Check the status of the service:
systemctl status -l sshd- If the status is in a Failed state, retrace your steps. Look back at the SSHd config file for typos. Redo the last two steps to apply additional changes.
- If the status is active (running), move onto the next step.
- In your test terminal, disconnect from your SSH connection and reconnect using the new port 22222. (Ex:
ssh -p 22222 yourSenecaUsername@address)- If you're able to reconnect, move on to the next step.
- If you can't reconnect, use your control terminal window to find any mistakes you may have made. Remember, don't disconnect from your control terminal until you're sure you can reconnect! Use as many test terminal windows as you need.
Part 5: Using SSH Keypairs
You will generate an SSH keypair on your Linux VM and copy your public key onto your personal computer.
Switching to SSH keypair authentication:
- First, download and install the FileZilla Client software on your personal computer.
- On your Linux VM as a regular user, generate your SSH keypair (accept all defaults):
ssh-keygen - Install the new keys on the system:
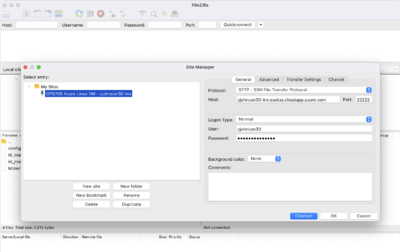
ssh-copy-id -p 22222 localhost - Using FileZilla on your personal computer, log into the Linux VM and download your new public key to your personal computer. They can be found on your Linux VM in
~/.ssh/- On Windows, store the downloaded key here:
C:\Users\[yoursenecaid]\.ssh\ - On Mac, store the downloaded key here:
~/.ssh/, then run the following command:chmod 700 ~/.ssh; chmod 600 ~/.ssh/id_rsa*
- On Windows, store the downloaded key here:
- With a second terminal, verify that you can login to your VM's SSH from your personal computer without a password (keypair authentication). Do not move on to the next step until you’re sure.
- Login the same way as before. If you aren't asked for a password, then keypair authentication has succeeded.
- Save both keys (id_rsa and id_rsa.pub) to secondary, portable location. This can be online storage like OneDrive or Dropbox, or to a USB drive. You will need your keys when you come to class to log in to your Linux VM going forward.
Adding Your Professor's Public Key
In this section, you will add your professor's public key to allow them to log in to your Linux VM and run lab checks and perform troubleshooting when needed.
- On Blackboard, find your professor's public key in Course Documents and copy the text from inside the file.
- Using the following command as your regular user, install your professor's public key on to your Linux VM (substitute <professorID> for the actual public key text):
echo "<professorID>" >> ~/.ssh/authorized_keys - On your test terminal, log out and log back in again to check that keypair authentication is still working.
Disabling SSH password authentication:
- Make sure you have two SSH separate terminals connected to you Azure Linux VM.
- In your control terminal, use vim to open the SSH configuration file:
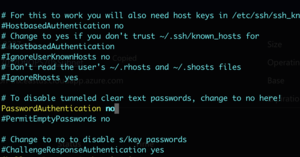
sudo vim /etc/ssh/sshd_config - Find the line that contains PasswordAuthentication, remove the # symbol at the beginning of the line, and change the yes into a no.
- Save and quit vim.
- Restart the sshd service:
sudo systemctl restart sshd - Check the status of the service:
systemctl status -l sshd- If the status is in a Failed state, retrace your steps. Look back at the SSHd config file for typos. Redo the last two steps to apply additional changes.
- If the status is active (running), move onto the next step.
- In your test terminal, disconnect from your SSH connection and reconnect.
- If you're able to reconnect, move on to the next step.
- If you can't reconnect, use your control terminal window to find any mistakes you may have made. Remember, don't disconnect from your control terminal until you're sure you can reconnect! Use as many test terminal windows as you need.
INVESTIGATION 4: Confirming Your Linux Work
Running a Shell Script to Check Your Work
Although you have been double-checking your work (right?), you might have made some mistakes.
For example:
- Forgetting to enable iptables.
- Missing a firewall rule.
- Forgetting to update Linux.
To check for mistakes, a shell script has been created to check your work. If the checking shell script detects an error, then it will tell you and offer constructive feedback on how to fix that problem so you can re-run the checking shell scripts until your work is correct.
Perform the following steps:
- Change directories to ~/bin:
cd ~/bin - Make sure you have the most recent lab files:
git pull - Change back to your home directory:
cd ~ - Run the checking script for your Linux work in this lab:
labcheck2.sh- If you encounter errors, then view the feedback to make corrections, and then re-run the checking script.
- If all checks pass, then proceed to the next part.
- Assuming you passed all checks, take a screenshot of the full script output. You'll need it for later.
INVESTIGATION 5: Updating Windows Server 2019
Updating your Windows Server VM in Azure is a little bit easier. It takes advantage of the cloud infrastructure to allow point-and-click updates.
Part 1: Updating with Artifacts
- Spin up your Windows Server VM, and wait until it's fully started up.
- In the Azure blade for your Windows Server VM, click on the Manage artifacts item in the menu bar to the left.
- In this new window, click on the Apply artifacts button. This will bring you to the Add artifacts screen.
- In the Add artifacts search field, type Time.
- Click on Set Time Zone in the results listing, then click Add in the next window.
- You'll be returned to the Add artifacts window.
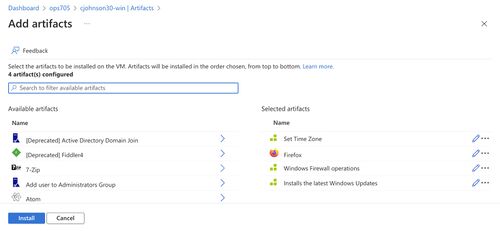
- Add the following additional artifacts:
- Firefox
- Windows Firewall operations – Enable ICMP (Ping)
- Installs the latest Windows Updates
- You'll be returned to the Add artifacts window. Simply click OK to install them.
- The Manage Artifacts window will return, and a new entry for each artifact will appear. Their statuses will cycle through Pending, Installing, and finally Succeeded.
- When all artifacts are in a Succeeded state, move to Part 2. (This may take 10-20 minutes.)
Lab Submission
Submit to Blackboard full-desktop screenshots (PNG/JPG) of the following:
- Logging in to your Linux VM without a password on port 22222.
- Run the
yum updatecommand to show there are no further updates to install and screenshot the result. - Service status of firewalld and iptables.
- Listing of your modified firewall rules.
- A full view of the contents of your othertext.txt file.
- A full view of the contents of ~/.ssh/authorized_keys.
- Listing of your applied artifacts in Azure for your Windows Server VM.
Make sure to fully stop your VMs when you're done!


