Difference between revisions of "Android Discovery Zone"
(→Google Maps Android API v2) |
Chris Tyler (talk | contribs) m (Reverted edits by Chris Tyler (talk) to last revision by Peter.liu) |
||
| (9 intermediate revisions by 5 users not shown) | |||
| Line 9: | Line 9: | ||
= Development Environment Setup for using Google Maps and Location Services = | = Development Environment Setup for using Google Maps and Location Services = | ||
* the Setup section in the Google Play services guide [http://developer.android.com/google/play-services/setup.html] | * the Setup section in the Google Play services guide [http://developer.android.com/google/play-services/setup.html] | ||
| + | |||
| + | = Importing Android Studio Project into Eclipse = | ||
| + | Android Studio integrates with Gradle, so the project structure is changed. | ||
| + | |||
| + | When importing from Eclipse to Android Studio, the IDE handles the conversion and will automatically update the directory structure. | ||
| + | |||
| + | For Android Studio to Eclipse: | ||
| + | |||
| + | * Create a new Android empty project in eclipse | ||
| + | * Overwrite the fresh res/ folder and the AndroidManifest.xml file, with the ones from the Android Studio project | ||
| + | * Copy the content of the java/ folder from the Android Studio project (it should contain your package name folder structure, like com/example/app/, and the java files of course) in the Eclipse src folder | ||
| + | * Link your needed libraries if it's the case | ||
| + | |||
| + | = Speeding Up Emulator with Intel Plugin (Pedro Bellesa)= | ||
| + | '''Mac Instructions''' | ||
| + | * Open the Android SDK Manager. | ||
| + | [[File:SDKManager.png|400px]] | ||
| + | * Navigate to the Extras folder, and select the Intel x86 Emulator Accelerator. | ||
| + | * Install the package. | ||
| + | * Navigate to the installation folder. (e.g. "/Applications/Android Studio.app/sdk/extras/intel/Hardware_Accelerated_Execution_Manager/") | ||
| + | * Open the .dmg file and follow the installation. | ||
| + | * When it asks you to select the amount of RAM for the accelerator, choose at least 2048Mb. | ||
| + | * When creating your device emulator in Android Device Manager, make sure it uses the x86 CPU. | ||
| + | [[File:AVD_X86.png|400px]] | ||
= Google Maps Android API v2 = | = Google Maps Android API v2 = | ||
| Line 33: | Line 57: | ||
**** a video demo on GenyMotion's emulator [http://www.youtube.com/watch?v=1kHVWwHRFm8] | **** a video demo on GenyMotion's emulator [http://www.youtube.com/watch?v=1kHVWwHRFm8] | ||
*** '''The Problem of Getting Map Keys for Google Maps Android API v1''' [http://stackoverflow.com/questions/13905293/is-google-maps-api-key-v2-eligible-for-mapview-element] | *** '''The Problem of Getting Map Keys for Google Maps Android API v1''' [http://stackoverflow.com/questions/13905293/is-google-maps-api-key-v2-eligible-for-mapview-element] | ||
| − | * How to get Google Maps/MyPlaces app to run on the emulator? | + | * '''How to get Google Maps/MyPlaces app to run on the emulator?''' |
** Alfred's contribution (Lab Q&A). | ** Alfred's contribution (Lab Q&A). | ||
| Line 161: | Line 185: | ||
[[File:twitter4j.jpg]] | [[File:twitter4j.jpg]] | ||
| + | |||
| + | =Projecting Android Phone to Computer (Alek Minassian) = | ||
| + | You can project the screen of your Android Phone to your computer in real time by using a program called Droid@Screen found at http://droid-at-screen.ribomation.com/download/ (download the latest version). This is a JAR file that does not require installation. Once you have downloaded the file, you can simply open it to run it. | ||
| + | |||
| + | Once you have opened Droid@Screen, USB connect your Android phone to your computer, enable USB Debugging on it, then on Droid@Screen, go to ADB --> ADB Executable Path, then enter the path to the adb.exe file for the version of ADT Eclipse you are using (...\sdk\platform-tools\adb.exe). Once you have done this, your phone should appear in the Devices list and you should be receiving a live projection of its screen. | ||
| + | |||
| + | = Viewing a Database on an Android Emulator/Device = | ||
| + | *how can i access the Sqlite database on real android device using DDMS in eclipse juno [http://stackoverflow.com/questions/28185335/how-can-i-access-the-sqlite-database-on-real-android-device-using-ddms-in-eclips] | ||
| + | *Database not visible in DDMS folder when real device used instead of emulator [http://stackoverflow.com/questions/18437347/database-not-visible-in-ddms-folder-when-real-device-used-instead-of-emulator] | ||
Latest revision as of 19:31, 23 April 2018
Contents
- 1 Android Services
- 2 Development Environment Setup for using Google Maps and Location Services
- 3 Importing Android Studio Project into Eclipse
- 4 Speeding Up Emulator with Intel Plugin (Pedro Bellesa)
- 5 Google Maps Android API v2
- 6 Location Awareness
- 7 XMLPullParser
- 8 Android UI Design
- 9 Resource Types
- 10 Decompiling Android
- 11 Installing and Debugging Android Apps into a Kobo Vox from Eclipse in a Ubuntu/Unix Environment (Dennis Villasenor)
- 12 Parsing XML Attributes (Dennis Villasenor)
- 13 Registering Twitter App - getting Consumer Key and Consumer Secret (Imtiaz Latif)
- 14 Projecting Android Phone to Computer (Alek Minassian)
- 15 Viewing a Database on an Android Emulator/Device
Android Services
- How to check all the running services in android? [1]
- AIDL (Android Interface Definition Language) [2]
- NotificationListenerService [3] [4]
- Android Push Notifications [5]
- Android Push Notification Service (APNS) [6]
- Android: implementing a notification service the right way [7]
Development Environment Setup for using Google Maps and Location Services
- the Setup section in the Google Play services guide [8]
Importing Android Studio Project into Eclipse
Android Studio integrates with Gradle, so the project structure is changed.
When importing from Eclipse to Android Studio, the IDE handles the conversion and will automatically update the directory structure.
For Android Studio to Eclipse:
- Create a new Android empty project in eclipse
- Overwrite the fresh res/ folder and the AndroidManifest.xml file, with the ones from the Android Studio project
- Copy the content of the java/ folder from the Android Studio project (it should contain your package name folder structure, like com/example/app/, and the java files of course) in the Eclipse src folder
- Link your needed libraries if it's the case
Speeding Up Emulator with Intel Plugin (Pedro Bellesa)
Mac Instructions
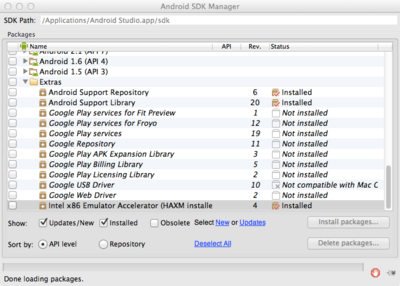
- Open the Android SDK Manager.
- Navigate to the Extras folder, and select the Intel x86 Emulator Accelerator.
- Install the package.
- Navigate to the installation folder. (e.g. "/Applications/Android Studio.app/sdk/extras/intel/Hardware_Accelerated_Execution_Manager/")
- Open the .dmg file and follow the installation.
- When it asks you to select the amount of RAM for the accelerator, choose at least 2048Mb.
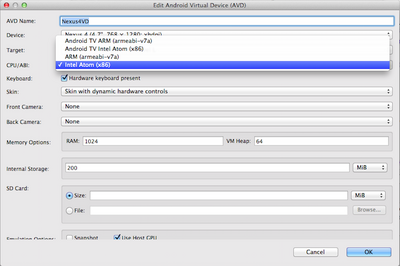
- When creating your device emulator in Android Device Manager, make sure it uses the x86 CPU.
Google Maps Android API v2
- Hands-On Tutorials
- Google Maps Android API v2 - Tutorial (Lars Vogel 2013) [9]
- Demo projects (Google Maps Android API v2) from Dartmouth College [10]
- use your own Maps API keys for different apps!
- Google Maps Android API (Google services) [11]
- Add a map object.
- Draw markers.
- Change views.
- Get your API key for Maps (Getting Started Guide)
- A simple example using Google Maps Android API v2 [12]
- Exploration with Google Maps Android API v2
- How to get Google Maps/MyPlaces app to run on the emulator?
- Alfred's contribution (Lab Q&A).
Location Awareness
- Making Your App Location-Aware [22]
- Location Services API (Google Play services)
XMLPullParser
Android UI Design
- Android UI Design
- Android UI: Menus vs Action Bar
- ebooks on Android UI Design at Seneca Library
- Smashing Android UI responsive user interfaces and design patterns for Android phones and tablets by Juhani Lehtimäki. Wiley 2013.
- Android UI fundamantals develop and design by Jason Ostrander. Peachpit 2012.
- Android design patterns interaction design solutions for developers byGreg Nudelman. Wiely 2013.
- Android documentation is very erroneous. I wasted nearly 4 hours trying to get a search bar feature in my app working as per what is given in Android Documentation for Search only to find this out:
Stackoverflow
-- Gideon
Resource Types
- application resources provided in the /res directory [31]
Decompiling Android
- Decompiling Android by Godfrey Nolan (2012). -- ebook at Seneca Library
- Dalvik bytecode (DEX files)
Installing and Debugging Android Apps into a Kobo Vox from Eclipse in a Ubuntu/Unix Environment (Dennis Villasenor)
turn on your device. In settings go to application. From applications go to development and enable USB debugging.
plug in your device to the usb in your computer/laptop
log in as sudo and create a file called 51-android.rules in your etc/udev/rules.d in the root folder.
sudo -i
enter your password
cd ../..
cd etc/udev/rules.d
gedit 51-android.rules
in that file you enter the following
SUBSYSTEM=="usb", ATTR{idVendor}=="2237", MODE="0666", GROUP="plugdev"
ATTR{idVendor} is passed the vendor code for your device and varies depending on the type of android device you are using. (in this case vendor 2237 is the vendor ID for the Kobo Vox)
A list of vendor ID's can be found here:
http://developer.android.com/tools/device.html
exit and save the file
now type in adb devices. Your device should now be listed
activate eclipse and select your application
right click on it, select run as android application. As long as your device runs the minimum SDK version listed in your apps manifest file (ie: <uses-sdk android:minSdkVersion="10" />) then your device should be on the list of devices where you can run and debug your app. Most devices can run a SDKVersion 8 though for some of the later labs you might need SDKVersion 10.
Parsing XML Attributes (Dennis Villasenor)
This section shows how to parse xml attributes using xmlpullparser like in the example below
<stop tag="473" title="Humber Loop At The Queensway" lat="43.6310799" lon="-79.47871" stopId="13692"/>
The first step will be to create a class that contains the attributes you wish to retrieve more than one attribute from the xml tag.
the next step will be to create an arraylist of either that class you just created or an arraylist of Strings (or any other type but Strings is recommended).
ie: ArrayList<Stop> stopArray = new ArrayList<Stop>();
do the xml pull parsing like here
http://developer.android.com/reference/org/xmlpull/v1/XmlPullParser.html
at the start tag section check for the tag whose attributes you wish to retrieve by calling xmlpullparser's getName method to get the current xml tag it is on and using string compare with a string containing the tag you wish to compare it to and use the getAttributeValue method as seen below to retrive the value of xml tag's attribute you wish to retrieve.
   else if(eventType == XmlPullParser.START_TAG) {
   if("stop".equals(parser.getName())){
   if(parser.getAttributeValue(null, "stopId") != null){
   String myTag = parser.getAttributeValue(null, "tag");
after this is done, add your String (or object) into your array. Be sure to do this while inside the the while(eventType != XmlPullParser.END_DOCUMENT) loop
stopArray.add(myTag);}
Once all this is done you can now work with the values of the xml attributes by just going through the arraylist.
Registering Twitter App - getting Consumer Key and Consumer Secret (Imtiaz Latif)
In order to access Twitter API, you must create Consumer Key and Consumer Secret. Why do you need these key? because Twitter and many other organizations have added an open standard token based framework called OAuth http://oauth.net/about/ for authentication and authorization purpose.
Steps for getting Consumer Key and Consumer Secret.
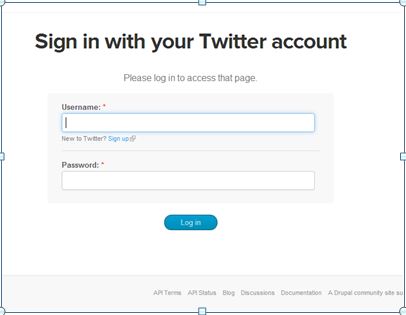
Step 1: Navigate to https://dev.twitter.com/apps/new and enter you Twitter user name and password.
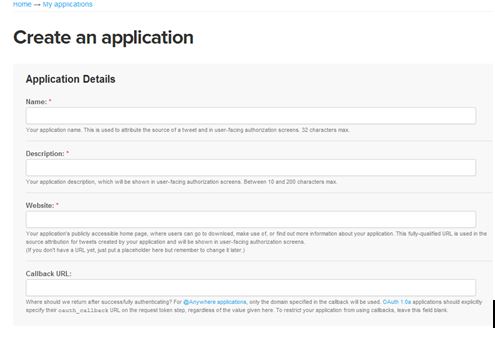
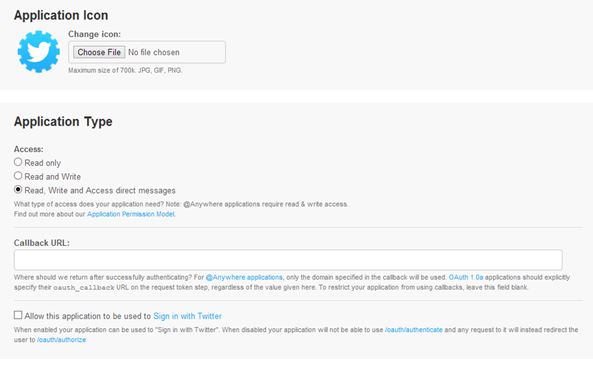
Step 2: Once you login, you need to register your application
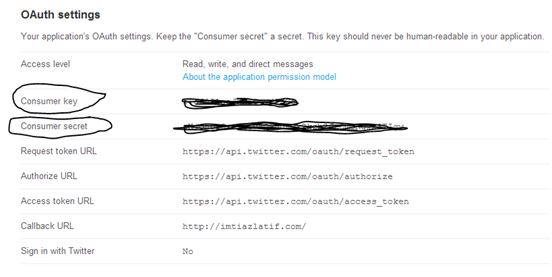
Step 3: After you register your App, click on settings tab and change the access type to read, write access.
Step 4: Copy the Consumer Key and Consumer Access
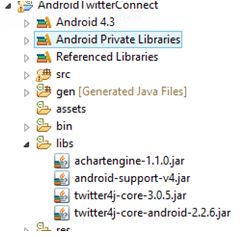
Please note: you also need to download Twitter4J.jar files and place it in your project's libs folder. you can further read their official documentation to determine which file you needed for your project here http://twitter4j.org/en/code-examples.html.
Projecting Android Phone to Computer (Alek Minassian)
You can project the screen of your Android Phone to your computer in real time by using a program called Droid@Screen found at http://droid-at-screen.ribomation.com/download/ (download the latest version). This is a JAR file that does not require installation. Once you have downloaded the file, you can simply open it to run it.
Once you have opened Droid@Screen, USB connect your Android phone to your computer, enable USB Debugging on it, then on Droid@Screen, go to ADB --> ADB Executable Path, then enter the path to the adb.exe file for the version of ADT Eclipse you are using (...\sdk\platform-tools\adb.exe). Once you have done this, your phone should appear in the Devices list and you should be receiving a live projection of its screen.
