Difference between revisions of "Printing / Scanning"
| (41 intermediate revisions by the same user not shown) | |||
| Line 9: | Line 9: | ||
'''Reasons For this Decision:''' | '''Reasons For this Decision:''' | ||
| − | # Due to the configuration of | + | # Due to the configuration of the workstations (disk-less FAT CLIENTS), printing via the workstations is NOT currently feasible. |
| − | # Printing in the Computer Lab is a privilege and not a right - we need to keep the costs of printer ink and paper to a minimum. | + | # Printing in the Computer Lab is a <u>privilege</u> and not a <u>right</u> - we need to keep the costs of printer ink and paper to a minimum. |
# Limiting the authority to instructors only will help prevent the needless printing of "rough-drafts", etc... | # Limiting the authority to instructors only will help prevent the needless printing of "rough-drafts", etc... | ||
# Limiting the printout of materials encourages printing at home to help minimise printing costs at the church. | # Limiting the printout of materials encourages printing at home to help minimise printing costs at the church. | ||
| − | # Program will be available for the instructor account to "grab" work for | + | # Program will be available for the instructor account to "grab" work for "off-site" printing and storage. |
| − | ''' | + | '''NOTE: In the future, if it becomes feasible to scan / make printouts from <u>workstations</u>, AVIT may require that access to the lab printer be limited to an adult instructor.''' |
== Printer Information == | == Printer Information == | ||
| + | [[Image:printer.jpg|thumb|150px|<b>HP 2170 Printer / Scanner</b> at Westminster Computer Lab ]] | ||
| + | |||
| + | :'''Model:''' '''HP psc 2170''' - multifunction ( printer / copier / scanner ) ( color ) | ||
| − | |||
:'''Features:''' | :'''Features:''' | ||
| − | :*'''General:''' Copier Type Digital | Fax Type Plain paper | Printing Technology Ink-jet - Color | Monthly Duty Cycle (max) 2000 impressions | + | :*'''General:''' Copier Type Digital <span style="color:#ff0000;font-weight:bold;">|</span> Fax Type Plain paper <span style="color:#ff0000;font-weight:bold;">|</span> Printing Technology Ink-jet - Color <span style="color:#ff0000;font-weight:bold;">|</span> Monthly Duty Cycle (max) 2000 impressions |
| − | :*Printing: | + | :*'''Printing:''' Max Printing Resolution up to 1200 x 1200 dpi (mono) / up to 4800 x 1200 dpi (color) <span style="color:#ff0000;font-weight:bold;">|</span> Max Printing Speed up to 16.0 ppm (mono) / up to 12.0 ppm (color) |
| − | :*Scanning: | + | :*'''Scanning''': Optical Resolution 1200 x 2400 dpi <span style="color:#ff0000;font-weight:bold;">|</span> Interpolated Resolution 19200 x 19200 dpi <span style="color:#ff0000;font-weight:bold;">|</span> Gray Scale Depth 8 bit <span style="color:#ff0000;font-weight:bold;">|</span> Color Depth 48.0 bit |
| − | '''Printer Manual:''' [ [http://www.google.com/url?sa=t&source=web&cd=5&ved=0CDAQFjAE&url=http%3A%2F%2Fec1.images-amazon.com%2Fmedia%2Fi3d%2F01%2FA%2Fman-migrate%2FMANUAL000039652.pdf&rct=j&q=hp%202170%20printer%20manual&ei=g-znTYPvGrPr0QG3g5mWCw&usg=AFQjCNFKotLzjeLlpsSpXN03E1OeO1iwaQ&cad=rja pdf] ] | + | :'''Printer Manual:''' [ [http://www.google.com/url?sa=t&source=web&cd=5&ved=0CDAQFjAE&url=http%3A%2F%2Fec1.images-amazon.com%2Fmedia%2Fi3d%2F01%2FA%2Fman-migrate%2FMANUAL000039652.pdf&rct=j&q=hp%202170%20printer%20manual&ei=g-znTYPvGrPr0QG3g5mWCw&usg=AFQjCNFKotLzjeLlpsSpXN03E1OeO1iwaQ&cad=rja pdf] ] |
== Procedure to Make a Printout == | == Procedure to Make a Printout == | ||
| Line 37: | Line 39: | ||
| − | == | + | == Procedures to Scan a Document == |
| + | |||
| + | Although there is software available to generate graphics and photographs, individuals may want the option to scan an existing graphic, picture or graphic. | ||
| + | The Westminster Computer Lab has the ability to scan graphics, pictures or documents. | ||
| + | |||
| + | |||
| + | '''WARNING BEFORE PROCEEDING: You are <u>not</u> permitted to scan material that is copy-right protected. You may not scan copyrighted pictures, graphics or documents without the written content of the author. If in doubt, or not certain - simply do NOT scan!!!''' | ||
| + | |||
| + | |||
| + | == YouTube Video == | ||
| + | |||
| + | : '''If you want to see the visual steps for "Procedures to Scan a Document", here is a link to a customized YouTube video: [http://www.youtube.com/watch?v=VJbUj2fMMrU http://www.youtube.com/watch?v=VJbUj2fMMrU] | ||
| + | |||
| + | |||
| + | === Written Instructions === | ||
| + | |||
| + | :'''Below are the written instructions (in case you prefer to have a printout of these procedures):''' | ||
| + | |||
| + | |||
| + | |||
| + | |||
| + | |||
| + | <table> | ||
| + | <tr> | ||
| + | <td width="45%"> | ||
| + | <ol> | ||
| + | <li>Make certain you are '''logged into the server with the "Teacher" account'''.</li> | ||
| + | <li> '''Power on the printer/scanner'''.</li> | ||
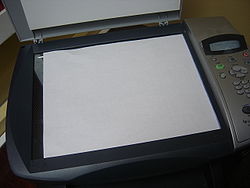
| + | <li> '''Open the the lid''' to the scanner (located on the top of the printer/scanner).</li> | ||
| + | <li>'''Place the graphic, picture or document face-down with the top of the document facing right'''.</li> | ||
| + | <li>'''Close the scanner lid'''.</li> | ||
| + | <li>'''CLick on the menu on the bottom right-hand side of the panel''', and '''select''' '''GRAPHICS''' -> '''SIMPLE SCAN'''.</li> | ||
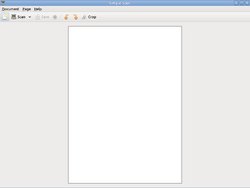
| + | <li>The Simple Scan application window will appear.</li> | ||
| + | <li>'''Click the Down Arrow to the right of the scan button. First select if the scan is "text" or "photo", then click on the item "Single Page"'''.</li> | ||
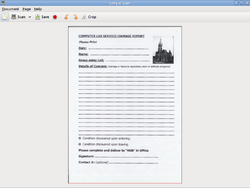
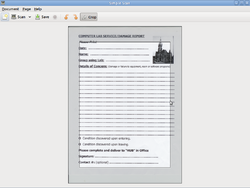
| + | <li>Allow time for the document or image to scan. This may take time due to factor such as resolution and colour. '''You should see the scanned image start to appear in the scanning window'''.</li> | ||
| + | <li>'''If you wish to remove unwanted areas within your scanned document, click on the CROP button'''. You can then move your pointer to "handles" that represent the scanned borders, '''then click and drag the handles to assign the correct scanning boundaries'''.<br /><br /></li> | ||
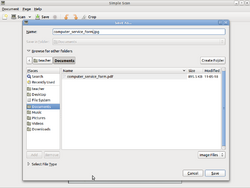
| + | <li>Select '''DOCUMENT''' -> '''SAVE AS''' in order to save your scanned Image. You have many different file formats to choose from:<br /><ul><li>'''JPG'''</li><li>'''PNG'''</li><li>'''PDF'''<br /><br /></li></ul> '''It is not only recommended, but <u>necessary</u> to save all scanned documents in the "Documents" folder'''. This keeps the storage of documents to a consistent location in order for "grabbing" applications to extract and remove the work in order to save disk space.<br /><br /></li> | ||
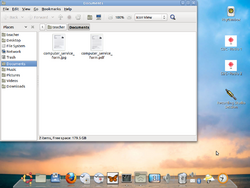
| + | <li>As a precaution, '''it is recommended to open the "Documents" folder to confirm that the scan was successful'''.</li> | ||
| + | <li>When you have finished scanning all of your documents, '''remove any pictures or documents from the scanner, and power-off the printer/scanner'''.</li> | ||
| + | </ol> | ||
| + | </td> | ||
| + | <td> | ||
| + | <table> | ||
| + | <tr> | ||
| + | <td> | ||
| + | [[Image:scan1.JPG|thumb|250px|<b>Steps #3/4</b> ]] | ||
| + | </td> | ||
| + | <td> | ||
| + | [[Image:scan1.png|thumb|250px|<b>Step #7</b> ]] | ||
| + | </td> | ||
| + | </tr> | ||
| + | <tr> | ||
| + | <td> | ||
| + | [[Image:SCAN2.png|thumb|250px|<b>Step #8</b> ]] | ||
| + | </td> | ||
| + | <td> | ||
| + | [[Image:scan3.png|thumb|250px|<b>Step #10</b> ]] | ||
| + | </td> | ||
| + | </tr> | ||
| + | <tr> | ||
| + | <td> | ||
| + | [[Image:scan5.png|thumb|250px|<b>Step #11</b> ]] | ||
| + | </td> | ||
| + | <td> | ||
| + | [[Image:scan7.png|thumb|250px|<b>Step #12</b> ]] | ||
| + | </td> | ||
| + | </tr> | ||
| + | </table> | ||
| + | </td> | ||
| + | </tr> | ||
| + | </table> | ||
| + | |||
| + | |||
| + | |||
| + | '''NOTE: The most comment problem with scanning is forgetting to remove the scanned picture or document from the printer/scanner. This can result in loss of a valuable photo, or could be annoying for the next individual that would like to scan a document!''' | ||
Latest revision as of 22:56, 13 June 2011
Contents
Purpose
This WIKI discusses the methods to print documents and to scan documents using the Westminster Computer Lab.
Note: The computer lab is currently set-up to print only from the server. Therefore, only the instructors have the authority to make printouts and scans.
Reasons For this Decision:
- Due to the configuration of the workstations (disk-less FAT CLIENTS), printing via the workstations is NOT currently feasible.
- Printing in the Computer Lab is a privilege and not a right - we need to keep the costs of printer ink and paper to a minimum.
- Limiting the authority to instructors only will help prevent the needless printing of "rough-drafts", etc...
- Limiting the printout of materials encourages printing at home to help minimise printing costs at the church.
- Program will be available for the instructor account to "grab" work for "off-site" printing and storage.
NOTE: In the future, if it becomes feasible to scan / make printouts from workstations, AVIT may require that access to the lab printer be limited to an adult instructor.
Printer Information
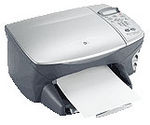
- Model: HP psc 2170 - multifunction ( printer / copier / scanner ) ( color )
- Features:
- General: Copier Type Digital | Fax Type Plain paper | Printing Technology Ink-jet - Color | Monthly Duty Cycle (max) 2000 impressions
- Printing: Max Printing Resolution up to 1200 x 1200 dpi (mono) / up to 4800 x 1200 dpi (color) | Max Printing Speed up to 16.0 ppm (mono) / up to 12.0 ppm (color)
- Scanning: Optical Resolution 1200 x 2400 dpi | Interpolated Resolution 19200 x 19200 dpi | Gray Scale Depth 8 bit | Color Depth 48.0 bit
- Printer Manual: [ pdf ]
Procedure to Make a Printout
To be completed...
Procedures to Scan a Document
Although there is software available to generate graphics and photographs, individuals may want the option to scan an existing graphic, picture or graphic. The Westminster Computer Lab has the ability to scan graphics, pictures or documents.
WARNING BEFORE PROCEEDING: You are not permitted to scan material that is copy-right protected. You may not scan copyrighted pictures, graphics or documents without the written content of the author. If in doubt, or not certain - simply do NOT scan!!!
YouTube Video
- If you want to see the visual steps for "Procedures to Scan a Document", here is a link to a customized YouTube video: http://www.youtube.com/watch?v=VJbUj2fMMrU
Written Instructions
- Below are the written instructions (in case you prefer to have a printout of these procedures):
|
|
NOTE: The most comment problem with scanning is forgetting to remove the scanned picture or document from the printer/scanner. This can result in loss of a valuable photo, or could be annoying for the next individual that would like to scan a document!
