Difference between revisions of "Teams Winter 2011/team1/Android/Adding Functionality to Main Screen Elements"
| Line 1: | Line 1: | ||
=== 3. Adding Functionality to Main Screen Elements === | === 3. Adding Functionality to Main Screen Elements === | ||
| − | 3.1. | + | 3.1. Create class <code>Student</code>. It is holder for contacts: |
<pre> | <pre> | ||
| − | + | ||
| − | |||
</pre> | </pre> | ||
| − | 3.2. Populate the listView on the main screen: | + | 3.2. Inside the <code>ContractList</code> class create a Vector of objects <code>Student</code>: |
| + | <pre> | ||
| + | private Vector<Student> studentList; | ||
| + | </pre> | ||
| + | 3.3. Populate the Vector: | ||
| + | <pre> | ||
| + | public Vector<Student> getList(){ | ||
| + | studentList = new Vector<Student>(); | ||
| + | |||
| + | studentList.addElement(new Student("Anastasia", "Semionova", "asemionova1@learn.senecac.on.ca")); | ||
| + | studentList.addElement(new Student("Minoo", "Ziaei", "minoo.ziaei@senecac.on.ca")); | ||
| + | studentList.addElement(new Student("Ladan", "Zadeh", "lzahiroleslamzadeh@learn.senecac.on.ca")); | ||
| + | studentList.addElement(new Student("Sergiu", "Ecob", "secob@learn.senecac.on.ca")); | ||
| + | return studentList; | ||
| + | } | ||
| + | </pre> | ||
| + | 3.4. Create the method that generates list on the screen: | ||
| + | <pre> | ||
| + | public void displayData(){ | ||
| + | |||
| + | ListAdapter adapter = new ArrayAdapter(this, android.R.layout.simple_list_item_1, studentList); | ||
| + | contactsList = (ListView) findViewById(R.id.listView1); | ||
| + | contactsList.setAdapter(adapter); | ||
| + | } | ||
| + | </pre> | ||
| + | 3.5. Populate the listView on the main screen: | ||
<pre> | <pre> | ||
ListAdapter adapter = new ArrayAdapter<String>(this, | ListAdapter adapter = new ArrayAdapter<String>(this, | ||
| Line 12: | Line 36: | ||
contactsList.setAdapter(adapter); | contactsList.setAdapter(adapter); | ||
</pre> | </pre> | ||
| − | 3.3. run the application:<br/> | + | 3.6. Add list to the main screen on create: |
| + | <pre> | ||
| + | @Override | ||
| + | public void onCreate(Bundle savedInstanceState) { | ||
| + | super.onCreate(savedInstanceState); | ||
| + | setContentView(R.layout.main); | ||
| + | studentList = getList(); | ||
| + | displayData(); | ||
| + | |||
| + | } | ||
| + | </pre> | ||
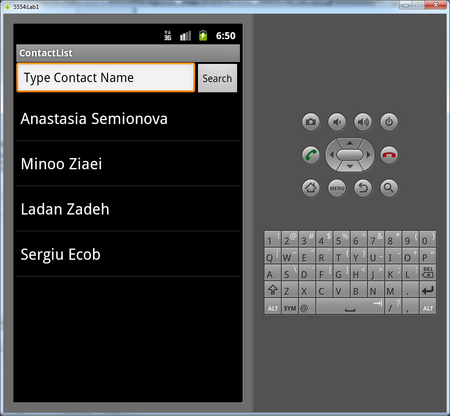
| + | 3.5. run the application:<br/> | ||
[[Image: A_main5.png | 450px]]<br/> | [[Image: A_main5.png | 450px]]<br/> | ||
| − | |||
Revision as of 15:01, 25 March 2011
3. Adding Functionality to Main Screen Elements
3.1. Create class Student. It is holder for contacts:
3.2. Inside the ContractList class create a Vector of objects Student:
private Vector<Student> studentList;
3.3. Populate the Vector:
     public Vector<Student> getList(){
        studentList = new Vector<Student>();

        studentList.addElement(new Student("Anastasia", "Semionova", "asemionova1@learn.senecac.on.ca"));
        studentList.addElement(new Student("Minoo", "Ziaei", "minoo.ziaei@senecac.on.ca"));
        studentList.addElement(new Student("Ladan", "Zadeh", "lzahiroleslamzadeh@learn.senecac.on.ca"));
        studentList.addElement(new Student("Sergiu", "Ecob", "secob@learn.senecac.on.ca"));
        return studentList;
      }
3.4. Create the method that generates list on the screen:
    public void displayData(){

        ListAdapter adapter = new ArrayAdapter(this, android.R.layout.simple_list_item_1, studentList);
        contactsList = (ListView) findViewById(R.id.listView1);
        contactsList.setAdapter(adapter);
    }
3.5. Populate the listView on the main screen:
   ListAdapter adapter = new ArrayAdapter<String>(this,
                android.R.layout.simple_list_item_1, studentList);
        ListView contactsList = (ListView) findViewById(R.id.listView1);
        contactsList.setAdapter(adapter);
3.6. Add list to the main screen on create:
  @Override
    public void onCreate(Bundle savedInstanceState) {
        super.onCreate(savedInstanceState);
        setContentView(R.layout.main);
        studentList = getList();
        displayData();

    }
