Difference between revisions of "Teams Winter 2011/team1/RCP/Define and use editors"
(→3. Define and Use Editors) |
|||
| Line 237: | Line 237: | ||
The view makes his viewer available as selection provider via the following line:<br/> | The view makes his viewer available as selection provider via the following line:<br/> | ||
<code>''getSite().setSelectionProvider(viewer);''</code> <br/> | <code>''getSite().setSelectionProvider(viewer);''</code> <br/> | ||
| − | This make is possible for the command which opens the editor to get the selection of the view. All workbench parts have a site, which can be accessed via the method <code>getSite()</code>. | + | This make is possible for the command which opens the editor to get the selection of the view.<br/> |
| + | All workbench parts have a site, which can be accessed via the method <code>getSite()</code>. | ||
<source lang=java> | <source lang=java> | ||
public void createPartControl(Composite parent) { | public void createPartControl(Composite parent) { | ||
Revision as of 18:31, 4 March 2011
3. Define and Use Editors
3.1 Editor area
The first step to add editor area to the application is to make the visibility of the editor area in Perspective.java to true .
public class Perspective implements IPerspectiveFactory {

	public void createInitialLayout(IPageLayout layout) {

		layout.setEditorAreaVisible(true);   < --

		layout.addView(StudentsView.ID, IPageLayout.LEFT, 1.0f, layout.getEditorArea());
		//make the view fixed
		layout.setFixed(true);
		//make the view non-closeable
		layout.getViewLayout(StudentsView.ID).setCloseable(false);

	}
}
3.2 Add input editor IEditorInput serves as the model for the editor and is supposed to be a light-weight representation of the model. For example the Eclipse IDE uses this concept to identify files without handling with the complete file. Based on the equals method the system will determine if the corresponding editor is already open or not therefore you should overwrite the method equals and hashcode in an implementation of IEditor.
Create the new class MyStudentEditorInput which implements IEditorInput.
package cs.ecl.rcp.simplercp.editor;

import org.eclipse.jface.resource.ImageDescriptor;
import org.eclipse.ui.IEditorInput;
import org.eclipse.ui.IPersistableElement;

public class MyStudentEditorInput implements IEditorInput {
        private final String id;

        public MyStudentEditorInput(String id) {
                this.id = id;
        }

        public String getId() {
                return id;
        }

	@Override
	public Object getAdapter(Class adapter) {
		return null;
	}

	@Override
	public boolean exists() {
        return true;
	}

	@Override
	public ImageDescriptor getImageDescriptor() {
		return null;
	}

	@Override
	public String getName() {
        return String.valueOf(id);
	}

	@Override
	public IPersistableElement getPersistable() {
		return null;
	}

	@Override
	public String getToolTipText() {
		return "Displays a student";
	}
}
3.3 Adding the editor
Now we should add the editor to our extensions.
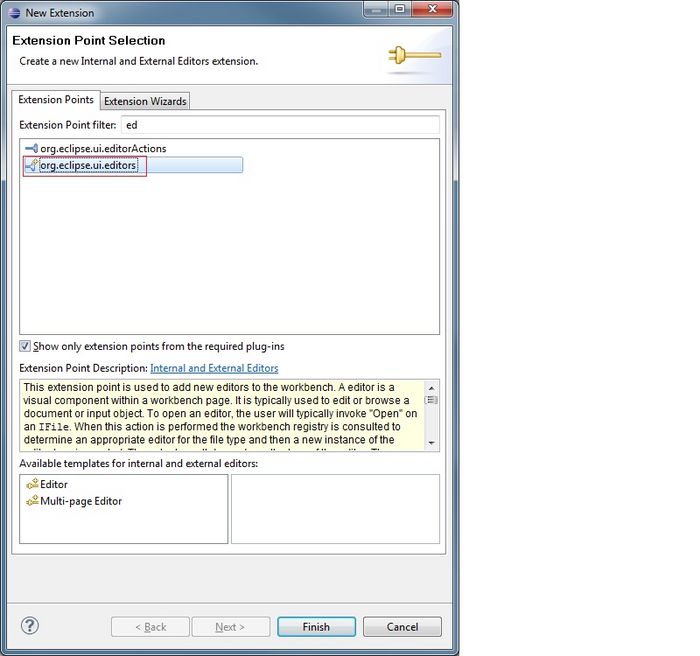
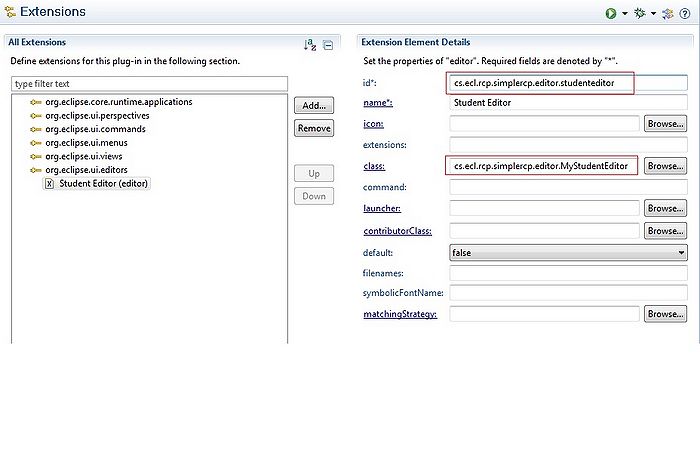
Go to plugin.xml and select the tab extensions. Add the extension org.eclipse.ui.editors.

In ID, type in cs.ecl.rcp.smiplercp.studentEditor.
In class, enter cs.ecl.rcp.simplercp.MyStudentEditor.

Here is the content of the class. Make sure the ID matches the ID of the editor extension.
public class MyStudentEditor extends EditorPart {
	public static final String ID = "cs.ecl.rcp.simplercp.editor.studenteditor";
	private Student student;
	private MyStudentEditorInput input;

	public MyStudentEditor() {
		// TODO Auto-generated constructor stub
	}

	@Override
	public void doSave(IProgressMonitor monitor) {
	}

	@Override
	public void doSaveAs() {
	}

	@Override
	public void init(IEditorSite site, IEditorInput input)
			throws PartInitException {
		if (!(input instanceof MyStudentEditorInput)) {
			throw new RuntimeException("Wrong input");
		}

		MyStudentEditorInput new_name = (MyStudentEditorInput) input;
		this.input = (MyStudentEditorInput) input;
		setSite(site);
		setInput(input);
		student = ModelProvider.INSTANCE.getPersonById(this.input.getId());
		setPartName("Student " + student.getLastName());

	}

	@Override
	public boolean isDirty() {
		return false;
	}

	@Override
	public boolean isSaveAsAllowed() {
		return false;
	}

	@Override
	public void createPartControl(Composite parent) {
		GridLayout layout = new GridLayout();
		layout.numColumns = 2;
		parent.setLayout(layout);
		Label label = new Label(parent, SWT.BORDER);
		label.setText("ID");
		Text text = new Text(parent, SWT.BORDER);
		text.setText(student.getId());
		text.setLayoutData(new GridData(SWT.FILL, SWT.BEGINNING, true, false));
		Label label1 = new Label(parent, SWT.BORDER);
		label1.setText("First Name");
		Text text1 = new Text(parent, SWT.BORDER);
		text1.setText(student.getFirstName());
		text1.setLayoutData(new GridData(SWT.FILL, SWT.BEGINNING, true, false));
		Label label2 = new Label(parent, SWT.BORDER);
		label2.setText("Last Name");
		Text text2 = new Text(parent, SWT.BORDER);
		text2.setText(student.getLastName());
		text2.setLayoutData(new GridData(SWT.FILL, SWT.BEGINNING, true, false));
		Label label3 = new Label(parent, SWT.BORDER);
		label3.setText("Program");
		Text text3 = new Text(parent, SWT.BORDER);
		text3.setText(student.getProgram());
		text3.setLayoutData(new GridData(SWT.FILL, SWT.BEGINNING, true, false));

	}


	@Override
	public void setFocus() {

	}

}
3.4 Open editor
The way we want to interact with the editor is, whenever we double click on a field, the editor opens in its area.
We need to take two steps for this:
3.4.1 Open editor command
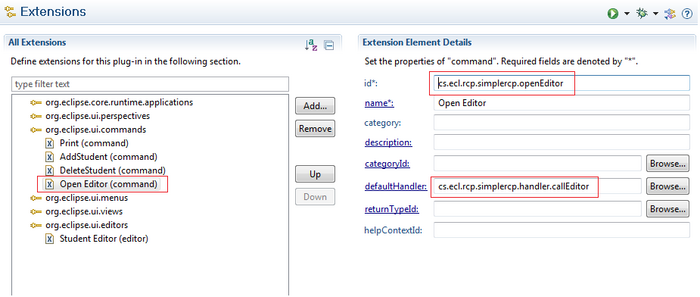
We add a command to the commands extension as it is explained in part 2 of this tutorial.

Here is how the callEditor class looks like:
public class callEditor extends AbstractHandler {

	@Override
	public Object execute(ExecutionEvent event) throws ExecutionException {
		//System.out.println("called");
		// Get the view
		IWorkbenchWindow window = HandlerUtil.getActiveWorkbenchWindow(event);
		IWorkbenchPage page = window.getActivePage();
		StudentsView studentsView = (StudentsView) page.findView(StudentsView.ID);
		// Get the selection
		ISelection selection = studentsView.getSite().getSelectionProvider()
				.getSelection();
		if (selection != null && selection instanceof IStructuredSelection) {
			Object obj = ((IStructuredSelection) selection).getFirstElement();
			// If we had a selection lets open the editor
			if (obj != null) {
				Student student = (Student) obj;
				MyStudentEditorInput input = new MyStudentEditorInput(
						student.getId());
				try {
					page.openEditor(input, MyStudentEditor.ID);

				} catch (PartInitException e) {
					throw new RuntimeException(e);
				}
			}
		}
		return null;
	}

}
3.4.2 Add a "double click" listener to the StudentsView class
For this, we need to add hookDoubleClick() method to the </code>StudentsView.java </code>.
	private void hookDoubleClickCommand() {
		viewer.addDoubleClickListener(new IDoubleClickListener() {
			public void doubleClick(DoubleClickEvent event) {
				IHandlerService handlerService = (IHandlerService) getSite()
						.getService(IHandlerService.class);
				try {
					handlerService.executeCommand(
							"cs.ecl.rcp.simplercp.openEditor", null);
				} catch (Exception ex) {
					throw new RuntimeException(
							"cs.ecl.rcp.simplercp.openEditor not found");
				}
			}
		});

	}
We will call this method from createPartControl() method.
The view makes his viewer available as selection provider via the following line:
getSite().setSelectionProvider(viewer);
This make is possible for the command which opens the editor to get the selection of the view.
All workbench parts have a site, which can be accessed via the method getSite().
	public void createPartControl(Composite parent) {
               ............
			// add double click listener for editing fields in a text editor
			viewer.setInput(ModelProvider.INSTANCE.getStudents());
			getSite().setSelectionProvider(viewer);
			hookDoubleClickCommand();
       }