Difference between revisions of "Using Cheese / Cinecutie / Audacity to Create a Stop Motion Video"
| Line 208: | Line 208: | ||
<li>'''Click on the title icon, and drag from the Resources window and drop between the In-Point and Out-Point in your Program Window'''. You should now see a area highlighted that represents the title.<br /><br /></li> | <li>'''Click on the title icon, and drag from the Resources window and drop between the In-Point and Out-Point in your Program Window'''. You should now see a area highlighted that represents the title.<br /><br /></li> | ||
<li>Now that you created the effect, you need to setup how the effect will run. '''Click on the icon in the special effect area that looks like a Magnifying Glass'''.<br /><br /></li> | <li>Now that you created the effect, you need to setup how the effect will run. '''Click on the icon in the special effect area that looks like a Magnifying Glass'''.<br /><br /></li> | ||
| − | <li>[[Image:cinecutie9d.png|thumb|450px|right ]]A title dialog box will appear. Here are some suggestions to setup your title effect:<br /><br /><ul><li>'''Enter appropriate title text''' in the text area.<br /><br /></li><li>'''Select the Color''' for the title.<br /><br /></li><li>'''Select the appropriate font''' for the title.<br /><br /></li><li>'''Select the appropriate font size'''.<br /><br /></li><li>'''Select the appropriate font style''' (eg. bold, italic) for the title.<br /><br /></li><li>'''Select the alignment (horizontal/vertical)''' for the title.<br /><br /></li><li>'''Select the fade-in and fade-out time''' to make a smoother transition of your title.<br /><br /></li></ul></li><li'''>Rewind to the beginning of your video and play it to view your title effect'''. If you want to make changes, just click on the magnifying glass icon on the title effect area.<br /><br /></li><li>You should save your work. Click the file menu, then save. Needless to say, you should save your work frequently...<br /><br /></li> | + | <li>[[Image:cinecutie9d.png|thumb|450px|right ]]A title dialog box will appear. Here are some suggestions to setup your title effect:<br /><br /><ul><li>'''Enter appropriate title text''' in the text area.<br /><br /></li><li>'''Select the Color''' for the title.<br /><br /></li><li>'''Select the appropriate font''' for the title.<br /><br /></li><li>'''Select the appropriate font size'''.<br /><br /></li><li>'''Select the appropriate font style''' (eg. bold, italic) for the title.<br /><br /></li><li>'''Select the alignment (horizontal/vertical)''' for the title.<br /><br /></li><li>'''Select the fade-in and fade-out time''' to make a smoother transition of your title.<br /><br /></li></ul></li><li'''>Rewind to the beginning of your video and play it to view your title effect'''. If you want to make changes, just click on the magnifying glass icon on the title effect area.<br /><br /></li><li>You should save your work. Click the '''file''' menu, then '''save'''. Needless to say, you should save your work frequently...<br /><br /></li> |
</ol> | </ol> | ||
Revision as of 10:51, 17 July 2010
A popular trend with youth today is to create lego stop-motion videos and post up to YouTube...
.. You can use the Cheese / Audacity and Cinecutie (Cinelerra) open source applications to do this for free...
In this tutorial, I will discuss how I created the stop motion Lego video called "How to Define Lego Pain" using these applications.
Here is a link to my YouTube Video: [ http://www.youtube.com/watch?v=8if6uyB9cqk ]
Contents
Capture Web Cam Pictures via Cheese Application
There are various ways to capture pictures for your Stop-Motion video: You can take pictures from your Digital Camera, and then upload the pictures to your computer, or you can use your Webcam to record your pictures (no uploading required).
There are advantages and limitations of each method. Digital cameras may provide a macro lens to allow close-up of figures, and have connectors to various supporting platforms like tripods or booms. On the other hand, many digital cameras do not number there pictures in a convenient format for loading into a Non-Linear Video editor. For example, cameras may not add "leading zeros" before picture numbers, and sometimes the number can be loaded into a non-linear editor out of sequence...
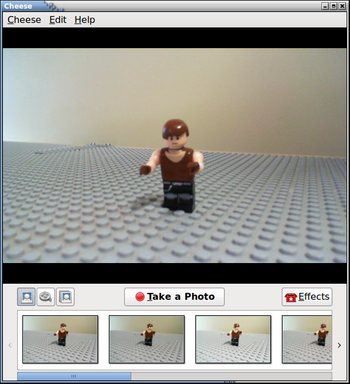
For this tutorial, I will be using the Cheese application to record pictures. This application correctly numbers each picture for loading all pictures in correct sequence into a non-linear video editor, and no uploading is required. Unfortunately, there is no macro capability with this webcam, so you will notice a blurred vision in some of the frames... Recent versions of Ubuntu are better at detected various manufacturers of webcams.
Make certain your webcam is connected to your Ubuntu system, and make certain that you have the cheese application installed on your system (is does NOT install by default). To learn how to use the Synaptic Package manager to install applications, click on the following link:
[ Install Applications in Ubuntu ]
To launch the Cheese application: Click APPLICATIONS -> SOUND & VIDEO -> Cheese
The Cheese application is designed to capture pictures, video and audio. There are buttons on the application to allow you to select the type of capture you would like to do. The default setting is to capture pictures from the webcam. It is recommended to Remove the count-down for each picture taken before proceeding with your session (can be annoying if you are capturing a long series of photos for stop-motion photography) by selecting the Cheese menu, and de-select the countdown checkbox option...
To create a stop-motion picture capture session, move the Lego piece by very small amounts for each sequence, then click on the "Take a Photo" button.
You should see the picture appear in the viewing area below. If you are not happy with the picture you can remove it by right-clicking on the picture and selecting Move to Trash...
All pictures taken in the current Cheese session are stored in the Pictures/Webcam subdirectory of your home directory.
It is recommended to move those pictures to another storage directory from your Video Editing project. For example, create a folder by project name, and then create a subdirectory called pics, and move those pictures to that location. Note that when you move those pictures, then the Cheese application no longer stores those pictures, and will be ready for the next picture capture session...
Loading and Editing Pictures in Cinecutie (Cinelerra)
The next step would be to launch a video editor to produce a video file to be uploaded to your YouTube account.
There are many types of video editors that you can use... I prefer to use a non-linear video editor like Cinecutie or Cinelerra. I am using the experimental version of Cinelerra (called Cinecutie) since it has better fonts for titles.
A non-linear editor is better suited to cutting, copying and pasting frames or a range of frames (cut points). All material is saved and can be recalled or re-used as needed. This non-linear method is superior to linear video editors which can be more "destructive" when you cut and paste frames.
Here is a link to a more comprehensive definition of a non-linear video editor:
[ http://en.wikipedia.org/wiki/Non-linear_editing_system ]
Here is a link to the community version of Cinelerra:
[ http://cinelerra.org/ ]
Installing Cinecutie (Cinelerra)
To this day, I do NOT understand why a powerful application like Cinelerra (or Cinecutie) is not bundled by the default Ubuntu Studio install...
The best way to obtain the Cinelerra is to go to the following link, and follow instructions how to make Cinelerra available in the repositories for the Synaptic Package Manager.
Link to Instructions:
[ http://cinelerra.org/getting_cinelerra.php#ubuntu ]
Follow the instructions, then run the Synaptic Package Manager and search for Cinelerra. You should see several versions of Cinelerra. For this tutorial, I installed the Cinecutie paackage.
Using Cinecutie
Launching / Setting up Cinecutie
To launch the Cinecutie application, click APPLICATIONS -> SOUND & VIDEO -> Cinecutie In addition to several windows, a "tip of the day" dialog box will appear. Click on the red close button to exit that dialog box...
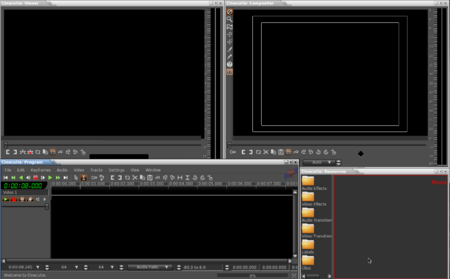
You should notice that by default, Cinecutie will display four application windows. Each of these windows is for a specific purpose:
- Program Window (bottom left-hand side) - Displays the timeline of the project and allows user to move to entry points. This window also allows for all menu driven operations.
- Viewer Window (Top left-hand side) - Allows user to load and preview source media and clips
- Compositor Window (Top right-hand side) - Allows user to effect video in terms of the timeline, but does NOT affect the clips or media.
- Resources Window (Bottom right-hand side) - Contains speciaL effects, transitions, and various media clips. These resources are usually dragged to the areas (i.e. "marked frames" or "cut points") in order to be inserted into the video production.
Before using Cinecutie, we should "think ahead" how we are going to use this application. For example, how many frames (pictures) will be used to represent 1 second of time. Remember, the process of stop motion photography is to take many pictures of a moving object to simulate action. Normal motion picture cameras capture 30 pictures or "frames" per second (fps). For stop motion photography, we can go with a lower number (depending on preference). For this video, I reduced the frames per second (fps) from 30 to 15. Some stop motion applications can have settings as low as 4 fps. I really depends on what the user wants to accomplish...
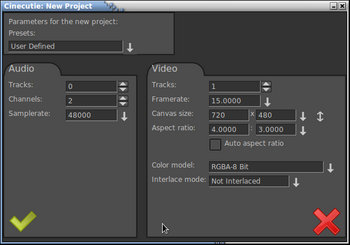
In the Cinecutie Program Window, click the FILE menu, and then select New.
In the New Project dialog box, change the Framerate text box to read 15.0000 (refer to diagram on right).
Click on the green check mark to accept.
Loading Files
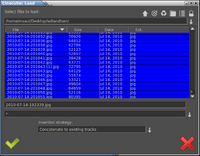
After setting the default frames per second, within the Program Window, click the FILE menu, then select Load Files.
In order to allow adding other pictures into an existing session, it is recommended to set Insertion Strategy to Concatenate to Existing Tracks.
Then move to folder that contains the pictures. Click on the first picture, then scroll down to the bottom and SHIFT-CLICK the last picture. You should notice all files are now selected.
Click on the green check mark to load the selected files.
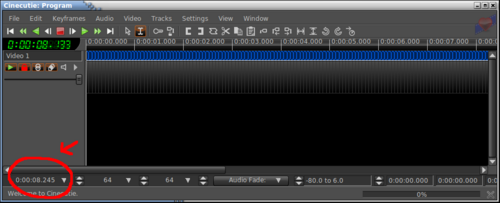
You should now notice the loaded pictures in the Program Window. You can select the the length of time intervals by clicking and selecting a value at the bottom left-hand side of the program window. This will allow you to stretch the time line, so you can view each picture as a visual element. This can make it easier to mark frames for editing.
Although there are many methods to navigate around your video project, we will just be mentioning the basic methods.
Near the top of the Program Window are transport controls for navigation:
- Green arrow (pointing right)- Play video
- Green arrow (pointing left)- Play video backwards
- Red Square - Stop playing video (remain at stopped location)
- White arrow (right of stop button)- advance one frame (picture) forward
- White arrow (left of stop button) - advance one frame (picture) backward
The additional transport control buttons are useful for moving to the beginning or end of video:
- White arrow pointing left to a line - Move to beginning of video
- White arrow pointing right to a line - Move to end of video
In order to perform any special effect, or cut, copy or paste frames, you are first required to mark your frames.
In order mark your frames, you need to define the beginning and the end of the range.
The beginning of the range is referred to as an "In Point", and the end of the range is referred to as an "End Point".
Here are the buttons on the transport control that relate to marking your frames:
- White open square bracket - Mark "In Point"
- White closed square bracket - Mark "Out Point"
Adding Effects within Marked Frames
The general procedure for adding effects is simple:
- Mark the frame range (i.e. "In Point" and "Out Point")
- Click and drag a video effect from the resources window into the frame range
- Click on the effect to setup that particular special effect
For an example, we will now create a title labelled "How to Define Lego Pain".
Perform the following steps in order to make a title:
STEPS TO CREATE A TITLE
- Using the navigation button discussed above, move to the In-Point.
- Mark the In-Point. You should notice that the In-Point appears green.
- Move to the Out-Point, and mark the Out-Point. You should now see a frame range between the marked In-Point and Out-Point.
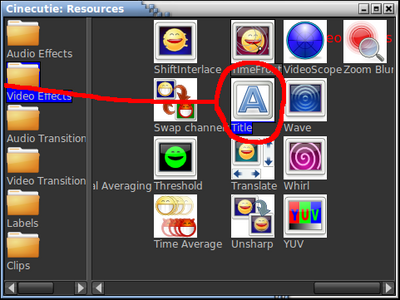
- Switch to the Resources window, and click Video Effect on the left-hand column window.
- Move to the right column window, and scroll to the right, until you see the icon displaying the title effect.
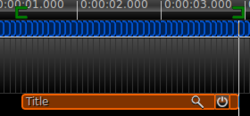
- Click on the title icon, and drag from the Resources window and drop between the In-Point and Out-Point in your Program Window. You should now see a area highlighted that represents the title.
- Now that you created the effect, you need to setup how the effect will run. Click on the icon in the special effect area that looks like a Magnifying Glass.
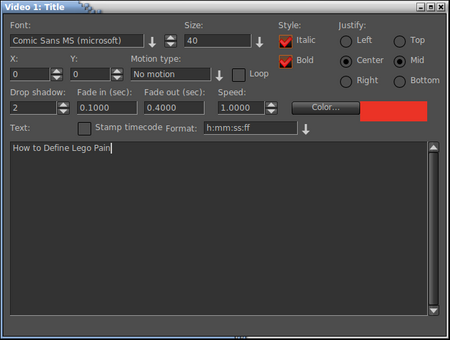
- A title dialog box will appear. Here are some suggestions to setup your title effect:
- Enter appropriate title text in the text area.
- Select the Color for the title.
- Select the appropriate font for the title.
- Select the appropriate font size.
- Select the appropriate font style (eg. bold, italic) for the title.
- Select the alignment (horizontal/vertical) for the title.
- Select the fade-in and fade-out time to make a smoother transition of your title.
<li>Rewind to the beginning of your video and play it to view your title effect. If you want to make changes, just click on the magnifying glass icon on the title effect area. - Enter appropriate title text in the text area.
- You should save your work. Click the file menu, then save. Needless to say, you should save your work frequently...
I repeated the above process in order to add the ending title effect, and I also added the fire effect later in the video...
Finishing Touches
Using Audacity to Record Music and Voices
To be completed ...
Arming Tracks / Truncation
To be completed ...
Backing Up / Removing Completed Projects
To be completed ...
Rendering Stop Motion Video to Ogg Theora Vorbis File
To be completed ...
Posting Stop Motion Video on YouTube
Creating a YouTube Account
To be completed ...
Upload Stop Motion Video to your YouTube Account
To be completed ...
View comments / statistics Regarding your YouTube Video
To be completed ...
Future Consideration: Adding Advanced Special Effects
Title Scrolls
To be completed
Laser fire
To be completed
Explosions
To be completed ...
