Difference between revisions of "OPS245 Lab 6"
m (→Purpose / Objectives of Lab 6: - removing extra bash content) |
|||
| (11 intermediate revisions by 3 users not shown) | |||
| Line 1: | Line 1: | ||
| + | {{Admon/caution|DO NOT USE THIS VERSION OF THE COURSE. This page will no longer be updated.|'''Debian version here:''' https://seneca-ictoer.github.io/OPS245 | ||
| + | <br>'''CentOS version here:''' https://seneca-ictoer.github.io/OPS245-C7<br>'''Andrew's version here:''' http://wiki.littlesvr.ca/wiki/OPS245_Lab_6}} | ||
=LAB PREPARATION= | =LAB PREPARATION= | ||
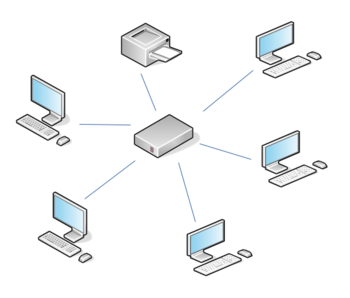
[[Image:my-network.png|thumb|right|350px|Setting up networks is an essential operation for a system administrator. Maintaining network connectivity and securing the network are also essential operations. In this lab, we will '''configure a private virtual network using static IP addresses''' (eg. wired workstation connections). We will learn how to setup a DHCP network (eg. for notebook, table and smartphones) in lab 8.]] | [[Image:my-network.png|thumb|right|350px|Setting up networks is an essential operation for a system administrator. Maintaining network connectivity and securing the network are also essential operations. In this lab, we will '''configure a private virtual network using static IP addresses''' (eg. wired workstation connections). We will learn how to setup a DHCP network (eg. for notebook, table and smartphones) in lab 8.]] | ||
| Line 104: | Line 106: | ||
#: IP Address: '''192.168.245.11''' | #: IP Address: '''192.168.245.11''' | ||
#: Subnet Mask: '''255.255.255.0''' | #: Subnet Mask: '''255.255.255.0''' | ||
| − | #: Default Gateway: The IP address of '''virbr1''' on your centos host. | + | #: Default Gateway: The IP address of '''virbr1''' on your centos host (c7host). |
# Click on the '''DNS''' field and add The IP address (''virbr1''' on your centos host) as the primary DNS server. | # Click on the '''DNS''' field and add The IP address (''virbr1''' on your centos host) as the primary DNS server. | ||
# When finished, check your settings, and then click the '''Apply''' button. | # When finished, check your settings, and then click the '''Apply''' button. | ||
| Line 113: | Line 115: | ||
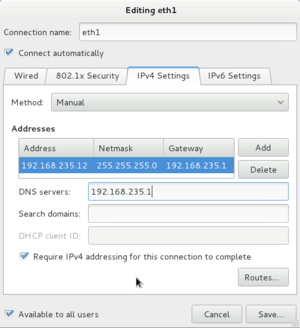
[[Image:network-scripts.png|thumb|right|250px|Although you can use the '''ifconfig''' command to temporarily create a static IP address connection to a network, you need to add the network settings in the '''/etc/sysconfig/network-scripts''' directory to automatically connect to the network upon Linux system boot-up.]] | [[Image:network-scripts.png|thumb|right|250px|Although you can use the '''ifconfig''' command to temporarily create a static IP address connection to a network, you need to add the network settings in the '''/etc/sysconfig/network-scripts''' directory to automatically connect to the network upon Linux system boot-up.]] | ||
| − | === Part 3: Configuring VM Network Setup via Command Line (''' | + | === Part 3: Configuring VM Network Setup via Command Line ('''centos2''' and '''centos3''') === |
| − | The centos3 | + | The centos2 and centos3 VMs are '''text-based only''' systems, thus we cannot use a graphical tool to configure centos3 to connect to our private network. Therefore we will learn how to perform this task by using command-line tools. |
:'''Perform the following steps:''' | :'''Perform the following steps:''' | ||
| Line 327: | Line 329: | ||
=INVESTIGATION 3: USING PYTHON TO MODIFY FILES= | =INVESTIGATION 3: USING PYTHON TO MODIFY FILES= | ||
| − | In this investigation you will write a python script that will allow a user to interactively configure a network interface's configuration file. Before beginning, make a backup of your ifcfg files. | + | In this investigation you will write a python script that will allow a user to interactively configure a network interface's configuration file. Before beginning, '''make a backup of your ifcfg files'''. '''Store the python script in ~/bin/''' on c7host. |
Write a script called '''netconfig.py''' that will prompt the user for the following values, and write their answers into an ifcfg file stored in the '''/etc/sysconfig/network-scripts''' directory. | Write a script called '''netconfig.py''' that will prompt the user for the following values, and write their answers into an ifcfg file stored in the '''/etc/sysconfig/network-scripts''' directory. | ||
| Line 354: | Line 356: | ||
# Switch to your '''c7host''' VM. | # Switch to your '''c7host''' VM. | ||
# Change to your user's '''bin''' directory. | # Change to your user's '''bin''' directory. | ||
| − | # Issue the Linux command: <b><code><span style="color:#3366CC;font-size:1.2em;">wget https:// | + | # Issue the Linux command: <b><code><span style="color:#3366CC;font-size:1.2em;">wget https://raw.githubusercontent.com/OPS245/labs/main/lab6-check.bash</span></code></b> |
# Give the '''lab6-check.bash''' file execute permissions (for the file owner). | # Give the '''lab6-check.bash''' file execute permissions (for the file owner). | ||
# Run the shell script and if there are any warnings, make fixes and re-run shell script until you receive "congratulations" message. | # Run the shell script and if there are any warnings, make fixes and re-run shell script until you receive "congratulations" message. | ||
| − | #Arrange proof of the following on the screen:<br><blockquote><span style="color:green;font-size:1.5em;">✓</span> '''centos2''' VM:<blockquote><ul><li>'''ssh''' from '''centos2''' to '''c7host''' VM.</li></ul></blockquote><span style="color:green;font-size:1.5em;">✓</span>'''c7host''' machine<blockquote><ul | + | #Arrange proof of the following on the screen:<br><blockquote><span style="color:green;font-size:1.5em;">✓</span> '''centos2''' VM:<blockquote><ul><li>'''ssh''' from '''centos2''' to '''c7host''' VM.</li></ul></blockquote><span style="color:green;font-size:1.5em;">✓</span>'''c7host''' machine<blockquote><ul><li>Run the '''lab6-check.bash''' script in front of your instructor (must have all <b><code><span style="color:#66cc00;border:thin solid black;font-size:1.2em;"> OK </span></code></b> messages)</li></ul></blockquote><span style="color:green;font-size:1.5em;">✓</span> '''Lab6''' log-book filled out. |
#Upload a screen of the proof from the previous step, along with the file generated by '''lab6-check.bash''', your log book, and your '''netconfig.py''' script to blackboard. | #Upload a screen of the proof from the previous step, along with the file generated by '''lab6-check.bash''', your log book, and your '''netconfig.py''' script to blackboard. | ||
Latest revision as of 19:54, 9 March 2024
Contents
LAB PREPARATION

Purpose / Objectives of Lab 6
In this lab, you will learn the basics of networking by using your Virtual Machines. You will first set up a virtual network among those machines. In addition, you will learn to set up network names (to associate with server's IP Addresses), associate network services with port numbers for troubleshooting purposes, and use shell scripts with arrays to store network configuration data.
Main Objectives
- Configure a private virtual network for your VMs and your c7host machine
- Configure network interfaces for your Virtual Machines using both graphical and command-line utilities.
- Use local hostname resolution to resolve simple server names with their corresponding IP Addresses
- Use common networking utilities to associate network services with port numbers for troubleshooting purposes
| Minimum Required Materials |
Linux Command Reference | ||||
|
|
Networking Utilities |
Networking Configuration Files |
Additional Utilities | ||
INVESTIGATION 1: CONFIGURING A VIRTUAL NETWORK
For the remainder of this course, we will focus on networking involving our VMs. This lab will focus on setting up a virtual network, connecting our VMs and c7host machine to the network, and configuring our private network to make more convenient to use, troubleshoot and protect. Lab 7 will focus on configuring SSH and making access to the private network more secure. Finally, lab 8 will focus on configuring mobile (as well as wired devices) via DHCP to automatically assign an IP address.
There are several reasons for creating virtual networks. The main reason is to safely connect servers together (i.e. to safely limit but allow the sharing of information among computer network users). This allows for a secure connection of computers yet controlling access to and monitoring (protecting) access to permitted users (discussed later in lab7).
Part 1: Configuring a Private Network (Via Virtual Machine Manager)
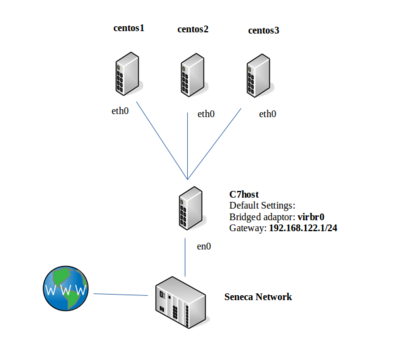
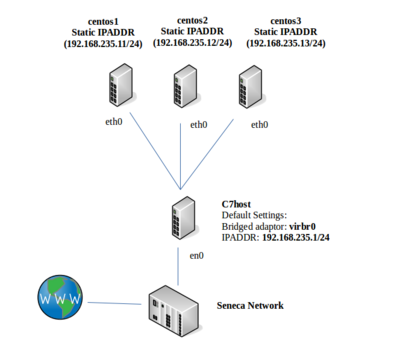
If we are going to setup a private network, there are a number of steps to perform: First, define a new private network in the Virtual Manager application; and second, configure each of our VMs to connect to this new private network. In Part 1, we will be perform the first operation. In part 2, we will be performing the second operation for all VMS (graphical and command-line).
Before configuring our network, we want to turn off dynamic network configuration for our Virtual Machines by turning off the "default" virtual network. We will then define our private network.
- Perform the following steps:
- Launch your c7host VM and start the Virtual Machine Manager.
- Make certain that the centos1, centos2, and centos3 virtual machines are powered off.
- In the Virtual Machine Manager dialog box, select Edit-> Connection Details.
- In the Connection Details dialog box, select the Virtual Networks tab
- Click to de-select the Autostart (on boot) check-box options and click the Apply button.
- Stop the default network by clicking on the stop button at the bottom left-side of the dialog box.
- Click the add button (the button resembles a "plus sign") to add a new network configuration.
- Type the network name called: network1, and then click the Forward button.
- In the next screen, enter the new network IP address space called: 192.168.245.0/24
- Disable the DHCP4 check box and click the Forward button.
- Click the Forward button again to accept the default in the next screen.
- Enable Network Forwarding by Selecting Forwarding to physical network, the destination should be Any physical device and the mode should be NAT
- Proceed with changes, and click Finish.
- We will now reconfigure each of our VMs to use our new virtual network network1
- Let's start with our centos1 VM. Double-click on your centos1 VM, but instead of running the VM, click on the view menu, and select: Details
(Note: the Virtual Machine window will appear - do not start virtual machine) - In the left pane of the Virtual Machine window, select NIC: and note that this NIC is on the "default" virtual network
- Change it to Virtual Network network1: NAT (i.e. the network that you just created) and click the Apply button.
- Let's start with our centos1 VM. Double-click on your centos1 VM, but instead of running the VM, click on the view menu, and select: Details
Part 2: Configuring Network For centos1 VM
In this section, we will be using a graphical tool to connect our centos1 VM to our private network.
- Perform the following steps:
- On your c7host machine, run ip address show and make note of the IP address assigned to the virbr1 (i.e. "Virtual Bridge) interface. This will be the default gateway and DNS server for your VMs.
- Select the Console view (instead of Details), start your centos1 VM and login.
- Within your centos1 VM, click Applications menu, then select System Tools, and then Settings.
- In the Settings Dialog Box, click on the Network icon.
- For the Wired connection, click the settings button (The icon appears as a gear located at the bottom right-hand corner of the dialog box).
- Select the IPv4 tab. Change Address from Automatic (DHCP) to Manual.
- In the Addresses section, enter the following information:
- IP Address: 192.168.245.11
- Subnet Mask: 255.255.255.0
- Default Gateway: The IP address of virbr1 on your centos host (c7host).
- Click on the DNS' field and add The IP address (virbr1 on your centos host) as the primary DNS server.
- When finished, check your settings, and then click the Apply button.
- Open a terminal and issue the ip address show command to confirm the change to the IP ADDRESS settings.
- Verify that centos1VM is now connected to the private network by issuing the following command from your c7host machine:
ping 192.168.245.11
Part 3: Configuring VM Network Setup via Command Line (centos2 and centos3)
The centos2 and centos3 VMs are text-based only systems, thus we cannot use a graphical tool to configure centos3 to connect to our private network. Therefore we will learn how to perform this task by using command-line tools.
- Perform the following steps:
- Configure your centos3 VM (in the View -> Details menu of Virtual Machine Manager) to configure the NIC interface to network1, click Apply, and switch your centos3 VM view from details to console.
- Start your centos3 VM, login, and use ip address show to check the current address.
- To configure your card with a static address from the command line, you will have to modify that interface's configuration file.
- Change to the /etc/sysconfig/network-scripts directory
- List the contents of this directory. You should see 2 different types of files, network config scripts and network configuration files.
- Look for the configuration file for your original interface, it should be named ifcfg-eth0
- Edit the file for your interface and give it the following settings (remember you will need elevated permissions to edit this file):
- DEVICE=eth0
- IPADDR=192.168.245.13
- PREFIX=24
- GATEWAY=192.168.245.1
- HWADDR=xx:xx:xx:xx:xx:xx <-- # Use YOUR centos3 VM's MAC ADDRESS!!!
- DNS1=192.168.245.1
- BOOTPROTO=static
- ONBOOT=yes
- NM_CONTROLLED=yes
- IPV6INIT=no
- Save the file and then restart the network connection by issuing the commands:
sudo ifdown eth0andsudo ifup eth0 - Verify your configuration as you did before.
- Restart the centos3 VM.
- Use the ip and ping commands to verify your network connection to other VMs.
- Login and attempt to ssh to your matrix account to verify the settings.
We need to also configure your centos2 VM for a persistent network connection as well: - Configure the centos2 VM (in the View -> Details menu of Virtual Machine Manager) to configure the NIC interface to network1, click Apply, and switch your centos2 VM view from details to console.
- Start your centos2 VM, login, and issue the command:
ip address showand write down the MAC address for your eth0 network interface. - Edit the /etc/sysconfig/network-scripts/ifcfg-eth0 file using the IPADDR: 192.168.245.12 , and the same PREFIX, GATEWAY, DNS1 and MAC address information for you centos2 VM (i.e. recorded previously).
- Save changes, re-issue the ifdown and ifup commands, and then issue the ip address and ping commands to verify that you can connect to other VMs on your network.
Answer INVESTIGATION 1 observations / questions in your lab log book.
INVESTIGATION 2: MANAGING YOUR NEWLY-CREATED NETWORK
Creating private networks are an important task, but a system administrator also needs to manage the network to make it convenient to use, and troubleshoot network connectivity problems.
This investigation will expose you to useful "tweaks" and utilities to help accomplish this task. Lab 7 requires that you understand these concepts and have a good general understanding how to use troubleshooting utilities (like ss).
Part 1: Using /etc/hosts File for Local Hostname Resolution
After setting up a private network, it can be hard to try to remember IP addresses. In this section, we will setup your network to associate easy-to-remember server names with IP ADDRESSES.
- Perform the following steps:
- Complete this investigation on all of your VMs and the c7host machine.
- Use the
hostnameandipcommands on your c7host machine and all of your 3 VM's to gather the information needed to configure the /etc/hosts file on all of your Linux systems. - Edit the /etc/hosts file for the c7host, centos1, centos2 and centos3 VMs. Add the following contents to the bottom of the /etc/hosts file:
- 192.168.245.1 c7host
- 192.168.245.11 centos1
- 192.168.245.12 centos2
- 192.168.245.13 centos3
- Verify that you can now ping any VM by their hostname instead of the IPADDR.
Part 2: Network Connectivity & Network Service Troubleshooting Utilities
|
Troubleshooting network problems is an extremely important and frequent task for a Linux/Unix system administrator. Since network services (such as file-server, print-servers, web-servers, and email-servers) depend on network connectivity, as Linux/Unix sysadmin must be able to quickly and effectively pin-point sources of network problems in order to resolve them.
Network service problems may not be entirely related to a "broken" network connection, but a service that is not running or not running correctly. The following table lists the most common listing of utilities to assist with detection of network connectivity or network service problems to help correct the problem.
- Perform the following steps:
- Switch to your c7host machine.
- Issue the ping command to test connectivity to your centos1, centos2, and centos3 VMs.
- Examine the contents of the ARP cache by using the command:
arpWhat is the purpose of ARP? - Check the contents of the cache again by using the command:
arp -nWhat was the difference in output? - Issue the following command:
ss -atThis command will list all active TCP ports. Note the state of your ports.
TCP is a connection oriented protocol that uses a handshaking mechanism to establish a connection. Those ports that show a state of LISTEN are waiting for connection requests to a particular service. For example you should see the ssh service in a LISTEN state as it is waiting for connections.
- From one of your VM's login to your host using the ssh command.
- On your c7host VM rerun the
ss -atcommand and in addition to the LISTEN port it should list a 2nd entry with a state of ESTABLISHED. This shows that there is a current connection to your ssh server. - Exit your ssh connection from the VM and rerun the command on the CentOS host. Instead of ESTABLISHED it should now show a state of CLOSE_WAIT. Indicating that the TCP connection is being closed.
- On your c7host VM, try the command:
ss -atnHow is this output different? Without the -n option ss attempts to resolve IP addresses to host names (using /etc/hosts) and port numbers to service names (using /etc/services) - Examine the /etc/services file and find which ports are used for the services: ssh, sftp, http
- Now execute the command ss -au What is the difference between the options: -at and -au? When examining UDP ports why is there no state?
Answer INVESTIGATION 2 observations / questions in your lab log book.
INVESTIGATION 3: USING PYTHON TO MODIFY FILES
In this investigation you will write a python script that will allow a user to interactively configure a network interface's configuration file. Before beginning, make a backup of your ifcfg files. Store the python script in ~/bin/ on c7host.
Write a script called netconfig.py that will prompt the user for the following values, and write their answers into an ifcfg file stored in the /etc/sysconfig/network-scripts directory.
- The name of the interface
- The interface's MAC address
- Whether the interface should automatically turn on when the machine boots.
- Whether the interface should get a static or DHCP address
- Note: Only prompt the user for the following values if they chose a static address.
- The static ip address
- The network prefix
- The default gateway
- The primary DNS server
- Note: Only prompt the user for the following values if they chose a static address.
Note that your script should make use of loops and try-except statements to make sure the user provided semi-reasonable data. You are not expected to create the regular expressions necessary to confirm the format of the IP address, but should be able handle simpler issues like forcing the user to give the interface a name (since you will need it for the filename), determining if it will start automatically, and the address type.
Remember to test your script to make sure it works.
LAB 6 SIGN-OFF (SHOW INSTRUCTOR)
Follow the submission instructions for lab 6 on Blackboard.
- Perform the Following Steps:
- Make certain that ALL of your VMs are running.
- Switch to your c7host VM.
- Change to your user's bin directory.
- Issue the Linux command:
wget https://raw.githubusercontent.com/OPS245/labs/main/lab6-check.bash - Give the lab6-check.bash file execute permissions (for the file owner).
- Run the shell script and if there are any warnings, make fixes and re-run shell script until you receive "congratulations" message.
- Arrange proof of the following on the screen:
✓ centos2 VM:
✓c7host machine- ssh from centos2 to c7host VM.
✓ Lab6 log-book filled out.- Run the lab6-check.bash script in front of your instructor (must have all
OKmessages)
- Upload a screen of the proof from the previous step, along with the file generated by lab6-check.bash, your log book, and your netconfig.py script to blackboard.
Practice For Quizzes, Tests, Midterm & Final Exam
- What is a port?
- What command will set your IP configuration to 192.168.55.22/24 ?
- What is the difference between UDP and TCP?
- What port number is used for DHCP servers?
- What is the function of the file
/etc/hosts? - What is the purpose of the file
/etc/sysconfig/network-scripts/ifcfg-eth0? - What tool is used to show you a list of current TCP connections?


