Difference between revisions of "Tutorial 4 - Data Representation / Numbering Conversions / File Permissions"
(→INVESTIGATION 2: FILE PERMISSIONS) |
|||
| Line 226: | Line 226: | ||
# '''Login''' to your matrix account and issue a command to '''confirm''' you are located in your '''home''' directory.<br><br> | # '''Login''' to your matrix account and issue a command to '''confirm''' you are located in your '''home''' directory.<br><br> | ||
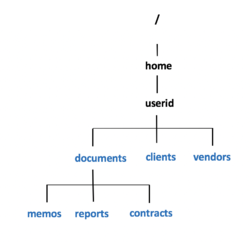
# Issue a single Linux command to create the following directory structure displayed in the diagram to the right.<br><br>'''NOTE:''' You will now run a shell script to confirm that you properly created that directory structure<br>in your ''Matrix'' account.<br><br> | # Issue a single Linux command to create the following directory structure displayed in the diagram to the right.<br><br>'''NOTE:''' You will now run a shell script to confirm that you properly created that directory structure<br>in your ''Matrix'' account.<br><br> | ||
| − | # Issue the following Linux command to run a checking script:<br><span style="color:blue;font-weight:bold;font-family:courier;">~ | + | # Issue the following Linux command to run a checking script:<br><span style="color:blue;font-weight:bold;font-family:courier;">~osl640/week4-check-1</span><br><br> |
# If you encounter errors, make corrections and '''re-run''' the checking script until you<br>receive a congratulations message, then you can proceed.<br><br>[[Image:file-permission-practice-2.png|right|450px|thumb|]] | # If you encounter errors, make corrections and '''re-run''' the checking script until you<br>receive a congratulations message, then you can proceed.<br><br>[[Image:file-permission-practice-2.png|right|450px|thumb|]] | ||
# Issue Linux commands to create '''<u>empty</u> files''' for each of those newly created '''directories''' as shown in diagram to the right:<br><br>'''NOTE:''' You will now run another shell script to confirm that you properly created those empty files within those specified directories.<br><br> | # Issue Linux commands to create '''<u>empty</u> files''' for each of those newly created '''directories''' as shown in diagram to the right:<br><br>'''NOTE:''' You will now run another shell script to confirm that you properly created those empty files within those specified directories.<br><br> | ||
| − | # Issue the following Linux command to run a checking script:<br><span style="color:blue;font-weight:bold;font-family:courier;">~ | + | # Issue the following Linux command to run a checking script:<br><span style="color:blue;font-weight:bold;font-family:courier;">~osl640/week4-check-2</span><br><br> |
# If you encounter errors, make corrections and '''re-run''' the checking script until you<br>receive a congratulations message, then continue the remaining steps.<br><br>Let's get practice '''viewing permissions''', '''changing permissions''', and <u>automatically</u> '''setting permissions for newly created files'''.<br><br> | # If you encounter errors, make corrections and '''re-run''' the checking script until you<br>receive a congratulations message, then continue the remaining steps.<br><br>Let's get practice '''viewing permissions''', '''changing permissions''', and <u>automatically</u> '''setting permissions for newly created files'''.<br><br> | ||
# Issue the following Linux commands:<br><span style="color:blue;font-weight:bold;font-family:courier;">ls -ld ~/documents ~/clients ~/vendors<br>ls -lR ~/documents ~/clients ~/vendors</span><br><br>'''NOTE:''' You should see permissions already set for those newly created directories and regular files.<br>What do these permissions mean for '''same group member''' and '''other group member''' access to those directory and regular files?<br><br> | # Issue the following Linux commands:<br><span style="color:blue;font-weight:bold;font-family:courier;">ls -ld ~/documents ~/clients ~/vendors<br>ls -lR ~/documents ~/clients ~/vendors</span><br><br>'''NOTE:''' You should see permissions already set for those newly created directories and regular files.<br>What do these permissions mean for '''same group member''' and '''other group member''' access to those directory and regular files?<br><br> | ||
| Line 239: | Line 239: | ||
# Issue the following Linux commands: <br><span style="color:blue;font-weight:bold;font-family:courier;">chmod 640 ~/documents/memos/memo*.txt<br>chmod 640 ~/documents/reports/report*.txt<br>chmod 640 ~/documents/contracts/contract*.txt</span><br><br> | # Issue the following Linux commands: <br><span style="color:blue;font-weight:bold;font-family:courier;">chmod 640 ~/documents/memos/memo*.txt<br>chmod 640 ~/documents/reports/report*.txt<br>chmod 640 ~/documents/contracts/contract*.txt</span><br><br> | ||
# Issue the <span style="font-weight:bold;font-family:courier;">ls -lR</span> command for the '''~/documents''' directory to confirm that those regular file permission have changed.<br><br>Let's run a checking script to make certain you correctly set permissions for those directories and files.<br><br> | # Issue the <span style="font-weight:bold;font-family:courier;">ls -lR</span> command for the '''~/documents''' directory to confirm that those regular file permission have changed.<br><br>Let's run a checking script to make certain you correctly set permissions for those directories and files.<br><br> | ||
| − | # Issue the following: <span style="color:blue;font-weight:bold;font-family:courier;">~ | + | # Issue the following: <span style="color:blue;font-weight:bold;font-family:courier;">~osl640/week4-check-3</span><br><br> |
# If you encounter errors, make corrections and then re-run the checking script until you receive a congratulations message<br>and then continue with this tutorial.<br><br>Let's get some practice setting permissions to allow users to make editing changes to regular files.<br><br> | # If you encounter errors, make corrections and then re-run the checking script until you receive a congratulations message<br>and then continue with this tutorial.<br><br>Let's get some practice setting permissions to allow users to make editing changes to regular files.<br><br> | ||
# Issue the following Linux command: <span style="color:blue;font-weight:bold;font-family:courier;">chmod ugo-w ~/documents/memos/memo*.txt</span><br><br> | # Issue the following Linux command: <span style="color:blue;font-weight:bold;font-family:courier;">chmod ugo-w ~/documents/memos/memo*.txt</span><br><br> | ||
| Line 261: | Line 261: | ||
# Issue the following Linux command to create an empty regular file called '''myfile.txt''' in the '''~/shared2''' directory:<br> <span style="color:blue;font-weight:bold;font-family:courier;">touch ~/shared2/myfile.txt</span><br><br> | # Issue the following Linux command to create an empty regular file called '''myfile.txt''' in the '''~/shared2''' directory:<br> <span style="color:blue;font-weight:bold;font-family:courier;">touch ~/shared2/myfile.txt</span><br><br> | ||
# Use the <span style="font-weight:bold;font-family:courier;">ls -l</span> command to view the permissions for this newly created regular file.<br><br>What do you notice about those permissions?<br><br>Let's run a checking script to make certain you correctly set permissions for those recently-created directories and files.<br><br> | # Use the <span style="font-weight:bold;font-family:courier;">ls -l</span> command to view the permissions for this newly created regular file.<br><br>What do you notice about those permissions?<br><br>Let's run a checking script to make certain you correctly set permissions for those recently-created directories and files.<br><br> | ||
| − | # Issue the following: <span style="color:blue;font-weight:bold;font-family:courier;"> | + | # Issue the following: <span style="color:blue;font-weight:bold;font-family:courier;">osl640/week4-check-4</span><br><br>If you encounter errors, make corrections and then re-run the checking script until you receive a congratulations message<br>and then continue with this tutorial.<br><br> |
# Logout of your Matrix account, and then log-back into your Matrix account.<br><br> | # Logout of your Matrix account, and then log-back into your Matrix account.<br><br> | ||
# Issue the following Linux command (without arguments): <span style="color:blue;font-weight:bold;font-family:courier;">umask</span><br><br>What happened? Referring to your notes, what do you need to do to make that umask value persistent?<br><br><span style="color:red;">'''WARNING''':<br>You should be <u>extremely</u> aware of your permissions since you may perform '''assignments''' for <u>other</u> courses on your '''Matrix''' server.<br>You should NOT set permissions to share your work with '''same group''' or '''other group''' members (unless given '''specific permissions instructions from your course professors''' involving '''assignment submission'''). If students can have access to your directories and assignment files, they could '''copy''' your work and thus make yourself and other student(s) that copied your assignment work<br>to be charged with '''academic dishonesty'''.</span><br><br> | # Issue the following Linux command (without arguments): <span style="color:blue;font-weight:bold;font-family:courier;">umask</span><br><br>What happened? Referring to your notes, what do you need to do to make that umask value persistent?<br><br><span style="color:red;">'''WARNING''':<br>You should be <u>extremely</u> aware of your permissions since you may perform '''assignments''' for <u>other</u> courses on your '''Matrix''' server.<br>You should NOT set permissions to share your work with '''same group''' or '''other group''' members (unless given '''specific permissions instructions from your course professors''' involving '''assignment submission'''). If students can have access to your directories and assignment files, they could '''copy''' your work and thus make yourself and other student(s) that copied your assignment work<br>to be charged with '''academic dishonesty'''.</span><br><br> | ||
Revision as of 19:04, 1 September 2021
Contents
Data Representation / Numbering Conversion / File Permissions
Main Objectives of this Practice Tutorial
- Understand how digital computers store data (i.e. data representation)
- Define decimal, binary, octal and hexadecimal numbers
- Manually perform numbering conversions between the decimal, binary, octal and hexadecimal numbering systems
(without the use of a computer or calculator)
- Manually perform numbering conversions between the decimal, binary, octal and hexadecimal numbering systems
- Explain the purpose of file permissions
- Explain how permissions work differently for directories as opposed for regular files
- Change file permissions with the chmod command (both symbolic and absolute methods)
- Use the umask command to automatically assign permissions for newly created directories and regular files
- Use the umask command to automatically assign permissions for newly created directories and regular files
Tutorial Reference Material
| Course Notes |
Numbering Conversion / File Permissions Reference |
YouTube Videos | |
| Slides:
|
Data Representation Definitions | File Permission Concepts
File Permission Commands |
Instructional Videos: |
KEY CONCEPTS
Data Representation
Digital computers are electronic devices that contain a series of circuits and voltage levels that can store / represent data.
Binary numbers can represent those series of circuits with voltage levels.
Those binary numbers are combined in a sequence to form a byte. Bytes are used to represent numbers or characters.
IT professionals may need to perform numbering conversion to use with
programming functions or OS commands to perform common operations on a computer system.
IT Professionals that Use Data Representation:
- Network Specialists: Building Large Networks via Sub-netting
- Programmers: Sending information over networks, files
- Web Developers: Setting color codes for webpage background or text
- Unix/Linux System Administrators: Setting permissions for files and directories
Numbering Conversion Methods
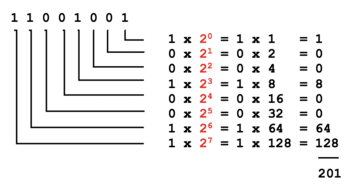
Method 1: Binary to Decimal
When converting binary numbers to decimal numbers, perform the following steps:
- Write down the binary number.
- Starting from the right-side, draw L's below the binary number moving to the left
(refer to diagram on right). - Starting on the rightmost "L", multiply the value (placeholder) by 2 to the power of zero.
- Continually repeat step #3 moving leftwards, increasing the power of 2 by 1
(refer to diagram on right). - Add up the results to obtain the decimal value equivalent.
NOTE: To convert octal and hexadecimal numbers to decimal, replace the number 2
(in red in the diagram to the right) with 8 (for octal) or 16 (for hexadecimal).
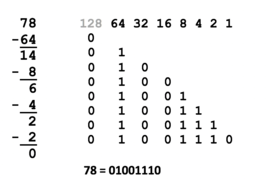
Method 2: Decimal to Binary
When converting decimal numbers to binary numbers, perform the following steps:
- Write down the decimal number to be converted.
- On the right-side, write the number 1 and moving leftwards, keep doubling the numbers until that number is greater than the decimal number to be converted (refer to the diagram on the right).
- Starting on the left-side of those doubled numbers, compare that number with the decimal number. If that number if less than or equal to the decimal number, then write a 1 below and subtract that number from the decimal number to get a remainder. If the number is greater than decimal number (or remainder), then write a 0 below.
- Repeat step #3 (moving rightwards and comparing the number with the decimal's remainder)
NOTE: If you are converting to 8-bit, 32-bit, etc., add leading zeros if necessary.
Method 3: Octal to Binary / Binary to Octal
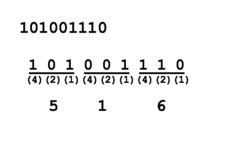
Binary to Octal
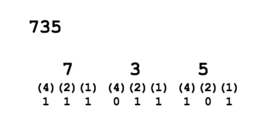
- One octal number represents 3 binary numbers, so starting from right-side, group binary digits into groups of 3
(add leading zeros if necessary). - Write (4)(2)(1) under each group of 3 binary numbers.
- Multiply the value or "placeholder" (i.e. 0's and 1's) by the corresponding (4)(2)(1) for each group to obtain the octal number (refer to diagram of binary to octal conversion).
Octal to Binary
- One octal number represents 3 binary numbers, so space-out
the octal numbers to make space for a binary number. - Write (4)(2)(1) under each octal number.
- Write 0's or 1's for each group of binary numbers to add up to the
corresponding octal number (refer to diagram of octal to binary conversion).
Method 4: Hexadecimal to Binary / Binary to Hexadecimal
Binary to Hexadecimal
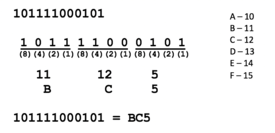
- One hexadecimal number represents 4 binary numbers, so starting from right-side, group binary digits into groups of 4 (add leading zeros if necessary).
- Write (8)(4)(2)(1) under each group of 4 binary numbers.
- Multiply the values or "placeholders" (i.e. 0's and 1's) by the corresponding (8)(4)(2)(1) for each group to obtain the octal number.
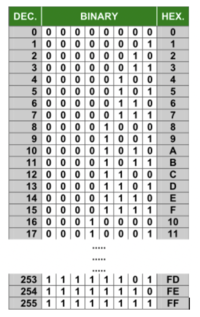
- Convert values from 10 to 15 to A to F
(refer to diagram of binary to hexadecimal conversion)
Hexadecimal to Binary
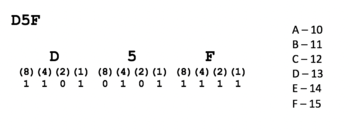
- One hexadecimal number represents 4 binary numbers,
so space-out the hexadecimal numbers to make space for a binary number. - Convert letters A to F to 10 to 15 (refer to diagram of binary to hexadecimal conversion)
- Write (8)(4)(2)(1) under each hexadecimal number.
- Write 0's or 1's for each group of binary numbers to add up to the corresponding
hexadecimal number (refer to diagram of hexadecimal to binary conversion).
Method 5: Octal to Hexadecimal / Hexadecimal to Octal
To convert using the method, simply use binary as a "bridge".
Example:
To convert octal to hexadecimal, convert octal to binary, then convert binary to hexadecimal.
To convert hexadecimal to octal, convert hexadecimal to binary, then convert binary to octal.
File Permissions
Since Unix / Linux operating file systems allow for multiple user accounts
it is essential to have a system to share or limit access to directories and files contained within the file system.
When directories and regular files are created, they are assigned to an owner
(typically the username which is the creator).
To allow or limit access to those
files and directories, those files and directories are assigned to an
initial group referred to as a "primary group".
Users that own those directories and regular files are referred to as users, users that belong within the same group are referred to as same group members, and those users that do NOT belong to a particular group are referred to as other group members.
NOTE: In this course, we CANNOT create groups or assign users to groups in the Matrix server. Instead, you may learn how to those tasks when or if you take a Unix/Linux administration course. On the other hand, you can change which user, same group members or other group members can access or NOT access a directory or regular file.
File Permissions consist of two-layers:
First, the permissions of a directory that contains regular files, and second, permissions of the subdirectories and/or regular files within that directory.
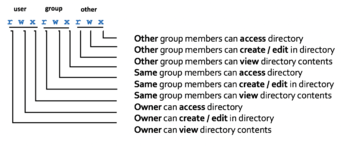
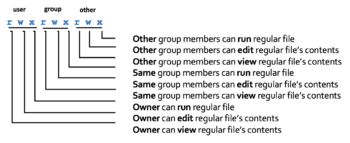
Permissions for directories have a different meaning than permissions for regular files. Refer to the diagrams to the right to see the explanation of permissions and how they differ between a directory and a regular file.
A symbol dash "-" indicates that the permission has NOT been granted.
The permissions of newly-created directories and regular files are automatically assigned
via a user mask (we will discuss this shortly). In order to change permissions for
directories and regular files, you would use the chmod command.
Changing File Permissions with "chmod" command:
Symbolic Method:
The chmod can use symbols to add, remove, and set rwx permissions for the user,
same group members, and/or other group members for a directory or reqular file.
Octal (Absolute) Method:
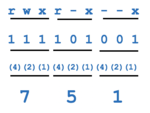
You can also use octal numbers to set permissions. This method is a short-cut and may require less typing than using the symbolic method. You can only use this method to set file permissions (as opposed to add or remove permissions.
Since 1 octal digit represents 3 binary digits, one octal digit can represent the rwx permission granted or NOT granted. The permissions rwx are be in the form of 3 binary digits (1 represents the permission granted and 0 represents the permission NOT granted).
NOTE: You can use the -R option to set permissions for directory, subdirectory and directory contents recursively.
Setting Permissions for Newly-Created Directories and Regular Files (umask):
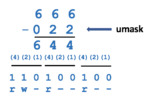
The umask command is used to set the permissions of newly-created directories and regular files.
Issuing the umask command without arguments will display the current umask value.
Refer to the diagrams on the right-side to set the umask value for directories and regular files.
Setting the umask value (for example umask 022) only takes effect for the current shell session unless the umask command is contained in a start-up file
(e.g. .profile, .bash_profile, or .bashrc).
INVESTIGATION 1: NUMBERING CONVERSIONS
ATTENTION: This tutorial will provide additional practice with the necessary skills for completing this weeks segment of your assignment and is not worth marks.
For this investigation, we will NOT be logged into our Matrix account, but it is recommended to have an MS Word document
open to manually perform numbering conversions.
NOTE: It is essential that you learn how to manually perform numbering conversions since you will NOT be permitted to perform quizzes, midterm, or your final exam with a computer or a calculator. Learning to quickly perform manual numbering conversions will make IT professional more productive such as setting permissions, designing computer networks, or selecting complex colors when developing webpages.
You will now get practice performing numbering conversions.
Perform the Following Steps:
- Let's convert the following 8-bit binary number 10111110 to a decimal number.
NOTE: It is important to learn and memorize the correct methods to perform the
proper numbering conversion method (i.e. view method 1 above (drawing the L's). - Write the manual conversion either in your MS Word document.
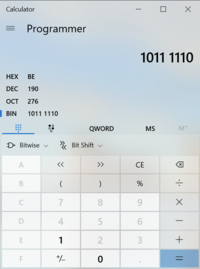
- Use a calculator to check your work. In MS Windows, you can set the calculator to Programming mode
by making the selection to binary, enter the binary number 10111110 and view the decimal equivalent.
Did you get the correct answer? If not, retry the method and check to see what you did wrong. - Perform a manual conversion of the decimal number 55 to an 8-bit binary number.
What method (displayed above) will you use? Use a calculator to check your work. - Perform a manual conversion of the octal number 461 to an 8-bit binary number.
What method (displayed above) will you use? Use a calculator to check your work. - Perform a manual conversion of the 8-bit binary number 11110001 to a hexadecimal number.
What method (displayed above) will you use? Use a calculator to check your work. - Perform a manual conversion of the hexadecimal number ABC to an 8-bit binary number.
What method (displayed above) will you use? Use a calculator to check your work. - Perform a manual conversion of the binary number 10101111 to an octal number.
What method (displayed above) will you use? Use a calculator to check your work. - Perform a manual conversion of the same binary number 10101111 to a hexadecimal number.
What method (displayed above) will you use? Use a calculator to check your work. - Perform a manual conversion of the octal number 5636 to a hexadecimal number.
What method (displayed above) will you use? Use a calculator to check your work. - Perform a manual conversion of the hexadecimal number D68 to an octal number.
What method (displayed above) will you use? Use a calculator to check your work. - When you have performed all of the numbering conversions above, then you can proceed to the next INVESTIGATION.
INVESTIGATION 2: FILE PERMISSIONS
In this investigation, you will get experience using the chmod command to change permissions
for existing files and the using umask command to automatically set permissions
for newly-created files.
Perform the Following Steps:
- Login to your matrix account and issue a command to confirm you are located in your home directory.
- Issue a single Linux command to create the following directory structure displayed in the diagram to the right.
NOTE: You will now run a shell script to confirm that you properly created that directory structure
in your Matrix account. - Issue the following Linux command to run a checking script:
~osl640/week4-check-1 - If you encounter errors, make corrections and re-run the checking script until you
receive a congratulations message, then you can proceed. - Issue Linux commands to create empty files for each of those newly created directories as shown in diagram to the right:
NOTE: You will now run another shell script to confirm that you properly created those empty files within those specified directories. - Issue the following Linux command to run a checking script:
~osl640/week4-check-2 - If you encounter errors, make corrections and re-run the checking script until you
receive a congratulations message, then continue the remaining steps.
Let's get practice viewing permissions, changing permissions, and automatically setting permissions for newly created files. - Issue the following Linux commands:
ls -ld ~/documents ~/clients ~/vendors
ls -lR ~/documents ~/clients ~/vendors
NOTE: You should see permissions already set for those newly created directories and regular files.
What do these permissions mean for same group member and other group member access to those directory and regular files? - Let's limit access to the clients and vendors directories to only yourself and same group members.
Issue the following Linux command:
chmod 750 ~/clients ~/vendors - Issue the ls -ld and ls -lR commands (as you did in step #8) to confirm that the permissions for those directories have been changed.
NOTE: The -R option for the chmod command can change the file permissions recursively within a directory structure. - Issue the following Linux command: chmod 750 -R ~/documents
- Issue the ls -ld command to confirm the permissions for the
~/documents, ~/document/memos , ~/documents/reports, and ~/documents/contracts directories. - Issue the following Linux command: ls -lR ~/documents
What do you noticed happened to the permissions for the regular files contained in those directories.
Did those regular file permissions change?
We will now change permissions for regular text file contained in subdirectories
of the documents directory to: r w - r - - - - - - Issue the following Linux commands:
chmod 640 ~/documents/memos/memo*.txt
chmod 640 ~/documents/reports/report*.txt
chmod 640 ~/documents/contracts/contract*.txt - Issue the ls -lR command for the ~/documents directory to confirm that those regular file permission have changed.
Let's run a checking script to make certain you correctly set permissions for those directories and files. - Issue the following: ~osl640/week4-check-3
- If you encounter errors, make corrections and then re-run the checking script until you receive a congratulations message
and then continue with this tutorial.
Let's get some practice setting permissions to allow users to make editing changes to regular files. - Issue the following Linux command: chmod ugo-w ~/documents/memos/memo*.txt
- Use the ls command to verify that those regular file's permissions have changed.
- Using the nano or vi text editor, open the regular file ~/documents/memos/memo1.txt
and type in some text and try to save your editing changes.
What happened? - To abort your editing session in vi: type :q! and press ENTER.
To abort your editing changes in nano: type ctrl-x
type n and then press ENTER when prompted to save editing changes. - Issue the following Linux command to add write permissions for all files in the memos directory
for yourself (i.e. user): chmod u+w ~/documents/memos/* - Repeat steps to edit the file ~/documents/memos/memo1.txt (as you did in step #20).
Were you able to edit the file and save your editing changes? - Issue a Linux command to view the contents of the ~/documents/memos/memo1.txt
text file that you were able to edit. - Issue the following Linux command to view permissions for your home directory: ls -ld ~
What does execute permissions mean for same group members and other group members
in terms of your home directory? - Issue the following Linux command to create a new subdirectory: mkdir ~/shared
- Issue the following Linux command: ls -ld ~/shared
What are the permissions for this newly-created directory?
Can other users access the directory pathname ~youruserid/shared ? - Issue the following Linux command (without an argument): umask
NOTE: You should see a four-digit octal number. Drop the leading zero on the left to obtain the default umask value. - Perform a mathematical calculation by taking the octal number 777 and subtracting
the default umask value you determined in the previous step. What is the result? - Convert that octal number result to a binary number. What does that represent as newly created directory permissions?
Does that correspond to the permissions for the newly created ~/shared directory? - Repeat the calculation (like in step #28) but with a umask setting of 077 to see how this new umask setting would
affect permissions of newly-created directories. - Issue the following Linux command: umask 077
- Issue the following Linux command (without arguments): umask
NOTE: You should notice the value 0077. By dropping the leading zero to the left,
that would provide the default umask value of 077. - Issue the following Linux command: mkdir ~/shared2
- Issue the following Linux command: ls -ld ~/shared2
Do the permissions for this newly created directory match the predicted permissions that you calculated in step #30? - Issue the following Linux command to create an empty regular file called myfile.txt in the ~/shared2 directory:
touch ~/shared2/myfile.txt - Use the ls -l command to view the permissions for this newly created regular file.
What do you notice about those permissions?
Let's run a checking script to make certain you correctly set permissions for those recently-created directories and files. - Issue the following: osl640/week4-check-4
If you encounter errors, make corrections and then re-run the checking script until you receive a congratulations message
and then continue with this tutorial. - Logout of your Matrix account, and then log-back into your Matrix account.
- Issue the following Linux command (without arguments): umask
What happened? Referring to your notes, what do you need to do to make that umask value persistent?
WARNING:
You should be extremely aware of your permissions since you may perform assignments for other courses on your Matrix server.
You should NOT set permissions to share your work with same group or other group members (unless given specific permissions instructions from your course professors involving assignment submission). If students can have access to your directories and assignment files, they could copy your work and thus make yourself and other student(s) that copied your assignment work
to be charged with academic dishonesty.
- After you complete the Review Questions sections to get additional practice, then work on your online assignment 2
and complete the sections 1 and 2 labelled: Practice Using The vi Text Editor and Permissions respectively.
LINUX PRACTICE QUESTIONS
The purpose of this section is to obtain extra practice to help with your assignment #1, quizzes, your midterm, and your final ezam.
Here is a link to the MS Word Document of ALL of the questions displayed below but with extra room to answer on the document to simulate a quiz:
https://ict.senecacollege.ca/~murray.saul/uli101/uli101_week4_practice.docx
Your instructor may take-up these questions during class. It is up to the student to attend classes in order to obtain the answers to the following questions. Your instructor will NOT provide these answers in any other form (eg. e-mail, etc).
Review Questions:
- List the number of digits for the following numbering systems:
- Decimal
- Binary
- Octal
- Hexadecimal
- Write a simple chart to show which values are represented for letter A - F for a hexadecimal number.
- How many binary digits does 1 octal digit represent?
- How many binary digits does 1 hexadecimal digit represent?
- Use manual numbering conversion to complete the table displayed to the right.
- Write the chmod command (using the symbolic method) to set “pass-through” permissions
(eg. r w x - - x - - x) for your home directory using an absolute pathname.
Write a Linux command to verify that permissions where set. - Perform a binary to octal numbering conversion for the permissions: r w x - - x - - x
Write single Linux command to set “pass-through” permissions for your home directory,
using the absolute method (i.e. octal numbers). - Write a single Linux command to add read permissions for same group members for the ~/tests directory.
- Write a single Linux command to remove write permissions for same group members
and other group members for the ~/projects directory. Use the symbolic method. - Write a single Linux command to set the permissions for the ~/assignments directory
to the following using the absolute method (i.e. octal numbers): r w x r - x - - x
Show your work to perform a binary to octal conversion.
Write the command below using octal numbers and using a relative-to-home pathname. - Assume that you just issued the command:
chmod u=rwx,go=x ~/linux/content
What would be the new permissions for the “content” directory? - Assume that you just issued the commands:
umask 077
mkdir mydir
touch mydir/myfile.txt
What would be the permissions for the newly created directory and regular file?
(show your work)
