Difference between revisions of "Lab 2 Warnings / Debrief"
| (12 intermediate revisions by the same user not shown) | |||
| Line 15: | Line 15: | ||
* '''Properly backup VMs and VM configuration''' in virtual manager application onto home directory and to external source (USB Key) | * '''Properly backup VMs and VM configuration''' in virtual manager application onto home directory and to external source (USB Key) | ||
* Observe how '''Bash Shell Scripting''' can be used to automate routine tasks involving VM management | * Observe how '''Bash Shell Scripting''' can be used to automate routine tasks involving VM management | ||
| + | |||
| + | |||
| + | == Installing Virtual Machines == | ||
| + | |||
| + | Prior to installing virtual machines, you need to issue a command to download and install virtualization software. There are many brands of this software (eg. VMWare, VirtualBox, etc), but will be using KVM. | ||
| + | |||
| + | The command to install KVM is: | ||
| + | |||
| + | '''yum install qemu-kvm qemu-img virt-manager libvirt libvirt-python \ | ||
| + | python-virtinst libvirt-client virt-install virt-viewer bridge-utils''' | ||
| + | |||
| + | |||
| + | When creating a virtual machine, two separate operations must be performed: | ||
| + | |||
| + | :# '''Create "storage space" for VM''' (complete details such as name, hard drive size, RAM, etc) | ||
| + | :# '''Install OS''' (eg. DVD, ISO image, Network, Network with kickstart file) | ||
| + | |||
| + | After using the yum install command to install the virtualization software, you MUST issue commands to '''start the virtulatization service''' and '''restart the firewall'''!. If you do <u>'''not'''</u> issue these commands, the virtual machine manager application will not work, and you may '''experience problems in future labs with ssh connections'''! | ||
| Line 37: | Line 55: | ||
Failure to follow instructions can lead to loss of backups! | Failure to follow instructions can lead to loss of backups! | ||
| − | There are two general processes in order to back up your images:<ol><li>'''Compressing your images''' (also recommended to backup up to external storage USB Key) using the '''gzip''' command. | + | There are two general processes in order to back up your images:<ol><li>'''Compressing your images''' (also recommended to backup up to external storage USB Key) using the '''gzip''' command.<br>eg. '''gzip < centos3.img > ~YourUserId/centos3.img.backup.gz''' (Use the redirect symbols!!!!)</li><li>'''Backup the VM xml configuration file''' (preferably to USB key) using '''virsh''' shell command to add VM to virtual machine manager list (in the event that the HOST machine is "wiped" and re-installed, but VM images and xml configuration files have been backed up external storage).<br>eg. '''virsh dumpxml centos3 > centos3.xml'''<br><br></li></ol><br />Taking the time to backup the image of the Operating System's file system allows the user to return to a '''"restoration point"''' using the '''gunzip''' command in case something bad occurs to the OS during a lab.<br>There are four general processes to restore your backed-up VMs:<ol><li>eg. Copy '''centos3.img.backup.gz''' from your USB to your <u>images</u> diretory</li><li>Issue command in <u>images</u> directory: '''gunzip < ~YourUserId/centos3.img.backup.gz > centos3.img'''</li><li>Copy '''centos3.xml''' from your USB to your <u>images</u> directory</li><li>In the <u>images</u> directory issue the command: '''virsh define centos3.xml'''</li></ol><br>Failure to take the time to make and confirm backups can result in loss of lab work for the student! |
| + | |||
| + | |||
| + | == Managing VMs with Shell Scripts == | ||
| + | |||
| + | Refer to the shell scripting section in lab 2 to see how shell scripts can use the virsh command to start and stop VMs automatically. | ||
| Line 50: | Line 73: | ||
* If need to start-over, you can right-click on VM in Virtual Machine Manager, and remove (Make certain "delete files" is also selected, so you can re-use VM name). | * If need to start-over, you can right-click on VM in Virtual Machine Manager, and remove (Make certain "delete files" is also selected, so you can re-use VM name). | ||
* Installation of centos2 and centos3 can only be performed at college since it uses internal Belmont network! | * Installation of centos2 and centos3 can only be performed at college since it uses internal Belmont network! | ||
| − | * Make certain to do following for EACH Virtual Machine:<ul><li>Start ssh service</li><li>Create firewall exception to allow ssh traffic for ssh (iptables)</li><li>Disable SElinux</li></ul> | + | * Make certain to do following for EACH Virtual Machine:<ul><li>Start ssh service</li><li>Create firewall exception to allow ssh traffic for ssh (iptables)</li><li>Disable SElinux</li></ul> |
| − | |||
Latest revision as of 08:17, 22 September 2015
Contents
Preparing for Lab 2
Purpose / Objectives of Lab2
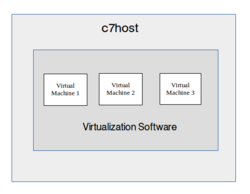
In this lab, you will create three virtual machines. This also gives you an opportunity to experiment with different ways of installing CentOS.
- Installing Virtualization Software on your c7host machine
- Create 3 separate VMs (virtual machines) using different installation methods:
- Centos Live DVDInstallation (Hostname: centos1)
- Network Installation without configuration file (Hostname: centos2)
- Network Installation with Kickstart file (Hostname: centos3)
- Understand the advantages and disadvantages of each type of installation, and be able to select the best installation method for a particular situation.
- Manipulate virtual machines by CLI (virsh)
- Properly backup VMs and VM configuration in virtual manager application onto home directory and to external source (USB Key)
- Observe how Bash Shell Scripting can be used to automate routine tasks involving VM management
Installing Virtual Machines
Prior to installing virtual machines, you need to issue a command to download and install virtualization software. There are many brands of this software (eg. VMWare, VirtualBox, etc), but will be using KVM.
The command to install KVM is:
yum install qemu-kvm qemu-img virt-manager libvirt libvirt-python \ python-virtinst libvirt-client virt-install virt-viewer bridge-utils
When creating a virtual machine, two separate operations must be performed:
- Create "storage space" for VM (complete details such as name, hard drive size, RAM, etc)
- Install OS (eg. DVD, ISO image, Network, Network with kickstart file)
After using the yum install command to install the virtualization software, you MUST issue commands to start the virtulatization service and restart the firewall!. If you do not issue these commands, the virtual machine manager application will not work, and you may experience problems in future labs with ssh connections!
Managing Virtual Machines
Can manipulate the Virtual Machines via command line (i.e. instead of Virtual Machine Manager, although that program must be running).
Useful when utilized within shell scripts (demonstrated at the end of lab2).
A command called virsh (Virtual Shell allows administrator to issue commands in this special shell)
Common virsh examples
- virsh list (only lists only running VMs)
- virsh list --all (lists running and non-running VMs)
- virsh list --inactive (lists only non-running VMs)
- virsh start centos1 (starts VM named "centos1")
- virsh stop centos3 (stops VM named "centos3" , although best to shut-down under normal methods)
Backing Up Virtual Machine Images
Backing up your virtual machine images and xml virtual machine menu configurations is extremely important and MUST be performed at the end of each lab onto you USB key. If something bad occurs (even removable hard disk failure). Student simply has to perform lab1 and first part of lab2 (install virtualization program), and then restore the VMs. Failure to follow instructions can lead to loss of backups!
There are two general processes in order to back up your images:- Compressing your images (also recommended to backup up to external storage USB Key) using the gzip command.
eg. gzip < centos3.img > ~YourUserId/centos3.img.backup.gz (Use the redirect symbols!!!!) - Backup the VM xml configuration file (preferably to USB key) using virsh shell command to add VM to virtual machine manager list (in the event that the HOST machine is "wiped" and re-installed, but VM images and xml configuration files have been backed up external storage).
eg. virsh dumpxml centos3 > centos3.xml
Taking the time to backup the image of the Operating System's file system allows the user to return to a "restoration point" using the gunzip command in case something bad occurs to the OS during a lab.
There are four general processes to restore your backed-up VMs:
- eg. Copy centos3.img.backup.gz from your USB to your images diretory
- Issue command in images directory: gunzip < ~YourUserId/centos3.img.backup.gz > centos3.img
- Copy centos3.xml from your USB to your images directory
- In the images directory issue the command: virsh define centos3.xml
Failure to take the time to make and confirm backups can result in loss of lab work for the student!
Managing VMs with Shell Scripts
Refer to the shell scripting section in lab 2 to see how shell scripts can use the virsh command to start and stop VMs automatically.
Common Mistakes / Warnings
- Use comparison chart on lab2 logbook to record your findings as you install each VM.
- After using the yum install command to install the virtualization software, you MUST issue commands to start the virtulatization service and restart the firewall!
- Best to start the virtual Manager by menu instead of command line (i.e. Applications > System Tools > Virtual Machine Manager)
- FOLLOW THE INSTRUCTIONS CAREFULLY in terms of hard disk sizes, image pathnames, RAM size, etc! Not following instructions can lead to removing VM and starting again.
- If need to start-over, you can right-click on VM in Virtual Machine Manager, and remove (Make certain "delete files" is also selected, so you can re-use VM name).
- Installation of centos2 and centos3 can only be performed at college since it uses internal Belmont network!
- Make certain to do following for EACH Virtual Machine:
- Start ssh service
- Create firewall exception to allow ssh traffic for ssh (iptables)
- Disable SElinux
Preparing for Lab Sign-Off
In order to properly complete your lab and move to the next lab, you must have your instructor "sign-off" on your lab
- Each "signed-off" lab (before due date) is worth 1% of your final grade.
- Signing-off on labs help to spot errors that can cause problems with future labs.
- Do you ask the instructor what to check for! Read at the bottom of the lab the requirements, and have all proof available for instructor to view at same time.
- Failing to be prepared and asking instructor what to check when assignment is mark will result in deduct of marks!
- For example, open multiple terminals with command results. If properly set-up ahead of sign-off, the process should only take instructor approx 20 seconds to sign-off your lab.
- If you do not have your lab-logbook, you MUST show your work and your lab log-book to your instructor for sign-off in the next class. This may cause a late penalty if past the required due date.

