Difference between revisions of "Lab 2 Warnings / Debrief"
| Line 23: | Line 23: | ||
* Use comparison chart on lab2 logbook to record your findings as you install <u>each</u> VM. | * Use comparison chart on lab2 logbook to record your findings as you install <u>each</u> VM. | ||
| + | * After using the yum install command to install the virtualization software, you MUST issue commands to start the virtulatization service and restart the firewall! | ||
| + | * Best to start the virtual Manager by menu instead of command line (i.e. '''Applications''' > '''System Tools''' > '''Virtual Machine Manager''') | ||
| + | |||
| + | |||
== Preparing for Lab Sign-Off == | == Preparing for Lab Sign-Off == | ||
Revision as of 09:22, 21 September 2015
Contents
Preparing for Lab 2
Purpose / Objectives of Lab2
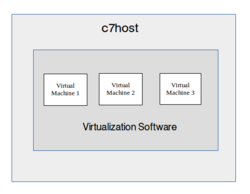
In this lab, you will create three virtual machines. This also gives you an opportunity to experiment with different ways of installing CentOS.
Main Objectives
- Installing Virtualization Software on your c7host machine
- Create 3 separate VMs (virtual machines) using different installation methods:
- Centos Live DVDInstallation (Hostname: centos1)
- Network Installation without configuration file (Hostname: centos2)
- Network Installation with Kickstart file (Hostname: centos3)
- Understand the advantages and disadvantages of each type of installation, and be able to select the best installation method for a particular situation.
- Manipulate virtual machines by CLI (virsh)
- Properly backup VMs and VM configuration in virtual manager application onto home directory and to external source (USB Key)
- Observe how Bash Shell Scripting can be used to automate routine tasks involving VM management
Common Mistakes / Warnings
- Use comparison chart on lab2 logbook to record your findings as you install each VM.
- After using the yum install command to install the virtualization software, you MUST issue commands to start the virtulatization service and restart the firewall!
- Best to start the virtual Manager by menu instead of command line (i.e. Applications > System Tools > Virtual Machine Manager)
Preparing for Lab Sign-Off
In order to properly complete your lab and move to the next lab, you must have your instructor "sign-off" on your lab
- Each "signed-off" lab (before due date) is worth 1% of your final grade.
- Signing-off on labs help to spot errors that can cause problems with future labs.
- Do you ask the instructor what to check for! Read at the bottom of the lab the requirements, and have all proof available for instructor to view at same time.
- Failing to be prepared and asking instructor what to check when assignment is mark will result in deduct of marks!
- For example, open multiple terminals with command results. If properly set-up ahead of sign-off, the process should only take instructor approx 20 seconds to sign-off your lab.
- If you do not have your lab-logbook, you MUST show your work and your lab log-book to your instructor for sign-off in the next class. This may cause a late penalty if past the required due date.

