Difference between revisions of "Lab 7 Warnings / Debrief"
| Line 52: | Line 52: | ||
<u>'''Deceiving the "Hacker"'''</u> | <u>'''Deceiving the "Hacker"'''</u> | ||
| + | To help harden (protect a server from attack or "penetration"), system or security administrators have the ability to "trick" or "mislead" a potential hacker in order to prevent system penetration. | ||
| + | In this part, you will learn to use a combination of '''SSH server configuration''' and '''iptables rules''' to <u>redirect</u> the SSH port to allow secure data traffic via another port (as opposed to the default port: 22), and use iptables to reject (better log) incoming tcp traffic via the default port. | ||
| + | |||
| + | What is the result of this? | ||
| + | Simple. Permit the SSH service for the organization, and yet '''trick and confound the potential hacker''' into thinking that ssh traffic is used on a port that is no longer available (but they may not know this!) | ||
| + | |||
| + | Sneaky! >;) | ||
Latest revision as of 11:06, 23 July 2015
Contents
Preparing for Lab 7
Purpose of Lab 7
Setting up a computer network is very important, but there are many other operations that occur on a daily basis that can include trouble-shooting, repairing network connection issues as well as maintaining network security. System administrators need to protect or "harden" their computer networks from "penetration" from unauthorized computer users. Hardening a computer system can range from running an IDS (Intrusion Detection System) to monitoring and flagging suspicious activity to implementing screen savers on workstations.
In this lab, you will learn how to use ssh, scp, sftp commands to securely access and share data between authorized personnel. In addition, you will learn various methods of running and configuring an ssh server which include: using Public Key Authentication, setting up an SSH tunnel in order to securely run graphical applications safely among computers in the network, disabling root login, and changing the default ssh communication port to mislead potential penetration testers (also known as "pen-testers" or "hackers").
INVESTIGATION 1:
CONFIGURING AND ESTABLISHING AN SSH CONNECTION
So far, you have learned to use the ssh utility to establish a secure connection to a remote server to perform tasks, administer the server, etc. For these common operations, you have issued the ssh command, which is the client application for ssh. In order to connect to a remote server (like your VMs, Matrix, etc) they need to be running the SSH service. In this lab, you will learn how to run an SSH server in a VM, then confirm that you can connect into the server by using the ssh client application.
We can use the netstat utility as a trouble-shooting / confirmation tool to view the SSH service and determine which STATE the SSH service is performing:
- LISTENING (waiting for a ssh connection attempt)
- ESTABLISHED (connection established)
- CLOSED (connection is closed)
- WAITING (time between connection closed, and changing to LISTENING mode)
Establishing a Safe SSH Connection: Public Key Authentication
As a system administrator, you have the ability to generate or create public and private keys to ensure safe and secure ssh connections. The system administer can generate these keys for the first time, of if they suspect that a hacker has compromised the server, can remove the existing keys and generate new keys. A common type of attack, Arp Poisoning (Man in the Middle Attack), can be used to redirect packets to a third party while maintaining the illusion that the connection is secure. Therefore, understanding about the generation and management of public/private keys are important to the security of servers.
When a user connects to a host using ssh, the host sends a fingerprint or digital signature to the client to establish its identity. The first time a connection is established the identity must be stored for subsequent connections. The fingerprints are stored separately for each user in a file called ~/.ssh/known_hosts .
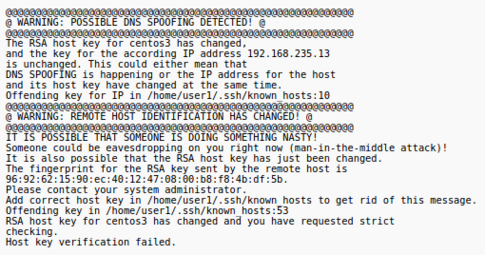
From now on when you connect to that host the client will compare the received fingerprint against the list of known hosts before connecting. If the fingerprint does not match it could indicate somebody had setup a system to impersonate the computer you wish to connect to and you would receive a message similar to depicted in the diagram on the right.
INVESTIGATION 2:
Using SSH Effectively
When you have created an SSH server, then users can take advantage of secure shell tools (including the scp and sftp utilities)
The ssh client utility also contains many options to provide useful features or options when establishing secure connections between servers. One of these features is referred to as tunnelling - this term refers to running programs on remote servers (i.e. running the program on a remote server, yet interacting and viewing program on your local server. Since X-windows in Linux is a support layer to transmit graphical information efficiently between servers, ssh tunnelling becomes more useful and important to allow organizations to work efficiently and securely in a user-friendly environment.
Making SSH More Secure
Anytime you configure your computer to allow logins from the network you are leaving yourself vulnerable to potential unauthorized access by so called "hackers". Running the sshd service is a fairly common practice but care must be taken to make things more difficult for those hackers that attempt to use "brute force" attacks to gain access to your system. Hackers use their knowledge of your system and many password guesses to gain access. They know which port is likely open to attack (TCP:22), the administrative account name (root), all they need to do is to "guess" the password.
Making your root password (and all other accounts!) both quite complex but easy to remember is not hard.
The Linux system administrator can also configure the SSH server to make the SSH server more secure. Examples include not permitting root login, and change the default port number for ssh.
Deceiving the "Hacker"
To help harden (protect a server from attack or "penetration"), system or security administrators have the ability to "trick" or "mislead" a potential hacker in order to prevent system penetration.
In this part, you will learn to use a combination of SSH server configuration and iptables rules to redirect the SSH port to allow secure data traffic via another port (as opposed to the default port: 22), and use iptables to reject (better log) incoming tcp traffic via the default port.
What is the result of this? Simple. Permit the SSH service for the organization, and yet trick and confound the potential hacker into thinking that ssh traffic is used on a port that is no longer available (but they may not know this!)
Sneaky! >;)
Common Mistakes / Warnings
- Not following instructions
- Not constantly issuing commands to verify previous command were properly executed
Preparing for Lab Sign-Off
In order to properly complete your lab and move to the next lab, you must have your instructor "sign-off" on your lab
- Each "signed-off" lab (before due date) is worth 1% of your final grade.
- Signing-off on labs help to spot errors that can cause problems with future labs.
- Do you ask the instructor what to check for! Read at the bottom of the lab the requirements, and have all proof available for instructor to view at same time.
- Failing to be prepared and asking instructor what to check when assignment is mark will result in deduct of marks!
- For example, open multiple terminals with command results. If properly set-up ahead of sign-off, the process should only take instructor approx 20 seconds to sign-off your lab.
- If you do not have your lab-logbook, you MUST show your work and your lab log-book to your instructor for sign-off in the next class. This may cause a late penalty if past the required due date.


